ACS:
SmartSpace:
SmartSpace/ACS Integration
This guide describes the integration of ACS with SmartSpace covering the cumulative changes to versions 2.7 to
It is intended to guide users of ACS through the configuration and use of an ACS system that has been installed alongside SmartSpace with guidance on where ACS has changed due to the integration of the two products.
For SmartSpace users, the table in ACS Objects, ACS SmartSpace Objects and ACS Complex Properties provides a summary of available ACS types and properties, for example for use in Business rules or for inclusion in searches for the SmartSpace web map or in HMIs.
Background
From version 2.7, ACS required the installation of SmartSpace in place of older Ubisense services. For the user setting up an ACS installation, the most important change was that where previously Ubisense Site Manager would have been used for some configuration activities such as creating geometry and location cells, these activities would now be carried out using SmartSpace Config. Eventually, Ubisense Site Manager was no longer required.
Access to the Ubisense Map application from within the ACS Main GUI was removed and, with the release of version 2.8, support for ACS in SmartSpace was enhanced: in particular ACS objects, could be viewed in SmartSpace Config, and in the SmartSpace web map (if the required Visibility features were licensed). Additionally, users with a license for the SmartSpace Health monitoring feature could make use of dashboards to monitor ACS health metrics.
ACS version 2.9 added further support for ACS maintenance tasks in SmartSpace.
From version 2.10, ACS Product Spaces and static spaces could be seen in the SmartSpace web map; and either ACS or SmartSpace could be used to manage product tags, while ACS product tracking on assembly lines continued to be supported.
With an integrated system, there are some activities you cannot carry out in ACS. These include:
-
Creation of Geometry Cells and Location Cells
-
Creation of ACS areas
-
Import of suitable graphics for use as models for ACS product types
-
Creation of users and roles to enable access to the screens and functions of SmartSpace Web
Other activities, such as configuring access permissions for the ACS Main GUI, can only be carried out from the ACS side.
The remainder of this guide covers the changes to configuring and maintaining ACS integrated with SmartSpace.
ACS Objects, ACS SmartSpace Objects and ACS Complex Properties
The table below summarizes the types used to integrate ACS with SmartSpace:
|
ACS type |
Description |
Spatial properties visible in SmartSpace |
Other properties visible in SmartSpace |
|---|---|---|---|
|
ACS Object |
Parent type for all ACS Object types. Not used directly. |
– |
ACS name Description Maintenance Mode Requested Maintenance Mode |
|
ACS Assembly Line |
Parent type for all ACS Assembly Line types |
– |
ACS name Description Maintenance Mode Path Requested Maintenance Mode Requested Reset Flag |
| ACS Assembly Point | Parent type for all ACS Assembly Point types | – | ACS name
Description Maintenance Mode Requested Maintenance Mode |
|
ACS Association Zone |
Parent type for all ACS Association Zone types |
– |
ACS name Description Maintenance Mode Requested Maintenance Mode |
|
ACS Device |
Parent type for all ACS Device types |
extent |
ACS name Deactivation Timeout Description Maintenance Mode Requested Maintenance Mode |
|
ACS Disassociation Zone |
Parent type for all ACS Disassociation Zone types |
– |
ACS name Description Maintenance Mode Requested Maintenance Mode |
|
ACS Event |
Parent type for all ACS Event types |
– |
ACS name Class Description Maintenance Mode Requested Maintenance Mode Timeout |
|
Outgoing ACS Event |
Parent type for all Outgoing ACS Event types |
– |
ACS name Class Description Maintenance Mode Requested Maintenance Mode Timeout |
| ACS Event Subscription | Parent type for all ACS Event Subscription types | – | ACS name
Description Maintenance Mode Requested Maintenance Mode |
|
ACS Exception |
Parent type for all ACS Exception types |
– |
ACS name Acknowledge Description Maintenance Mode Requested Maintenance Mode Text Time Type |
|
ACS External System |
Parent type for all ACS External System types |
– |
ACS name Actual Connection Status Connection Info Description Desired Connection Status IP Address Maintenance Mode Parameters Port Protocol Protocol Version Remote station is server Requested Connection Status Requested Maintenance Mode |
|
ACS Ident Zone |
Parent type for all ACS Ident Zone types |
preparation zone trigger zone |
ACS name Description Maintenance Mode Requested Maintenance Mode |
|
ACS Product |
Parent type for all ACS Product types |
– |
ACS name Description Maintenance Mode Requested Maintenance Mode Requested Tag Position and Group Tag Position and Group Tag Position Options |
| ACS Production Line | Parent type for all ACS Production Line types | – | ACS name
Description Maintenance Mode Requested Maintenance Mode |
|
ACS Station |
Parent type for all ACS Station types |
extent |
ACS name Description Maintenance Mode Owner Requested Maintenance Mode |
|
ACS Trigger Point |
Parent type for all ACS Trigger Point types |
– |
ACS name Description Maintenance Mode Offset Owner Requested Maintenance Mode |
|
ACS Workspace |
Parent type for all ACS Workspace types |
extent |
ACS name Description Maintenance Mode Requested Maintenance Mode |
|
ACS SmartSpace Object |
This is a parent type to group ACS types in SmartSpace Config. Not used directly. |
– |
– |
|
ACS Object Lifecycle |
Parent type for all ACS Object Lifecycle types |
– |
Description Requested Creation Parameters |
|
ACS Product Space |
Parent type for all ACS Product Space types |
– |
Description |
|
ACS Product Type |
Parent type for all ACS Product Type types |
– |
Description |
Representing ACS Static Spaces in SmartSpace
ACS 2.10 copies the shapes that represent static spaces to a new property "the shape of <Object> for <String> : String", where the result type is a string-encoded representation of the shape in the regular expression format "(ABS|REL)(:<X>:<Y>)*", where ABS denotes an absolute space, REL a relative space, and <X> and <Y> denote X and Y coordinates in centimeters. The objects can be any ACS object that has an extent (e.g. workspaces, stations, ident zones) or instances of a new SmartSpace type 'ACS Product Space', which is populated with all defined ACS product spaces. This new feature makes it possible for authors of HMIs to display configured spaces in the web map.
Searches using ACS types
If you have licensed the Visibility component of SmartSpace, you create searches to use with the web map and web forms for display in a browser. When creating a search for an ACS type, it is based on the ACS name property. For example a search for ACS Products would be defined in the Web searches workspace as shown below:

Complex Properties
The following ACS complex properties are available in SmartSpace:
-
'ACS Assembly Line' is segment 'Int' of 'ACS Production Line'
-
'ACS Assembly Point' uses 'ACS Ident Zone'
-
'ACS Association Zone' uses 'ACS External System'
-
'ACS Association Zone' uses 'ACS Ident Zone'
-
'ACS Disassociation Zone' uses 'ACS External System'
-
'ACS Disassociation Zone' uses 'ACS Ident Zone'
-
'ACS Event' uses 'ACS External System'
-
'ACS Event' uses 'ACS Object'
-
'ACS Event' uses 'ACS Product Space' of 'ACS Product Type'
-
'ACS Event' uses 'ACS Product Type'
-
'ACS External System' has additional parameter 'String' with value 'String'
-
'ACS Object' is located at 'ACS Object' with role 'String'
-
'Outgoing ACS Event' applies to 'Object' with data 'String'
-
external system message of 'Tag Association Point' is 'String'
-
external system status of 'Tag Association Point' is 'String'
-
the shape of 'Object' for 'String'
Installing ACS with SmartSpace
SmartSpace Installation provides a choice of guides providing detailed information on installing ACS with SmartSpace and, optionally, DIMENSION4, Series 7000 and Site connector.
Note: As stated in the installation guides, before you can run the ACS Main GUI to configure your installation you must use SmartSpace Config to create at least one geometry and location cell. See the Cells section of Configure SmartSpace for further information.
ACS Product Configuration
Importing models into ACS from SmartSpace
You can import 2D models into ACS from SmartSpace. Note, however, that the 3D view engine is not the same in ACS and SmartSpace and you cannot share 3D representations between SmartSpace and ACS.
When you want to use a representation in ACS, the original image size, in pixels, must be in terms of powers of 2. So, for example, a square image could be 256 x 256 or 512 x 512. Rectangular images can be, for example, 256 x 128 or 256 x 512. If the original images do not conform to this rule, then, although they appear as expected in SmartSpace, when they are imported into ACS the representations' origins may be shifted or their scaling distorted.
Note: If your image does not have dimensions that conform to the power of 2 rule, you could add transparent padding to the image to make it comply.
You import 2D models using the Model import workspace in SmartSpace Config where you can select an image file for import and give it a name.
For any models you intend to associate with product types in ACS, you must include the suffix _template in their names.
To import an object representation:
- In SmartSpace Config click MODEL IMPORT to open the Model import workspace.
- Double-click <Import representation>.
- Navigate to the image file.
-
The filename, including its suffix, becomes the default name of the representation.
Edit the name ensuring that you add the suffix _template to the filename.
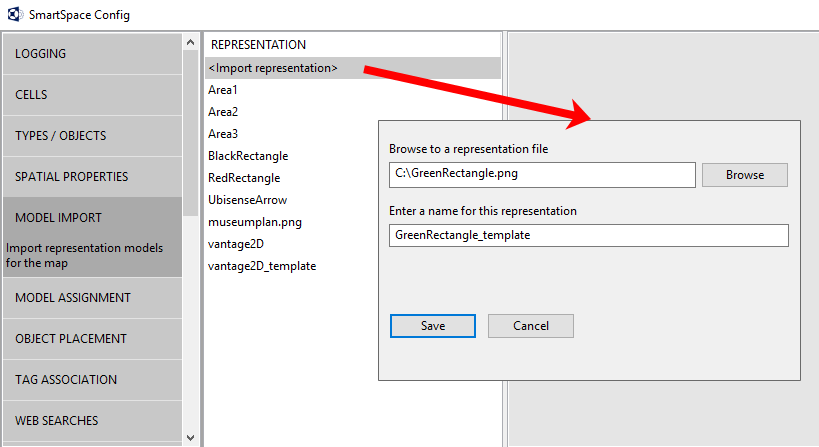
- Click Save.
-
You can now adjust the size and orientation of the representation, and set its origin to match the object it will depict.
See the Model import section of Configure SmartSpace for further information on manipulating imported representations.
When you have imported the models you require, you can copy them to ACS.
Copying models to ACS
To copy 2D models to ACS:
- In SmartSpace Config, click MODEL ASSIGNMENT to open the Model assignment workspace.
-
Click the Copy 2D models to Ubisense Generation2.X programs button to display a list of 2D models to be copied.
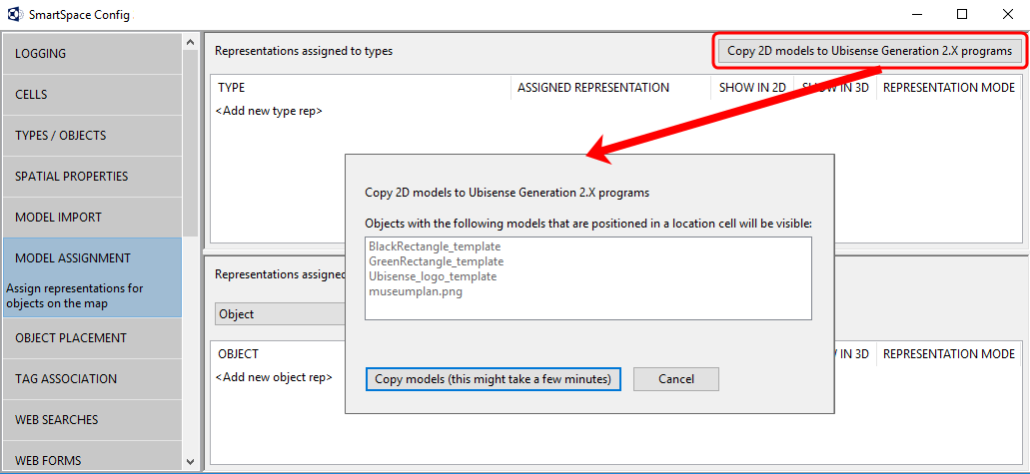
All objects listed in the dialog will be imported into ACS. However, only those whose names end in _template will be offered as representations when defining product types.
-
Click the Copy models... button and the files are copied to ACS.
When the operation is complete, the dialog closes and you are returned to the Model assignment workspace.
You can now use the templates when defining ACS Product types.
Synchronizing SmartSpace properties and ACS product parameters
ACS product parameters can be pushed into SmartSpace properties by following these steps:
-
Identify the property to sync in the ACS Main GUI.
Go to Operation > Product Instances and click Show parameters. Select a product and any parameters associated with it are listed.
-
Create a corresponding property in SmartSpace Config.
In the Types and objects workspace, select the ACS type in the upper part of the types and properties list. Double-click <Create new property> and enter the details of the property.
-
Set up the transfer process with the ubisense_acs_smartspace_sync_admin tool.
You can get the ubisense_acs_smartspace_sync_admin tool using the Application Manager where you can find it in the DOWNLOADABLES tab under Ubisense Generation 2.X > SmartSpace backwards compatibility with ACS > ACS SmartSpace sync admin tools.
The command-line usage is as follows:
ubisense_acs_smartspace_sync_admin.exe create <property> <type> <internal>where:
- <property> is the name in the ACS Main GUI Product Instances screen
- <type> is the type of object that has a value for the parameter
It is the internal name of the type, which must inherit “ACS::Physical”
For example, “ACS::Physical” and “ACS::Product” are both valid and user-defined product types prefixed with “ACS::” are also valid
- <internal> is the internal name of the SmartSpace property, for example [Custom]sequence_number<ACS::Product>
Support for Managing Product Tag Ownership from both ACS and SmartSpace
Before ACS 2.10, tag ownership information for ACS products was not always accessible to or changeable by SmartSpace. From ACS 2.10 onwards, there is an integrated model of tag ownership that allows either ACS or SmartSpace to manage product tags, while still supporting ACS product tracking on assembly lines.
Ancillary tracking information for ACS Products in ACS
When an ACS Product owns a tag, some supporting information must be available on the ACS side:
-
A named tag position records information about the offset of the tag on the product, and whether the tag is able to drive the product directly, or only via ACS line tracking
-
An information string is used optionally to record the 'tag group' that the product is using – where the group is normally defined by a tag association point
-
The association time of the tag to the product is recorded for visibility reasons only
Synchronizing ancillary information to SmartSpace
From ACS 2.10 onwards, the tag position and group information is synchronized to SmartSpace (the association time is not synchronized):
-
The tag positions defined for products in ACS are copied to the SmartSpace tag positions schema, so that SmartSpace tag positions for ACS Products are identical to ACS tag positions for ACS Products
-
The information about the current ACS tag position and group is copied to the ACS user data store as the property 'Tag Position And Group <ACS Product> : String'. If on the ACS side a product has tag position 'POSITION' and tag group 'GROUP' then the value of 'Tag Position And Group' for the object on the SmartSpace side will be 'POSITION|GROUP'
-
Note that, if a timestamp equivalent to 'association time' is required in SmartSpace, then this can be defined by the configuration user and maintained via an event handler on the Tag Position And Group property
This ensures that SmartSpace configuration users can also see and use the ACS tag data for products.
ACS control of tracking for ACS Products
Before ACS 2.10, when a product was being tracked on an assembly line by ACS, its tag ownership would be made invisible to SmartSpace. From ACS 2.10 onwards, the tag ownership is always visible to SmartSpace, and ACS controls the property 'ignore tag locations flag <Object> : Bool' for all subtypes of 'ACS Product'; when ACS is tracking a product on an assembly line its 'ignore tag locations flag' property will be set to true. Note that this means that any user changes made to the 'ignore tag locations flag' property for any ACS Product object in SmartSpace will be overwritten by ACS.
Using SmartSpace to assign tags and tag positions to ACS Products
Features are provided in SmartSpace to ensure that the configuration user has complete control over the ACS tag ownership parameters, but also to guarantee that any of the default SmartSpace association methods (e.g. automated assignment, web forms, SmartSpace Config) can be used, with the guarantee that ACS settings will be changed where necessary to ensure consistency with the changes made on the SmartSpace side.
Using the Requested Tag Position And Group property
When an ACS Product's tag ownership is set in SmartSpace, it is necessary to ensure that ACS has the appropriate tag position and group information. It might also be desirable at some point to change the requested tag position from SmartSpace (e.g. based on production context we might wish to change from a tag position for which the ACS property 'Drive Directly?' is set to a position where it is unset).
To support this there is a property available on the SmartSpace side: 'Requested Tag Position And Group <ACS Product> : String'. On the SmartSpace side, this value is set to the desired value of 'Tag Position And Group': the ACS side will then set the ACS tag position and tag group appropriately, so that synchronization sets the value of 'Tag Position And Group' to the desired value, and then the value of 'Requested Tag Position And Group' is deleted.
Using the Tag Position Options property
SmartSpace provides various different ways of changing tag assignments (e.g. automated assignment, web forms, SmartSpace Config, the .NET API). To make it easier to maintain the ACS tag position in this context, SmartSpace will detect when the assigned tag offset on a product is inconsistent with the current value of the tag position on the ACS side, and list the options for fixing this inconsistency, using the 'Tag Position Options <ACS Product> : String' property.
For example, suppose a product P has three potential tag position options T1, T2, T3, which correspond to tag offsets O1, O1, and O2 respectively (i.e. the offsets for T1 and T2 are the same), and on the ACS side a tag is assigned using tag position T3, so that the tag position is stored as T3 on the ACS side and the tag offset is stored as O2 (on both sides). If we now use some SmartSpace feature to assign a new tag (or change the tag position) so that the tag offset is now O1, then the ACS tag position will be inconsistent with this (because its offset is O2). This will cause 'Tag Position Options of P' to be set to 'T1|T2' (i.e. the list of all tag positions that would fix the inconsistency, with each element separated by the character '|'). There are then two options for dealing with this inconsistency:
-
In the rules engine, an event handler on the 'Tag Position Options' property can be configured, so that a suitable value can be constructed for 'Requested Tag Position And Group of P', to fix the inconsistency.
-
If no action is taken by the rules engine, then a fallback action is provided, which will kick in after 'acs_tag_position_sync_timeout' seconds (the default value is 15). This will construct a value for 'Requested Tag Position And Group of P' by taking the first option in 'Tag Position Options of P' and adding the group currently set in 'Tag Position And Group of P' (or the group will be the empty string value "SmartSpace" if there is no current value for 'Tag Position And Group of P'). This fallback action can be disabled by setting 'acs_tag_position_sync_timeout' to 0.
Site Configuration (Factory Layout)
Creating areas for use in ACS
In addition to its use in creating a cell hierarchy, Ubisense Site Manager also provided a method to define areas and walls for ACS. You can now add areas and walls using the command-line tools described below. Areas can also be pulled into SmartSpace and are visible in relevant workspaces in SmartSpace Config. Walls are not visible in SmartSpace Config.
In ACS, areas are used to partition the site model. Usually an area will represent some complete, but relatively self-contained region of the site, such as one floor of a building, or one functional area of a large floor. ACS areas can include walls which are used to create a simple visualization of the area's layout. Walls are defined in text files containing a list of coordinates for the start and end point of each wall in an area. To create an area with walls for use in ACS, you must first define the walls and then load them into a new area. The extent of the area is automatically created. After they have been defined, you can view the areas in the map views in ACS.
Command-line tools are available for working with walls and areas for ACS:
- ubisense_load_walls creates a new area with a given name with wall details read from a specified file
- ubisense_export_walls allows you to export existing wall data for an area for import into a different dataset
Other command-line tools enable you to import and export area data in .xbd format:
- ubisense_import_area_data allows you to import area data from a file into ACS
- ubisense_export_area_data allows you to export existing area data from ACS
You can download these tools using the Ubisense Application Manager where they can be found in the DOWNLOADABLES tab under Ubisense Generation 2.X > ACS > Tools.
Creating an Area with Walls for ACS
The following example shows how a file of co-ordinates that define the locations of a number of walls can be used to create an area for use in ACS.
The file walls-area-1.txt contains details of an area with each wall defined in a line of details containing a pair of (x,y) co-ordinates for the beginning and end of the wall:
-35.25 -32.25 -35.25 25.35
-35.25 -32.25 -2.6 -32.25
-35.25 -25.1 -35.25 25.35
-34.95 -31.95 -34.95 -25.3
-34.95 -31.95 -16.76 -31.95
The co-ordinates are calculated from the origin on your site map. You can specify an offset during area creation to shift the area and walls relative to the origin. The height of the area is also specified during this process.
To create a new area called Area-1 containing these walls with a vertical extent of 1.5 m, run the following command:
ubisense_load_walls create Area-1 "Area 1" 0 1.5 walls-area-1.txt
In the ACS Main GUI, you can now select the area for display in maps for example in the Edit Assembly Parameters dialog:

You can view the extents of imported areas in SmartSpace by using the Pull areas from Generation2.X button in the Spatial properties workspace:

Note: You cannot see the details of walls in SmartSpace.
After you have pulled details of ACS areas into SmartSpace Config you can edit their extents. You must then use the Push areas to Generation2.X button to propagate the changes to the ACS Main GUI. Similarly, if you edit areas extents in the ACS Main GUI and you want to see these changes in SmartSpace, you must use the Pull areas from Generation2.X button to ensure the details match.
You can also create ACS areas directly in SmartSpace Config and define their extents. However areas created in this way cannot have walls within them and are not visible in the ACS Main GUI. See Creating areas for use in ACS.
You can use the ubisense_load_walls command to list all areas whether imported or created in SmartSpace. For example, the three areas shown in the preceding screenshots are listed as follows:
Area-3 Generated by SmartSpace Config
Area-2 Area 2
Area-1 Area 1
Device Configuration
Adding Extents for ACS Devices in SmartSpace
If you need various hysteresis values, you can use SmartSpace Config to configure multiple extents using different spatial property names, and you can then select them in the ACS Main GUI. The steps to take are summarized below. See Types and objects and Spatial properties for further information on configuring types and their spatial properties in SmartSpace Config, and the section on Devices
To configure additional non-default extents for ACS devices:
In SmartSpace Config:
-
In TYPES / OBJECTS, create a new property of type "Space" for the ACS Device type or any of its descendants:

-
In SPATIAL PROPERTIES, create a default space for the property you just created:

-
In the Device Instances dialog, choose the space you just created from the Space dropdown:

-
Depending on your workflow and how this is done across multiple datasets, changing the default extent might be confusing, so always consider giving non-default extents a suitable property name.
In the ACS Main GUI
Support for Managing Device Tag Ownership from both ACS and SmartSpace
In ACS 2.10, the treatment of device tags is essentially the same as for ACS 2.9, and the SmartSpace features for tag assignment are unchanged. They are summarized below.
Initial assignment of tags to new devices
ACS requires that devices are assigned a 'tag profile' as well as a tag ID, and these two properties are assigned at the same time in ACS, but SmartSpace by design does not have a concept of tag profile, so therefore the initial assignment of a tag to an ACS Device object must be done in ACS.
Changing tag assignments for devices
Once a tag (and a tag profile) has been assigned to a device, the tag ownership and the tracking of the device are both managed by SmartSpace in exactly the same way as any normal SmartSpace object. So the device may be reassigned with another tag ID using any of the available SmartSpace interfaces (e.g. SmartSpace Config, web forms, etc.).
Triggering ACS Telegrams from SmartSpace Events
The 'Outgoing ACS Event' type in SmartSpace can be used to trigger ACS from SmartSpace events.
To create a trigger for an event:
-
In SmartSpace Config, go to TYPES / OBJECTS and create a new type 'NewEventClass' inheriting from the 'Outgoing ACS Event' type.
Double-click <Create new type>, type in the name NewEvent Class, and select Outgoing ACS Event from this list of parent types.

Click Save.
-
Create an instance of the 'NewEventClass' type.
Drag NewEventClass out from the list of types and double-click <Create new object>. In the window that opens, enter a name for the instance of the event:

Click Save.
-
Create a row of the complex property 'Outgoing ACS Event' applies to 'Object' with data 'String'.
Drag Outgoing ACS Event' applies to 'Object' with data 'String' out of the list of complex properties into the workspace and double-click <Create new property row>:

The 'Outgoing ACS Event' must be the instance of type 'NewEventClass'; the 'Object' may be any named object.
In the text box enter the string containing all necessary data ACS might need to create the telegram.
Click Save
Once this complex property is created, a row in the ACS (UTCP) relation NamedEventHasDetails is entered, with 'ACS Object' being the NamedEvent, 'NewEventClass' being the EventClass, 'Object' being the activator and 'Data' being the data. Changes to the NamedEventHasDetails table are picked up by the UTCP Event Forwarding infrastructure so that protocol services can distribute the events to external systems which are interested in the events. The NamedEvent can be associated to an external system with the effect that the external system is then interested in the event. The external system must be able to handle the event of the new event class, so usually some programming is involved to implement the event handler.
Generating SimpleObjectLocationEvents for the ACS Atlas Copco Open Protocol
The ACS Atlas Copco Open Protocol supports SmartSpace generating Outgoing ACS Event events of the type SimpleObjectLocationEvent. The format of the data is JSON in the following format:
{
"workAreaName": "",
"workSpaceName": "H56-B041-S093",
"productSpaceName": "L400-B600-M100",
"productId": "12345678",
"isEnabled": true
}
To generate a 'SimpleObjectLocationEvent' event:
-
In SmartSpace TYPES / OBJECTS, create a subtype of Outgoing ACS Event called SimpleObjectLocationEvent. Create an instance of that type with the name X.

-
In ACS, associate this object instance X with an Open Protocol external system.
Go to ACS > Configuration > External Systems > External Systems. Choose an external system, open the Associated Objects tab and click Add. In the External System Object Association dialog, select Event and then SimpleObjectLocationEvent and X from the dropdowns.

-
In ACS, setup connectivity between ACS and an external system using Open Protocol.
-
In SmartSpace TYPES / OBJECTS, create a new row in the "'Outgoing ACS Event' applies to 'Object' with data 'String'" complex property, using the values:
-
SimpleObjectLocationEvent : X
-
Second object is not really important, but must be set
-
value = JSON string in the format shown above
Now the event is generated in ACS and the external system should pick it up and handle it, i.e. a Open Protocol message will be sent out.
-
Tag Management
Tag Management in SmartSpace Config and on SmartSpace Web
As described in Support for Managing Product Tag Ownership from both ACS and SmartSpace and Support for Managing Device Tag Ownership from both ACS and SmartSpace, tags can be managed using features of SmartSpace, either in TAG ASSOCIATION in SmartSpace Config or using the Tag and Battery Status screen in SmartSpace Web.
Displaying the ACS tag representation in SmartSpace
In ACS, tags are displayed using a green representation. To enable the same default representation in SmartSpace, for example to be visible in the Place objects workspace, download and run the ubisense_toggle_v2_tag_rep tool.
Download the tool using Ubisense Application Manager. You can find the ubisense_toggle_v2_tag_rep tool by choosing the DOWNLOADABLES tab and going to Ubisense Generation 2.X > ACS > Tools. Select the ubisense_toggle_v2_tag_rep tool, click Download selected items and then choose your download location and click Start download.
To switch the default representation on, use the following command:
ubisense_toggle_v2_tag_rep onMaintenance Tasks
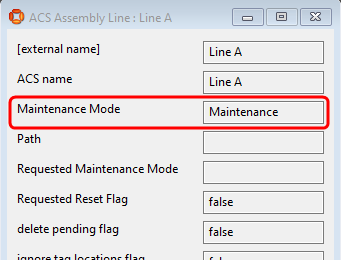
Setting Maintenance Mode for Tag-driven Assembly Lines, Association Zones and Disassociation Zones
Maintenance mode, which can be scheduled for setting/unsetting in the Process Management tab in the ACS Main GUI can also be set in SmartSpace. For example, to change the maintenance mode for an Assembly Line:
-
In SmartSpace Config, go to TYPES / OBJECTS and drag out the ACS Assembly Line type. Double-click Line A to open details of the assembly line and click Edit.

-
At Requested Maintenance Mode, you can enter either Maintenance or Operational to change the operational state.
-
Click Save and the maintenance mode is updated with its new status:
Resetting Assembly Line Tracking
The Requested Reset Flag can be set in SmartSpace to reset line tracking.
-
In SmartSpace Config, go to TYPES / OBJECTS and drag out the ACS Assembly Line type. Double-click Line B to open details of the assembly line and click Edit.
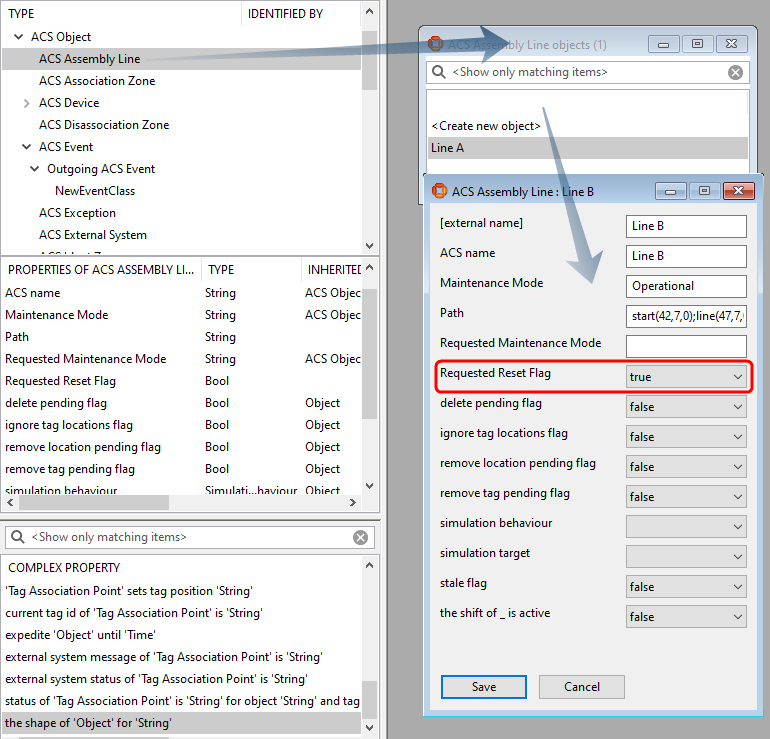
-
At Requested Reset Flag, select True and click Save.
Changing the External System Status
The ACS External System type has a number of properties whose values can be seen in SmartSpace. However, with one exception, you cannot set these values in SmartSpace. If you attempt to do so they will change back to the real values from ACS. The special case is Requested Connection Status which you can set to one of three permitted values:
-
Connected
-
Disconnected
-
Restart
This value is sent to the Desired Connection Status in ACS. If you have the Visibility component licensed, you can create a web search and a web form that allows users to connect or disconnect external systems.
-
In SmartSpace Config, go to TYPES / OBJECTS and drag out the ACS External System type. Double-click External 1 to open details of the external system named External 1 and click Edit.

-
At Requested Connection Status, you can enter the required status, for example Connected or Disconnected. Click Save.
ACS Messages
The ACS Exception type enables the viewing of ACS messages within SmartSpace. For example in TYPES / OBJECTS in SmartSpace Config, you can drag the type into the workspace and double-click on a message number to display the text, time and type of message:

However, more usefully, if you have licenses for web forms or HMIs exceptions could be displayed within the web browser.