Model import
You can use the Model import workspace to import graphical representations for both your site and the objects within it.
Images for use as SmartSpace reps can come from many sources and may require preparation before they are suitable for import and use in SmartSpace. See Graphics in SmartSpace for a selection of guides describing the steps required to optimize image files for use in SmartSpace.
Note: there are additional requirements specific to importing representations for use in ACS. See Copying models for use in ACS for further information.
The Model import workspace
The Model import workspace lists all representations (images) that have been imported into SmartSpace. This includes both images used for object representations and background images. The main purpose of the workspace is to import new reps and transform them to meet the scale, orientation and offset requirements of the object to which they will be attached, or the environment into which they will be dropped for background images.
Click on MODEL IMPORT to display the workspace.

The workspace is described in the following sections:
A list of representations currently available in SmartSpace is displayed.
- Clicking on a representation name populates a second table listing transformations applied to the image and displays the image in the representation editor.
- Double-clicking a representation name allows you to give it a new name.
- Double-clicking <Import representation> allows you to import new image files for use as representations.
When a rep is displayed in the Model import workspace details of its size, position, scale and orientation are shown. You can change these by double-clicking a measurement and entering a new value.
Clicking Reset transformation returns the image to its originals dimensions and position. See Resetting a Representation to its Initial Values
Clicking Export allows you to export a rep for editing with tools outside of SmartSpace. See Exporting Representations from SmartSpace.
When a rep is selected from the List of representations, it is displayed in the Representation editor.
- To zoom into the workspace, rotate the mouse wheel away from you.
- To zoom out of the workspace, rotate the mouse wheel towards you.
- If the representation is too large (or too small) to view in the workspace, press Home to go back to the default screen setting.
Resetting a Representation to its Initial Values
At any point, you can reset a representation back to the default size, scale, rotation and offset from the origin:
1. On the Model import workspace, select the representation.
2. Click the Reset transformation button.
This will also reset any map representations that you may have placed on the map.
Managing the Rendering Order of 2D reps
When importing 2D representations for use in the WebMap, consideration must be given to the layering of reps as they are rendered into the WebMap view. The default Z coordinate of all reps is Z=0. This means that 2D reps dropped into the z-plane of the world model will all be coplanar which results in an unpredictable output from the rendering engine, i.e. it is not clear which rep is “on top”. To ensure 2D reps are rendered correctly in the WebMap view, list the reps in the 'MODE' pane of the Web Searches tab in SmartSpace Config. The ordering of 2D reps is determined by their ordering in the 'MODE' pane. The Z-index is not considered here.


When viewing reps in SmartSpace Config, the Z-index is considered for reps with the mode <default>. We recommend setting a small offset for the background rep in the Z-axis so it is placed below 0. This ensures that object reps are always rendered on top of the background rep in the SmartSpace Config 3D map. We recommend a value of 0.01.
1. On the Import visual models tab, select the map representation.
2. In the Origin Z field, enter 0.01.
Replacing an Existing Representation with a New Source File
It may be necessary to update a representation because the base image has changed (for example when the site background is modified due to building layout changes). Replacing a rep is straightforward. Import the new rep using the standard import procedure, but when you are asked to name the rep, use the same name as the one you are trying to replace. You will be asked to confirm the change and the transformation of the original rep will be applied to the new rep. Now wherever the old rep appears in your SmartSpace configuration, the new rep will appear instead.
Exporting Representations from SmartSpace
Representation files are modified outside of SmartSpace using appropriate editing tool
Importing an object representation
Importing a New Object Rep File
To import an object representation:
1. On the Model import workspace, double-click <Import representation>.
2. Navigate to the image file.
3. The filename, including its suffix, becomes the default name of the representation. Edit the name as required.
4. Click Save.
Setting Scale, Orientation and Origin Offset
After importing a representation, you need to adjust it to match the size, position and orientation of the object to which it will be attached.
The controls that enable you to make these adjustments are discussed below.
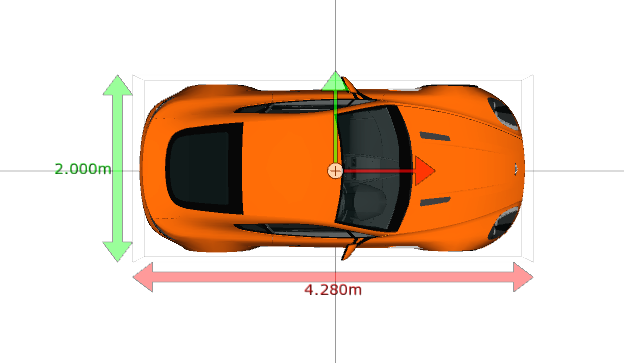
Setting rep size
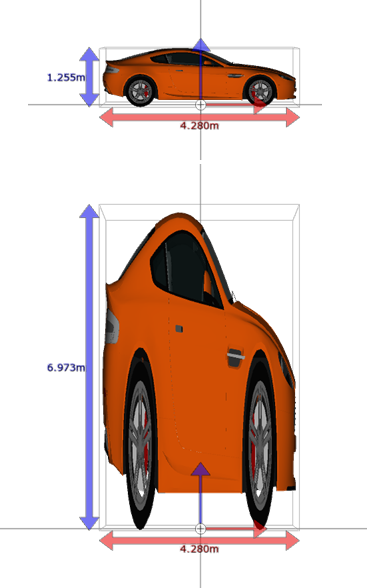
Size adjustment allows you to explicitly set the size of the rep to a size that matches the known (or approximate) dimensions of the object. Clicking on any of the X, Y, or Z values switches into an edit mode allowing you to set a new value. Clicking away from the edit control sets the new value and scales the other two values accordingly, ensuring that the aspect ratio of the representation is preserved. Within the rendering workspace you will see the changes to the rep scale portrayed along the axes of the view projection you are using (Top Down, Front View or Side View). Switching to a different projection will display a different scale combination pair. Note that Front and Side views are not relevant for 2D Reps because there is no height (Z) scale that needs to be set.
Setting Rep Origin
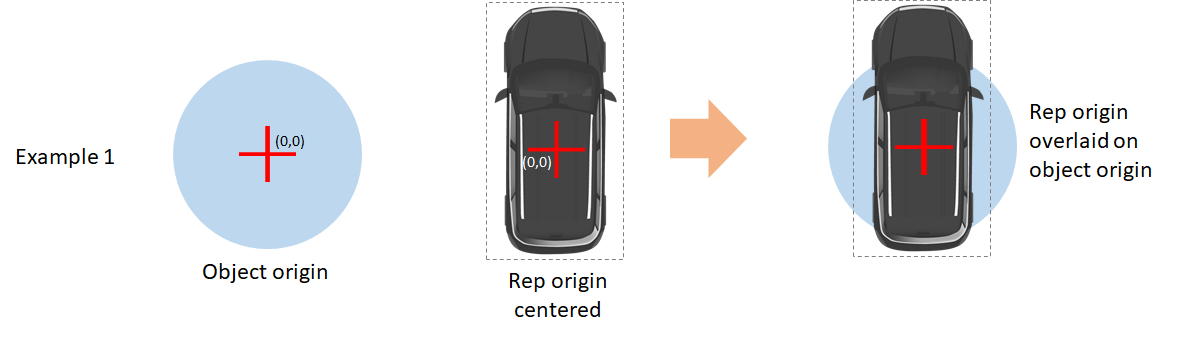
The rep origin is important as this determines how the representation will appear relative to the location of an object to which it is assigned. In most situations, the base rep for an object – the image that depicts it as a car, a tractor, a trolley etc. – will have its origin in the center of the bounding box of that rep. When the rep is assigned to a object the two origins overlap and the rep is centered around the object. See Example 1.
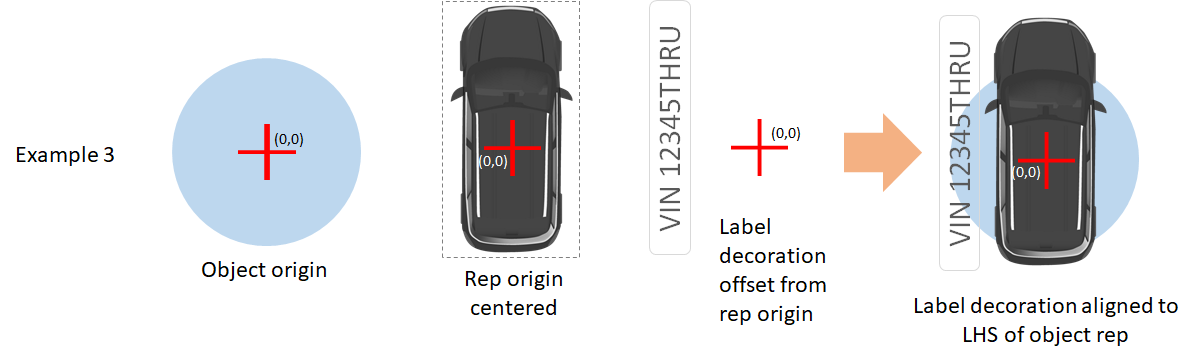
If the object rep were not centered within the bounding box the rep would be offset from the object origin (see example 2). This ability to offset the rep is important for decorations where the decoration can be attached alongside the object. Example 3 depicts this for a text label assigned to the object.

Modifying the rep origin can be done numerically by single-clicking and updating the values in X, Y and Z (Z only for 3D reps), or by dragging the origin-point that is rendered over the rep in the render view, as shown below.
Setting Rep Scale
Instead of setting explicit dimensions for a rep (which preserves the aspect ratio of the object in all dimensions), you can set the scale of each dimension independently of the other dimensions. In this way, the example below shows a 3D rep with the Z scale at 1 and a comparative change with the Z scale at 3. Neither of the other dimensions for the rep have changed.
Scaling 2D Representations
If you are scaling a 2D rep, make sure you scale the z axis size to a similar scale to the x and y axes, otherwise the default zoom in the SmartSpace Config maps may be further out than expected. For example, if you have a rep with (Scale X, Scale Y, Scale Z) set to (0.05, 0.05, 1.0), you will find that the map default zoom gives a lot of space around the rep. This is automatically done correctly if you scale the image using reference points (described in Resizing a representation based on the distance between two points) or if you set the image's overall size. But if you directly set the scale, it is up to you to ensure that the relative scales are reasonable.
Setting Rep Orientation
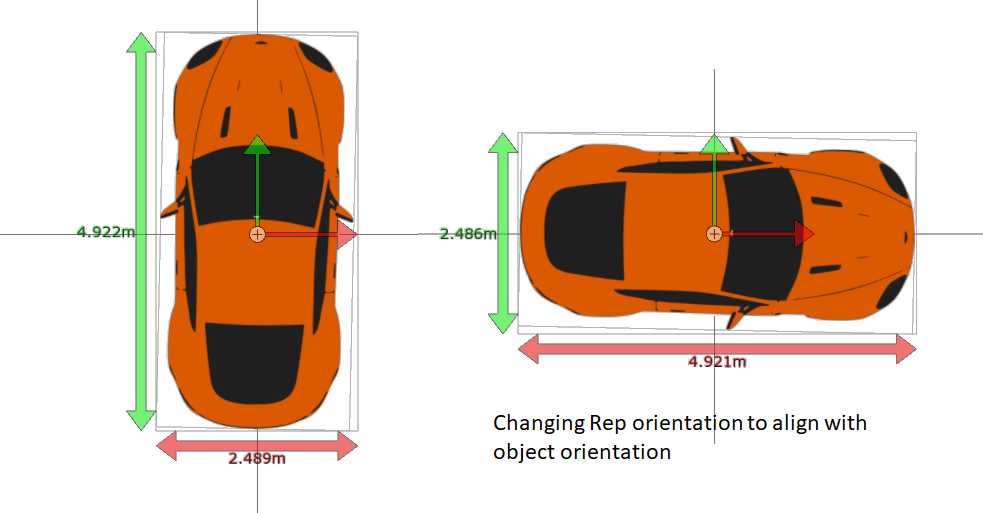
If the representation used for the object has an implied directionality (such as the front and back of a vehicle), then the object representation should preferably be aligned with the forward facing axis of the object. As was the case for aligning origins, the vertical and horizontal axes of the object and rep coordinate systems are aligned. So if the imported rep is not properly aligned, it is possible to rotate the rep axes to properly align with the object, as shown below.
Orientation can be adjusted by dragging the red or green axis arrows, or by setting any of the angular rotations explicitly by clicking on the edit controls. Pitch and Roll values only apply to 3D reps.
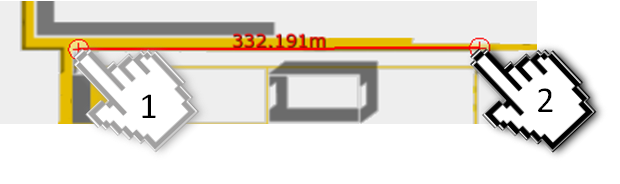
Resizing a representation based on the distance between two points
To resize or scale a representation based on a known distance:
1. Click to turn on Show reference points.
2. Position the two ends of the reference line on the two points.
3. If you are scaling the X-axis (the same applies if you are scaling the Y-axis):
- Note the value in Point 1 X and adjust the distance in Point 2 X.
Or:- a. Enter 0 in Point 1 X.
- b. Enter the distance in Point 2 X.
The representation is then scaled along the X-axis – the scale factor is shown in the Scaling X field.
4. If necessary, press the Home key to zoom to the representation.
Importing a site model
The site background can be configured in several different ways, depending on whether you’re configuring the 3D site visualization or the browser-based web map view. In general, the same principles are followed; an image or model is imported, saved and then transformed to match the scale and coordinate system of the world model.
To import a site background:
1. On the Model import workspace, double-click <Import representation>.
2. Navigate to the image file.
3. The filename, including its suffix, becomes the default name of the representation. Edit the name as required.
4. Click Save.
The next step is to adjust the representation for scale, orientation and offset so as to match the main coordinate system. The easiest and most accurate way to do this is with the Reference Points tool, but this can also be done manually by adjusting the following parameters.
Size
Shows the size of the X,Y (and Z with 3D) dimensions of the representation. These dimensions can be modified to match the scaling of the world model.
Origin
By default, the lower-left corner of the representation is positioned at the origin (0,0). In the workspace, the origin is marked by the crosshair inside following symbol, and by the intersection of the axis lines (if the Show axis lines option is turned on).
The origin of a background rep is primarily important for 2D reps used in the web map feature of the visibility component. The web map supports the configuration of Views (described in Views and configured in The Cells workspace) and the origin of the 2D rep is the point that is evaluated for whether the rep falls within the view (of a defined search) or not. This is particularly important if views are being used to restrict certain user Roles from seeing different parts of the site, in which case multiple background reps would be used to correspond to the set of defined views, thereby returning only the portion of the background map they are authorized to see.
The best and most accurate way to set the origin is with the Set Reference Points tool. This will ensure that all background reps align with each other and the world coordinate system.
Scaling
Shows the current scale of the representation. You can enter new scale factors here or use the reference points to set the scale.
Rotation
Shows the angle of rotation (in degrees) of the map representation. You can use the reference points to rotate the representation. While pitch and roll are settable, they are not commonly used as reps are typically already aligned correctly with these axes, and only yaw needs to be modified (in some circumstances). This is particularly true for 2D reps which are already coplanar with the horizontal plane of the world model.
Setting Scale, Orientation and Origin Using the Set Reference Points Tool
The most accurate way to align a background representation is to use the set Reference Points tool. This allows you to select two known points in the imported representation and match them to known coordinates in the world model. SmartSpace then calculates the scale, orientation and (origin) offset that maps the selected points in the representation to the defined coordinates in the world model.
To do this you need to know the coordinates (x,y,z) of two points that exist in the real world which are also easily identifiable in the site representation. This is typically a set of edges, corners or other easily identifiable marker. The greater the distance between these points the more accurate the alignment will be, because any error in the point positions is a proportion of the baseline between the two points.
To transform a map representation based on known coordinates:
1. On the Model import workspace, select the map representation.
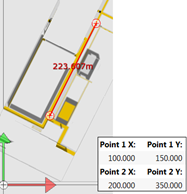
2. In the workspace, click to turn on Show reference points.
3. Position the two ends of the reference line on the two locations.
4. Enter the X, Y coordinates of the first location in the Point 1 X, Point 1 Y fields.
5. Enter the X, Y coordinates of the second location in the Point 2 X, Point 2 Y fields.