Rules engine developer
SmartSpace Rules engine developer provides you with the graphical environment to capture logic and relationships between objects in rules and event handlers that reflect your business processes. These definitions are then used by the Business rules engine.
The Business rules workspace in SmartSpace Config provides an editing environment which aids the creation of rule and event definitions. Definitions are constructed by dragging and dropping properties and keywords into available slots in templates. Visual cues in the interface and real-time error messages support the creation of valid definitions.
You can create the following kinds of definition:
-
Events
Actions defined in an event definition run when a value or a fact about a property changes. Events can be used to create or delete objects, set a property, set or unset representations, or send notifications.
More than one action can be included in an event, and further tests and conditions can be specified within the definition.
The template for an event definition is based around a statement that begins with “when…”. -
Timeouts
A timeout is triggered when the time specified by a property (whose type must be time) is reached. Timeouts can be used to create or delete objects, set a property, set or unset representations, or send notifications.
More than one action can be included in a timeout, and further tests and conditions can be specified within the definition.
The template for the definition of a timeout is based around a statement that begins with “when…”. -
Rules
Rules are an invariant statement of fact.
The template for the definition of a rule is based around a statement that begins “property whenever…”.
-
External definitions
External definition rules are used to create a named list of properties to be used in the creation of a .NET plugin. See External Definition API for information.
Workflow
The steps to create a business rule in SmartSpace are as follows:
- Create a new definition.
See Adding a definition. - Open the definition in the editor.
The features of the editor are described in The Business rules workspace. - Build the logic.
Drag properties and keywords into the definition and select or enter values to construct a logical expression.
See Editing a definition.
Follow these steps to create the collection of rules you require and then publish them to activate them in your system. See Publishing definitions.
After definitions have been published, you can trace the behavior of business rules in real time in the Rules engine trace workspace in SmartSpace Config. See Rules engine trace.
Requirements for Rules engine developer
You will need SmartSpace version 3.4 or later with a license for Business rules and Rules engine developer.
The Business rules workspace
The Business rules workspace in SmartSpace Config provides tools to create and edit business rules.
Click on BUSINESS RULES to display the workspace.

Features of the Business rules workspace are described in the following sections.
- The leftmost part of the workspace list definitions for you to work with. Double-click <Create new definition> to add a new definition—see Adding a definition. Open a definition for editing by double-clicking it or dragging it into the editor.
-
An icon to the left of a definition’s name identifies the kind of definition it is, if it is incomplete (a work in progress), or if it contains errors:

- Unsaved definitions are marked with an asterisk (*).
- Filters allow you to limit the definitions listed to those that match one or more of: name; label; and which properties are used or set. Enter text at <Type here: filter by NAME> (case sensitive) or drag labels or properties into their respective fields. Click
 to remove a filter.
 - You can rename a definition by slowly double-clicking its name and entering the new one.
- You can remove selected definitions from the list by pressing Delete and confirming the deletion. Removing an active definition from the list does not immediately delete it from SmartSpace. To delete an active definition from your system, you must publish a new version of your definitions. See Publishing definitions.
The editor provides a multi-tabbed workspace in which you can edit definitions. Choose a definition, by double-clicking it or dragging it into the workspace, and it is opened in its own tab in the editor.

Each definition is based on a template which provides a framework that is shown in the editor and into which you drag elements such as keywords and properties. See Building definitions for an example of the process.
- When you drag an element, valid slots are highlighted in the editor and you can only drop the element into a valid slot.
- Color-coded prompts indicate what can be dragged or entered in a slot.
- Error messages, described below, also provide help in creating correct definitions.
- Some slots require you to enter a value; other slots provide you with a dropdown of possible entries (double-click to open the dropdown).
- You can drag elements out of a slot and into the area around a definition (the scratchpad). You can also open extra tabs to provide additional scratchpads.
- You can copy between different rule definitions by using Ctrl+C and Ctrl+V, and elements can be duplicated by holding down Ctrl and dragging them.
- You can use Ctrl+Z to undo Ctrl+Y to redo drag actions.
- Drag unwanted elements into the trash can to delete them
- Double click on literal terms to edit the value.
- Comments can be added to annotate a definition or keywords within it—see Adding comments to your definitions.
- Apply label(s) to definitions to categorize them—see Organizing definitions.
- You can zoom in and out by using either Ctrl+mouse wheel or Ctrl+Plus sign and Ctrl+Minus sign.
As you build longer and more complex definitions, selecting the correct block of syntax to move can become tricky. The following hints should help you select and move the right elements:
- Clicking unselected syntax selects the smallest possible element (you will see the dotted highlight appear around it).
- Subsequent clicks at the same point expand the selection.
- When the largest possible element is selected, a subsequent click cycles back to the smallest element.
- Only selected syntax is dragged out.
- Holding Shift while clicking on elements adds to the selection.
- Holding Ctrl while clicking on the same selected element toggles the selection.
- Draw a selection rectangle around elements by clicking and holding the left mouse button while dragging the mouse over the elements you want to select.
When you have finished, you can close individual tabs by clicking the close button beside their titles or use the Close all tabs button to clear the editor. When you close a tab, anything in the scratchpad is lost. Changes to a definition that you wish to keep must be saved before you close SmartSpace Config (you will be warned if you have unsaved changes), and any new or changed definitions you want to make active in SmartSpace must be published. See Publishing definitions.
While you are editing a definition, SmartSpace monitors it for completeness and validity—and displays descriptive error messages in real time. Click an error message and the error is highlighted in the definition:

You can save an incomplete definition (or one with errors) but you cannot publish it.
Error messages are also displayed for duplicate definitions in the same dataset if:
-
Multiple "whenever" rules maintain the same property
-
Multiple event handlers or timeout definitions are semantically identical
Click Check all definitions to display a message indicating the status of the definitions. If the definitions are not OK, the number of incomplete definitions or definitions which contain errors is displayed.
The toolbox contains a list of keywords that you use along with properties to construct definitions. When you drag a keyword into the editor the possible slots into which it can be dropped are highlighted. Different keywords are available for different definitions. See Keywords for definitions for descriptions and availability.
The list of properties includes all simple and complex properties created in the Types and objects workspace, and also any Ubisense types supplied with the features you have licensed
When you drag a property into the editor, the valid slots into which the property can be dropped are highlighted.
Filters allow you to limit the properties listed to those that match one or more of: name, type, and argument. Enter text at <Type here: filter by NAME> (case sensitive) or drag labels or properties into their respective fields. Click to remove a filter.
You can organize definitions and make them easier to locate by creating and applying labels to them. See Organizing definitions.
Building definitions
Adding a definition
To create a definition, you first give it a name and choose the kind of definition it is. Double-click <Create new definition>, enter a name, and choose one of:
- whenever to create a rule
- when fact changes to create an event where a property of a Boolean type changes
- when value changes to create an event where the value of a property changes
- when timeout is triggered to create a timeout
- external definition to create a named list of properties to be used in the creation of a .NET plugin. See External Definition API for information.

Click Create and the definition is added to the list, where it is shown as an unsaved work in progress.

Editing a definition
Now when you drag the definition into the editor, the empty template for the definition’s type opens and you can begin to build the logic of your definition:

In this example, the property ‘Office’ contains ‘Person’ is dragged into the Property slot in the template. Note the color used to display properties matches the display color of the prompt.
The Action for this event is shown being built. The set property action (whose color matches the Action slot in the template) has been dragged into the scratchpad. Its Property slot is filled with a property with the integer type, the occupancy of Office. The Value slot is filled with an expression built from the + operator with one value provided by a property and

As you work the error messages change to reflect the state of the definition. At this stage, the definition is still incomplete and clicking an error will highlight a missing term:

Where a list of values is available, you can double-click to select one from a dropdown:

When all the slots have been filled and configured correctly, there will be no error messages, and the definition is no longer flagged with the work in progress icon. At this point, you can publish it and it will become active. (See Publishing definitions for how to do this.)
After publishing the definition, you can see the event in action. Go to the Types and Objects workspace in SmartSpace Config and open a window showing the properties of the object Office 2 and another window for the ‘Office’ contains ‘Person’ complex property.

Create a new property row in Office contains Person:

When you save this row, the occupancy of the office has been increased by 1.

Order of entry and exit events
When an object moves between two spaces, the entry and exit events can arrive in any order. This can cause issues when an object moves from one space directly into the next space.
The example above can be expanded to track the zone of a person.

Simplistically, the following Business rules could be written to track which office a person is in.


However, if Person moves from Office 1 and then directly into Office 2, the order of the exit and entry events may cause the property value to be incorrect. The exit event of Office 1 could happen after the entry event of Office 2. This would result in zone of Person = null, even though the person is in Office 2.
An extra check is needed to make sure that the current zone of Person is the zone that is being removed. For example, when office contains person becomes false, if zone of person = office then set zone of person = null. Then the entry event can happen for Office 2 and set zone of Person = Office 2, and the exit event from Office 1 will do nothing.

Keywords for definitions
The following are the keywords available in the toolbox.
Actions
Available for events and timeouts
use new
Creates a new object of a selected object type for use in a subsequent action.
delete
Deletes an object.
Creates an additional action slot to chain actions together. This keyword is represented by a semi-colon in the definition editor.

for each
Performs an action for each instance where a specific fact is true.
Supports the definition of local variables in terms of properties or as the result of computations. Declare variables by dragging properties, terms, or term templates (+, -, * and /) into the (drag items here to declare variables) slot.
- How many items there are in the area
- How long the process area has remained unchanged, where a change is defined as an increase in the number of items in the area
It sorts using the for each keyword and two local variables so a list of all process areas is ordered with oldest and emptiest at the top, with emptiest trumping oldest.
The example uses the Process type with a unique name, integer properties—count and order—and a time property. Also, a complex property, 'Process' needs demotion below 'Process' must be defined. These types and properties are shown in the Types and objects workspace below:

Add Process objects "Pa", "Pb", "Pc", "Pd" and "lowest priority object" with their associated properties:
|
Process object |
count |
time |
|---|---|---|
|
Pa |
4 |
18/12/19 18:51:29 |
|
Pb |
6 |
18/12/19 18:50:31 |
|
Pc |
5 |
18/12/19 18:27:52 |
|
Pd |
2 |
18/12/19 15:43:35 |
|
lowest priority object |
1000000 |
01/01/2000 00:00:00 |
Note: You can enter any values for count and time for objects Pa, Pb, Pc and Pd. You must, however, use the values shown for lowest priority object for the business rules to run correctly.
In the Business rules workspace, create the following definitions:


In the next definition, you set a local variable. Add the for each keyword and then drag the + into the (drag items here to declare variables) slot:

Now double-click the int property and give it the variable name x:

Continue creating the definition, by dragging keywords into the definition and filling in the slots. Create multiple set property actions by using the and then keyword to create two slots. Then insert other instances of the variable x by dragging it from its first slot:

The final definition uses a variable based on a property. Drag process into the for each slot and rename it process'. Then drag this new variable into the other slots that use it:

Save and publish all the rules.
In the Types and objects workspace, drag out the order property of Process:

The order is now given based on the sort criteria.
if then
Performs an action if a specific fact is true.
if then else
Performs an action if a specific fact is true, otherwise perform another action.
set property
Sets the value of a property.
set representation
Sets the representation for a specified representation mode of an object.
unset representation
Unsets the representation for a specified representation mode of an object.
notify
Sends a notification to a role on the web map.
- Requires roles to have been configured in the Users and roles workspace.
notify near
Sends a notification to a role on the web map including a specific object.
- Requires roles to have been configured in the Users and roles workspace.
- Requires the Visibility component to display the web map.
notify near using
Sends a notification to a role on the web map including an object located using a search.
- Requires roles to have been configured in the Users and roles workspace and a search to have been defined in Web searches.
- Requires the Visibility component to display the web map.
Operators
Available for rules, events and timeouts
and
This is true if all the slots are true.
or
This is true if any one of the slots is true.
not
This returns true if none of its contents are true.
=
The equals operator returns true if the two slots have the same value.
!=
Returns true if the two values do not have the same value.
<
Returns true if the first slot is strictly less than the second.
>
Returns true if the first slot is strictly greater than the second.
is a
Tests the type of an object
there is a
Checks for the existence of an object that matches some condition.
contains
Tests spatial containment.
+
Adds the slots. For strings, concatenates the slots.
-
Subtracts the slots.
*
Multiplies the slots.
/
Divides the first slot by the second slot.
Terms
as string
Converts a non-string value to a string.
now
Returns the current date/time.
null
Unsets a value.
hours between
Gets a difference in time based on a specified shift.
-
Requires shift patterns and shifts to have been configured in the Shift patterns workspace (or in the Shifts screen in SmartSpace web if you have licensed the Visibility component).
hours in the future
Gets a time in the future based on a specified shift.
- Requires shift patterns and shifts to have been configured in the Shift patterns workspace (or in the Shifts screen in SmartSpace web if you have licensed the Visibility component).
shift
Returns the string which is the value of log duration in shift for an object, or No Shift.
The object's type must be a descendant of the Ubisense Object type
- Requires shift patterns and shifts to have been configured in the Shift patterns workspace (or in the Shifts screen in SmartSpace web if you have licensed the Visibility component).
Terms for String Manipulation
Terms introduced in the 3.5 release can be used to extract information from string properties.
When using string manipulation terms the following should be noted:
- Any expression with a null argument returns null
- The index of a substring that is not found is -1
- A substring expression with index equal to the string length returns the empty string
- A substring expression with index greater than the string length returns null
- If a substring length extends past the end of the string, the expression returns the rest of the string
-
A negative substring length is implicitly converted to an unsigned value before applying the previous rule. This effectively means that a negative number is treated as a very large positive number that extends past the end of the string. For example:
the substring of "abcde" at 3 with length -1
returns "de".
Use this special case to get the remainder of a string from a specified position to the end.
The following terms are available for string manipulation.
substring
Display only characters from position X and a length of Y.
replaced by
Search for occurrence of STRING X and replace it with STRING Y. Replacing the empty string with anything has no effect.
index of
The index of the substring.
length of
The length of the substring.
trimmed
Trimmed substring.
uppercase
Convert the string to uppercase characters. Does not take the server locale into account.
lowercase
Convert the string to lowercase characters. Does not take the server locale into account.
Tag Battery Status
The assertion <Object> has tag status <Int>, which appears in the User Data Model as a complex property, contains a row for each object that has an associated tag whose status is either "warning" or "failing". The corresponding integer value for each status is: 1 = "warning", 2 = "failing".
This assertion can be used in Business rules. For example, an event handler can be used to notify you of the tag battery status.
Adding comments to your definitions
You can add a comment to a definition by double-clicking the “when” or “whenever” in its first line. This opens a dialog where you can enter explanatory text. Click OK to save. You can add comments to actions in a similar way.
Elements with comments are tagged with a triangular earmark. Click an earmark to display the comment inline. Double-click to edit a comment. (You can delete a comment by opening it, deleting all the text, and clicking OK.)
Organizing definitions
As you build up your collection of business rules, the list of definitions can become long and particular definitions hard to find. You can organize definitions and make them easier to locate by creating and applying labels to them. Definitions can be tagged with more than one label.
Labels are also used to organize definitions for saving. See Managing definitions
Create a label by double-clicking <Create new label>, entering the name for the label and clicking Save. Drag a label into a definition to tag it: the label is shown at the top of the definition.

(You can edit a label’s name by double-clicking its current one. Enter a new name and click Save.)
You can limit the contents of the list of definitions to those tagged with particular labels by dragging the labels into <Drag here: filter by LABELS>. Only those definitions tagged with matching labels will be shown.

Publishing definitions
When you have finished creating definitions, or loading them from other sources, and you want to make them active in SmartSpace, you publish them.
Note: Only definitions that are complete and contain valid logic can become active in SmartSpace. However, incomplete or invalid definitions can be kept alongside published definitions to be completed or corrected later.
If definitions have already been published, the new definitions will replace them. Each collection of definitions that is published is identified by a version number. Past versions are retained in SmartSpace, unless you explicitly delete them.
To publish a new version of your definitions or to delete superseded versions you no longer require:
-
Click Publish. A list of versions is displayed and you can mark them for publication or deletion. No changes are saved until you commit them.

The status of each version is indicated. Status can be:
-
Unpublished: the definitions currently loaded in the Business rules workspace. There can be only one unpublished version
Double-click the unpublished version to give it a description and then select the Publish check box if you are ready to make this the active version. The number of valid definitions that can be published is indicated, along with the number of invalid or incomplete definitions.

-
Active: the definitions currently in use in SmartSpace. There can be only one active version
Double-click the active version to give it a description. Select the active version's details and press Delete if you want to delete it (its details will be displayed in gray). When you commit your changes, the most recent superseded version will become the active version.
-
Superseded: versions of definitions that were active in SmartSpace in the past. There can be multiple superseded versions
Double-click a superseded version to give it a description. Select a superseded version's details and press Delete if you want to delete it (its details will be displayed in gray). When you commit your changes, it will be removed from your installation.
-
- Click Commit to confirm.
Managing definitions
In addition to developing and maintaining the rules in your current SmartSpace installation, you can load collections of rules called modules that have been developed in another SmartSpace installation, and save your rules—along with other items required by them—for use in other installations. The content of modules can extend beyond rule definitions to include other assets you might want to move, such as searches, screens for web forms, or report definitions. Again, you can choose to save dependencies along with these assets. For a full description, see Module import and export.
Use the Load
Loading definitions
When you first open SmartSpace Config and go to the Business rules workspace, the list of definitions is empty. You can start adding new definitions immediately, or you can load and edit:
- the definitions currently active in SmartSpace
- superseded definitions stored in SmartSpace
- a module containing definitions and other items saved from a Ubisense installation
You can load definitions from more than one source, for example to merge definitions from different versions, and then publish a new combined version. When loading, alongside the rule definitions you may also be offered types and objects and other items required by the rules. When you load definitions, you specify how any conflicts between different items are handled.
When you add new definitions, or make changes to active or superseded definitions, these updates are not applied to your system until you publish a new version. Similarly, when you load a module file with definitions, searches, types, properties, etc, everything except the business rules definitions is applied immediately. The definitions must be published after they have been loaded.
You can load
Note: It is important to remember that loading business rule definitions does not make them active in SmartSpace. When you are ready to make them active, you must publish them.
To load
-
Click Load to open a dialog where you can choose the source of the

-
Choose the file or rules to be loaded.
- To load from an external file, select Load file and enter the path and filename for the saved
- To load current or past rule definitions, select Load published rules and select the current rules—labeled active—or a previous set from the dropdown
- To load from an external file, select Load file and enter the path and filename for the saved
-
With the
Note: If the property contents are altered while the load screen is open, refresh the display by pressing F5 to update the view.
Select the items to load.
- Use the Expand all button to display available items
- Selecting a parent item selects all child items in that category
- At <Type here: search by NAME or LABELS> enter text (case sensitive) to search for items whose names match your input. Click
 to remove the filter.
As you select items, information in the STATUS column indicates the result of loading those items, and the number of items currently selected for loading is shown in the Load x item(s) from source button.
If you already have
- Selecting any changed items where otherwise they would be skipped and the current version retained
- Choosing Cancel to abandon the process completely
To help you identify which items to load, you can open a second source for comparison. Choose Compare with another set of items and choose another file or published version (as described in step 2). Items are displayed in categories: Only in source, Only in source for comparison, Identical, Different.
- If you want to have only the items you select loaded and any definitions currently available in the Business rules workspace to be cleared away, select Discard previously loaded rule definitions.
-
When you have selected the items you require, click Load x item(s) from source.
All selected items are loaded and rule definitions are available in the Business rules editor. However, the definitions are not yet active in SmartSpace until you publish them— see Publishing definitions.
The load operation ensures the contents of the dataset are identical to the contents of the .ssc file. Therefore, unsaved assets can be removed from the dataset when loading a file.
Saving definitions
Saving definitions allows you to keep a copy of the definitions currently loaded in the Business rules workspace, for example if you want to merge them into another SmartSpace installation. Saving definitions does not make them active in your SmartSpace installation: to make definitions active, you must publish them— see Publishing definitions.
When you save one or more definitions, you can also save other items they reference, and you can use this functionality to create a collection of types, objects, searches, rules and so on to encapsulate specific business processes for use in other SmartSpace installations.
The recommended workflow for saving
- Select a file to save the
- Create labels and apply them to assets
- Use the Add suggested labels to selected items button to apply labels to selected items required by labeled assets
- Select the items you want to save
- Save the file
To save
-
Click Save to open a dialog where you can specify the content and destination of a collection of
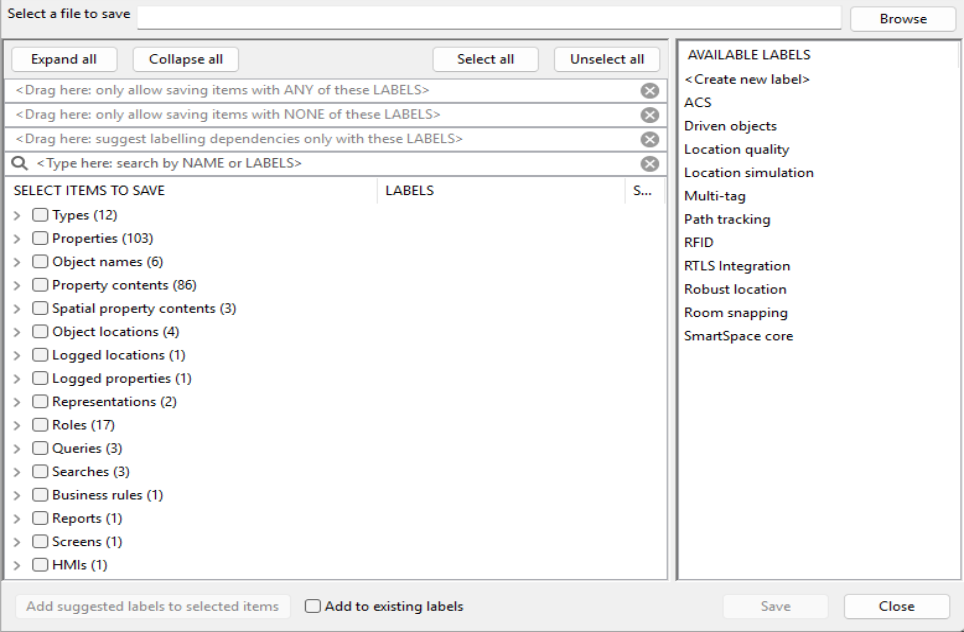
All items available for saving are listed with any previously-applied labels shown in the LABELS column.
At any time you can:
- Use the Expand all button to display available items
- At <Type here: search by NAME or LABELS> enter text (case sensitive) to limit the display to items whose names to remove the filter.
-
At Select a file to save enter the path and filename for the
To save your module in a format compatible with both SmartSpace Config and the ubisense_smartspace_module_admin command-line tool, save it with the .ssc extension.
If there are only business rules and no other object types in your file, you cannot use the .ssc extension. Save a rules-only module with a .rules extension.
-
Create and apply labels.
- Create a label by double-clicking <Create new label>, entering the name for the label and clicking Save.
- Drag labels from the AVAILABLE LABELS list onto assets. Other items required by a labeled asset are indicated by the relevant label appearing in the SUGGESTED LABELS column. Items labeled as suggested are those which are necessary for the module to work and whose omission will cause a future import to fail.
- Slowly double-click an asset's current labels to open a dropdown from which you can select a single label to replace the current ones, or the blank entry to delete all labels from the asset.
- Highlight one or more assets (using Shift+click or Ctrl+click
Suggested labels are automatically created for types and properties generated by the platform. You can add the suggested labels and then exclude them when saving .ssc files. Including autogenerated items in .ssc files doesn't do any harm, but it will often be easier to manage files containing fewer items.
-
While you are adding labels, you can click Add suggested labels to selected items if you want any dependencies
When structuring sets of definitions it can be useful to ensure that each asset gets one single label, corresponding to the activity that 'owns' the asset. If you check Add to existing labels, then a suggested label is always added to every asset; if you leave Add to existing labels unchecked, then a suggested label is only added to assets that had no labels before Add suggested labels to selected items was selected.
-
Select the items to be saved.
-
Drag labels to the filters at the top of the screen to limit the displayed items to those that match the criteria you define
-
Use the Select all and Unselect all buttons to select all or none of the displayed items
-
Selecting a top-level category, such as Roles or Types, selects all items in that category
-
Selecting parent assets to save means that you don't need to save the names of child assets separately
As you add to your selection, the number of items to be saved is shown in the Save x item(s) button.
Make sure all required items are selected to ensure successful import of the module.
-
- When you have specified the destination and selected the items to be saved, click Save x item(s).
Saving Reports and Logged Locations and Logged Properties
When saving reports, you might need to label types and properties manually, since report dependencies are not computed automatically.
Saving modules examples
Saving without labeling
Whilst the recommended method for saving makes use of labels, you can save selected assets without the use of labels. For example, to save just the business rules and no other items you:
- Select the file to save to
- Check Business rules in the list of items to save and all listed rules are selected
- Click Save x item(s)
In this case, no dependencies are saved, and there would be no guarantee that the rules would function if loaded into a different SmartSpace installation.
Note: You cannot use the .ssc extension to save modules containing only rules.
Saving all items
You can save all available items by:
- Selecting the file to save to
- Clicking Select All
- Clicking Save x item(s)
Saving a web form and all dependencies by using a label
With the use of labels, as the following example shows, all dependencies can be identified and (optionally) selected to build a meaningful collection of assets into a module. Here, a form that lists products ready for dispatch to a selected country is to be saved.

First a label is created and is dragged onto the name of the form:

The label is added to the SUGGESTED LABELS column for the following related assets:
- The search on which the form is based
- The types and properties used in the search
- The roles to which the screen and form have been assigned
Additionally, the names of the objects used in the search filter, here a list of countries for selection when the form displays, are available for saving. This is because the Country type has only a name property and inherits an enumeration type. See Assets that can be included in a module
Pressing Ctrl+A and clicking Add suggested labels to selected items adds the label to all the identified items. Note that nothing has as yet been selected for inclusion in the module. The most reliable way to ensure all labeled items are selected is to use one of the filters. Drag the despatch label into a filter:

The list of items now shows only those items with the corresponding label:

Clicking Select all and then Save 19 items adds all the required assets to the module.
Saving a module with space properties
The following example shows how a module that includes types with space properties and a containment relationship requires a little more work to ensure all dependencies are identified and included in a module.
In TYPES / OBJECTS, the Product and Workspace types each have an extent property:

In SPATIAL PROPERTIES, specific spaces have been defined for the area of each workspace, a default space has been created for the product type, and a request to monitor their spatial relationship has been defined. (See Spatial properties for further information.)
A complex property is defined for the spatial relationship between the two types:

A business rule then makes use of the complex property:

To create a module containing this rule and all dependencies, in BUSINESS RULES with the rule loaded, click Save. Creating a label and dragging it onto the business rule and then clicking Add suggested labels to selected items results in dependencies being identified. These are shown filtered by their label below:

Missing from the items identified for saving are extent of 'Product' and extent of 'Workspace'. The easiest way to ensure these properties are also identified is to drag the label onto the autogenerated Business rule for the 'Workspace' extent contains 'Product' extent complex property (remove the filter first). Clicking Add suggested labels to selected items again adds the label to the two properties:

Selecting all the labeled items and saving them will create a module with all dependencies satisfied.
Managing modules from the command line
Before using the command-line tool, ubisense_smartspace_module_admin, label everything in Business rules, publish the labels, then use the command-line tool to manage your .ssc files in source control.
The command-line tool allows you to:
-
Save items from your dataset to .ssc files
-
Diff items from your dataset against .ssc files
-
Load items from .ssc files and sync with your dataset
-
Remove .ssc file assets from your dataset
-
Print a list of all the labels in your dataset
-
Print a list of all the assets in your dataset
-
Print a list of all the assets in your dataset without a label
You can download ubisense_smartspace_module_admin using the Ubisense Application Manager where it can be found in the DOWNLOADABLES task under Ubisense > SmartSpace core > Module admin tools.
For example, to load a module packing-bay.ssc, use the command:
C:\Ubisense>ubisense_smartspace_module_admin load packing-bay

ubisense_smartspace_module_admin (version 3.9 build 8545)
Copyright 2023-2024 Ubisense Limited, all rights reserved.
Please report any bugs to <support@ubisense.com>.
For more information visit <http://www.ubisense.net>.

> Dataset assets labelled 'packing-bay' = 1/281
> packing-bay.ssc assets labelled 'packing-bay' = 3/3
> Loading rule "packing bay" .. OK
> Applying changes .. OK
> Loaded 1 asset; 0 deprecated; 2 skipped
> Published rule and label definitions as version 50
Note: Do not include the .ssc extension of the module's filename when using ubisense_smartspace_module_admin.
To view the information about how to use the command-line tool, use the command:
ubisense_smartspace_module_admin --help
Rules engine trace
The Rules engine trace workspace in SmartSpace Config allows you to monitor the published business rule definitions in real time.
The Rules engine trace workspace
Click on BUSINESS RULE TRACE to display the workspace.
You can zoom in and out by using either Ctrl+mouse wheel or Ctrl+Plus sign and Ctrl+Minus sign.

Features of the Business rule trace workspace are described in the following sections.
Displays the logic of the current rule definition. As you step through the trace, additional information is displayed explaining changes to be made.
You can click in the definition to set or unset a breakpoint.
Check Show variable values in the Options popup to display values of variables instead of variable names in the rule definition.
Displays the current transaction and lists the actual events and any actions performed on the data. Events are highlighted in green if the command executed successfully or red if the command failed to execute. Right-click a command to set or unset a breakpoint. Double-click a command to jump to its position in the Definition viewer and Trace viewer.
Lists transactions and the rules and events involved in each. The estimated elapsed time taken to process a transaction is shown.
- An icon to the left of a definition’s name identifies the kind of definition it is:

- Definitions with breakpoints that will actually be hit in this trace are identified by an icon that also indicates whether it is enabled:

- An arrow
 indicates progress when stepping through the trace and identifies the current definition.
 - Check Show skipped events in the Options popup to display events that have not been hit by the trace.
If the Real-time rules engine has been licensed and you have loaded a geometry cell in the Types and objects workspace, you can see cellular rule evaluations and the cell is indicated beside the transaction. Site-level transactions are labeled Site.
Other additional information includes: skipped for rule evaluations that didn't result in any changes, and event handlers for 'X becomes true' when X became false (and vice versa); recursive for an event that was handled within the previous evaluation.
You can copy the contents of the trace viewer to the Clipboard by clicking in it and pressing Ctrl+C. To clear the content of the trace viewer, click Clear.
Displays a list of properties set by the published rule and event definitions. By selecting a property, breakpoints are set wherever that property is set.
- Enter text at <Type here: filter by NAME> (case sensitive) to limit the definitions listed to those whose names match the your input. Click to remove the filter.
-
Double-click a property to toggle breakpoints. See Using Breakpoints.
Properties with breakpoints are identified by an icon indicating whether breakpoints are enabled or not:

Displays a list of all published rule and event definitions.
- Enter text at <Type here: filter by NAME> (case sensitive) to limit the definitions listed to those whose names match the your input. Click to remove the filter.
- Drag properties into <Drag here: filter by SETS PROPERTY> or <Drag here: filter by USES PROPERTY> to display only definitions that set or use those properties.
- An icon to the left of a definition’s name identifies the kind of definition it is:
-
Double-click a definition to display it to set breakpoints. See Using Breakpoints.
Definitions with breakpoints are identified by an icon indicating whether breakpoints are enabled or not:
Use the playback buttons to step through the code. An arrow indicates progress in each of the viewers.
 searches back through the trace for breakpoints
 steps back through the trace
 steps through the trace
 searches through the trace for breakpoints
Click Options to display a popup of options to configure the trace:

- Choose Stop listening when a breakpoint is hit to stop the addition of events to the trace when a breakpoint is hit
- Choose Automatically scroll to current trace to keep the display in the Trace viewer in sync whilst stepping through definitions
- Choose Show variable values to display values instead of variable names in the Definition viewer
- Choose Show skipped events for the trace to include rule evaluations that didn't result in any changes, and event handlers for 'X becomes true' when X became false (and vice versa)
- By default, a maximum of 200 transactions is shown. You can enter a different value between 1 and 1000. Click Reset to return to the default setting
Using Rules engine trace
Because tracing can have an adverse impact on the performance of the Business rules engine, it is not enabled by default or when the server restarts. Before you can see any trace results you must enable tracing. Click Start tracing on the server and confirm the operation. You can halt tracing, by clicking Stop tracing on the server. Also, when you close SmartSpace Config, if you still have tracing enabled, you will be asked to choose whether to leave it running or shut it down.
After you have enabled tracing, click Start listening. A green progress bar indicates that you are listening to the trace, and transactions will begin to populate the trace viewer.
Step forward and back through the trace using the playback buttons. A single definition is displayed at any time in the viewer and the current definition's position in the trace viewer is indicated by a green arrow.
You can also double-click a definition's name in the trace viewer to go directly to its contents.
Using Breakpoints
You can add breakpoints to an event by double-clicking its name in the set breakpoints list and displaying the definition in the viewer. Click an action (indicated by brown text) in the code to add a breakpoint. To remove a single breakpoint, display the definition and click on the breakpoint icon or the action. You can remove all breakpoints you have set by clicking Delete breakpoints and confirming the deletion.
You can also double-click a property to add breakpoints wherever that property is set.
To enable breakpoints,
Breakpoints are highlighted in definitions, and events with breakpoints are identified, by one of the following symbols:
Copying Trace Data
To copy trace data to the Clipboard, click Copy trace to clipboard and the trace data for all tests currently listed is copied. Clear the contents of the trace viewer by clicking Clear.