External Definition API
The following describes using external definition rules to create a .NET plugin with callbacks, performing actions on property changes.
Installing .NET API
Requirements
In order to use the .NET API, you require SmartSpace platform version 3.6 or higher with a license for the Rules engine developer.
You also need:
-
.NET Core SDK 8.0.x
-
UbisensePlatform and UbisenseApiBase NuGet packages
-
ubisense_external_code_generator command-line tool
Installation
Install Rules engine developer
If you do not already have the Rules engine developer, make sure the SmartSpace platform includes a license for it, and install the feature using Service Manager. (For further information on all aspects of installation, see SmartSpace Installation.)
Install ubisense_external_code_generator
You can install ubisense_external_code_generator from either one of two sources:
-
Add the Ubisense package source using the command:
dotnet nuget add source https://nuget.ubisense.net/v3/index.json -n "Ubisense"
You can list the registered sources:
dotnet nuget list source
Registered Sources:
1.  nuget.org [Enabled]
https://api.nuget.org/v3/index.json
2.  Ubisense [Enabled]
https://nuget.ubisense.net/v3/index.json
-
Install the tool using the following command:
dotnet tool install --global UbisenseExternalCodeGenerator --version 3.x.xxxx
You can invoke the tool using the ubigen command.
-
Run Application Manager.
-
Choose the DOWNLOADABLES task, and select Ubisense/Business rules/External plugin tools.
-
Click Download selected items and specify a path into which the tool will be written. This will typically be a folder that is on the user PATH, to make it easy to run the tool.
-
After you have downloaded it, you must unzip the tool.
Developer Tools for .NET Core
If you have not already installed it, you need the .NET SDK.
UbisensePlatform and UbisenseApiBase NuGet packages
You can download the
You can
Setting up the package source
Download the
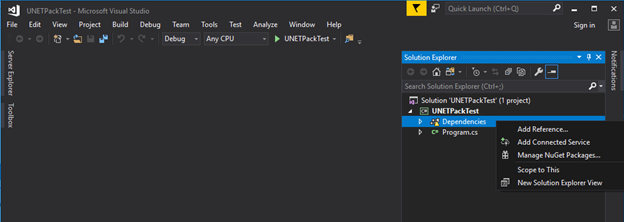
Configuration of sources can be done within the Visual Studio GUI. By default, this will configure your global NuGet settings. If you would like to configure NuGet sources for a specific project only, it is recommended you follow the instructions in Creating a local NuGet.config file for a Visual Studio solution.
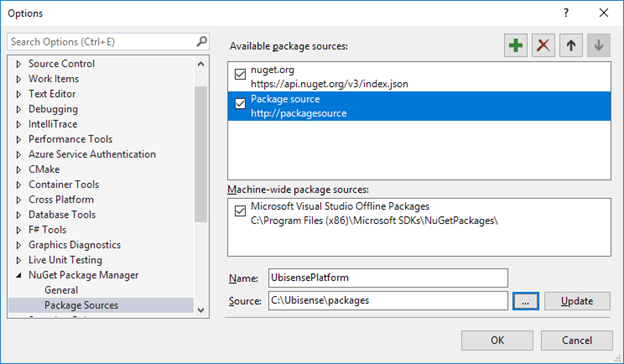
Open your project within Visual Studio and open its NuGet package manager, then click the cog next to the package source box. Alternatively, choose Tools, Options… and navigate to NuGet Package Manager, Package Sources.

In this dialog, click the green plus to add a new package source. Give it a recognizable name and set the source to the directory containing the
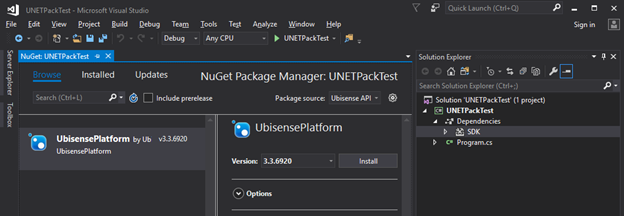
Back in your project’s NuGet package manager, select the new source from the package source drop down. The
For .NET Core and .NET standard projects, you can add the source and package details directly to a .csproj file within the VS GUI. Right click on your project and click edit <ProjectName>.csproj. The following lines will add a directory to the sources used when restoring your project, where <source directory> is the directory you want to add, e.g. C:/Ubisense/packages.
  <PropertyGroup>
    <RestoreSources>$(RestoreSources);<source directory>;https://api.nuget.org/v3/index.json</RestoreSources>
  </PropertyGroup>
The package can then be added with the following lines.
  <ItemGroup>
    <PackageReference Include="UbisensePlatform" Version="3.x.xxxx" />
    <PackageReference Include="UbisenseApiBase" Version="3.x.xxxx" />
  </ItemGroup>
The version number should be the version of your package. Building and restoring packages for this project should fetch the required files.
This method will not edit the NuGet configuration so the package manager UI and other projects will not be affected.
NuGet sources can be configured using the NuGet command-line tool. In a command prompt with NuGet in the path, sources are added using to following command:
nuget sources add -name <source name> -source <path to source>
This will add a source named <source name> and URL/file path of <source> to your NuGet configuration. By default, this is added to your global NuGet configuration but you can specify a different configuration file with the -configfile argument as follows:
nuget sources add -name <source name> -source <path to source> -configfile <path to config file>
This configuration file must already exist and be of a valid format.
Creating a local NuGet.config file for a Visual Studio solution
A NuGet.config file in the same directory as a Visual Studio solution or project file will be detected by Visual Studio and used for the purposes of package management, in addition to the global settings, overriding in case of a conflict.
You can create a new, empty NuGet configuration file by creating a new file named NuGet.config with the following contents:
<?xml version="1.0" encoding="utf-8"?>
<configuration>
</configuration>
You can then add a source to this configuration file with the nuget sources command, pointing at this configuration file, allowing use of this source with the package management UI within Visual Studio or dotnet CLI.
A NuGet package can be added to a project directly with the .NET command-line interface. In the Visual Studio command prompt, or similar command prompt with the dotnet CLI in the path, run the following command:
dotnet add <solution> package
This will add the package to your project and immediately resolve it from the source directory supplied in the argument. However, this will not add this source to your NuGet configuration. Future restoring and building of this project may succeed, restoring from your NuGet package cache, but if this cache is cleared the restore will fail. It is recommended that you first add a source to NuGet for this package, as described in the other sections, then add the package to your solution without the source argument.
If you have already configured the NuGet sources for this project, the package can be added with the above command without the source argument.
Demo
We will use a worked example in this document. The example dataset has the following objects/properties already added to the UDM:
-
A DampedObject type with the following properties:
-
An Alpha property of type Double;
-
A Damped property of type Double;
-
A Reading property of type Double;
-
-
A DampedObject named Object1 with an Alpha value between 0 and 1.
In the example, we will create a service that applies a damping filter whenever a reading is updated, with the following logic:
Whenever we have a new reading for an object X, set
damped(X) = alpha(X) * reading(X) + (1 – alpha(X)) * damped(X)
Configuring the external relationship
We configure the external relationship in BUSINESS RULES in SmartSpace Config:
-
Create a new external definition by double-clicking <Create new definition> and choosing external definition.
The name of this definition will determine the name of the DLL we will generate later.
Our demo uses the name DemoExternal.
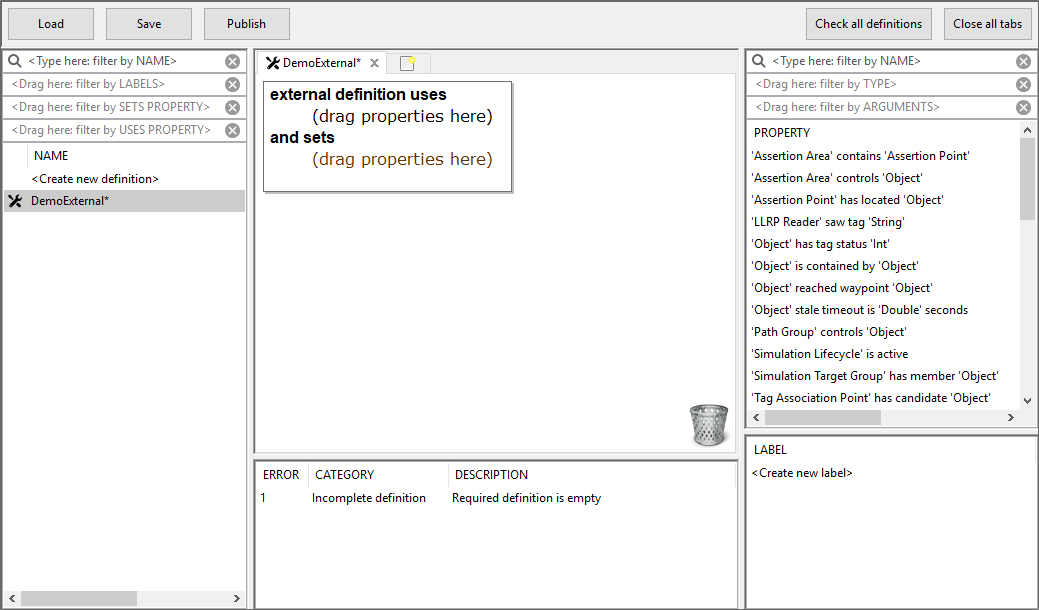
-
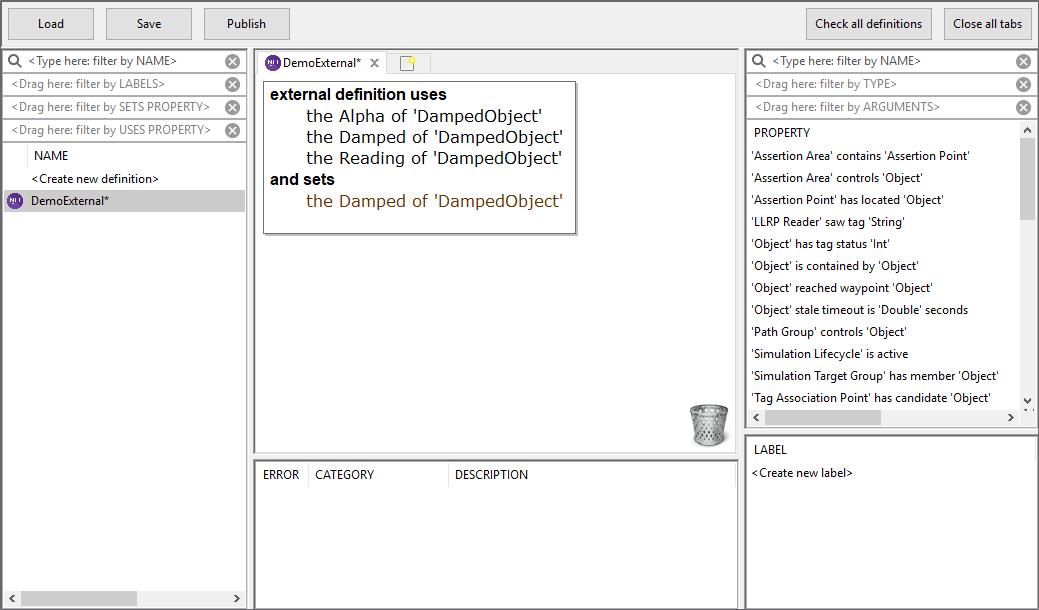
Add the required properties to the definition. Our example service we will need to read the Alpha, Damped and Reading properties as well as set the Damped property. We will need to drag all three properties to the slot under external definition uses and the Damped property to the slot under and sets.
-
Publish the external definition.
Creating a plugin
Plugin creation requires the ubisense_external_code_generator tool. See Install ubisense_external_code_generator for more information.
Code Generator
The code generator tool generates C# code for accessing the SmartSpace properties defined in your external definition, with events for property value changes. Generated code implements interfaces defined in the UbisenseApiBase package, these interfaces are outlined later in this document. Generated code will be output to the “output/” directory and will contain the following classes:
-
UDM UObject types used by the properties.
-
Accessors for the properties with event handlers, implementing IGetter, ISetter and ICallback.
-
KeyRows for the properties, implementing IKeyRow.
-
A wrapper class, containing all accessors and an establish event handler. The class will be named <External name>Wrapper where external name is in Pascal case.
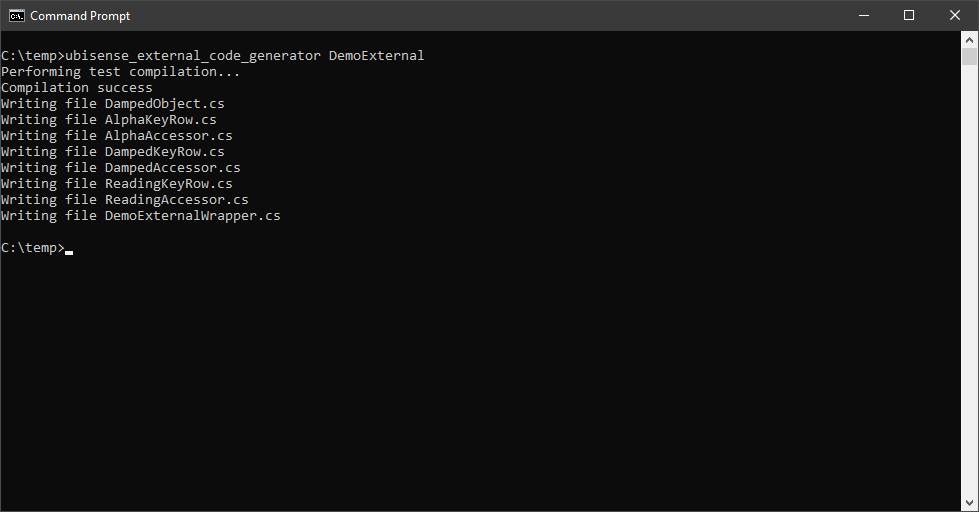
We will run the tool with the name of the external definition we published, DemoExternal. The result should look like the following:
Implementing the plugin
To create a plugin, create a .NET standard class library and add the generated code files to it.
Adding package dependencies
The generated code depends on two Ubisense NuGet packages, UbisensePlatform and UbisenseApiBase. If your project uses package references, you can include these dependencies by adding the following to your .csproj file.
<ItemGroup>
    <PackageReference Include="UbisensePlatform" Version="3.*" />
    <PackageReference Include="UbisenseApiBase" Version="3.*" />
</ItemGroup>
Implementing the callback class
Define a class that derives from the wrapper class. This will be the entry point to your plugin. Add callback functions to the relevant events within the class’ constructor.
We implement our callback to set the damped value in example_client.csproj in the file DemoExternalImplementation.cs file. The files in the Autogenerated/ directory are those generated by the code generator tool. The implementation is as follows:
namespace Ubisense.UDMAPI
{
    public class DemoExternal : DemoexternalWrapper
    {
        public DemoExternal ()
        {
            Log.Enabled = true;
            Reading.update += Reading_Update;
            Reading.insert += Reading_Insert;
        }

        private void Reading_Insert(ReadingKeyRow key, double newValue)
        {
            if (!Alpha.GetValue(key.DampedObject, out double alpha))
            {
                return;
            }
            if (!Damped.GetValue(key.DampedObject, out double damped))
            {
                damped = 0.0;
            }
            double v = alpha * newValue + (1 - alpha) * damped;
            Log.WriteLine($"Updating damped to {v}");
            Damped.SetValue(key.DampedObject, v);
        }

        private void Reading_Update(ReadingKeyRow oldKey,
                                    double oldValue,
                                    double newValue)
        {
            Reading_Insert(oldKey, newValue);
        }
    }
}
Here we derive from the wrapper class and implement the logic to set the damped value in the Reading_Insert method, adding callbacks to the reading insert and update events in the constructor. The names of key properties in the KeyRow types generated are based on the type of that key, for example “key.Damped_Object”. If a property used has more than one key column with the same type, then it adds numbers, so you might have key.Damped_Object1 and key.Damped_Object2.
Note: There is a “.Log” property in the wrapper which, if enabled, can be used to write to the “plugin” platform monitor stream.
Loading the plugin
Plugins are hosted by the Ubisense:Business rules:External plugin host service. Upon loading a plugin, the service will create an instance of your wrapper class and run until terminated.
Loading a plugin
Define the plugin directory. This is a local parameter external_plugin_directory and will need to be set in so in the registry or platform.conf on the machine running the service.
If a plugin directory is not configured, the host exits and a trace message is generated:
typed_api_host: plugin directory not set
If the configured plugin directory does not exist the following message is generated:
typed_api_host: plugin directory does not exist
Publish your classlib and copy the directory into the external_plugin_directory. The classlib directory must have the same name as the classlib’s main DLL, excluding file extension. The host service will automatically load all plugins in the external_plugin_directory on startup as well as any new plugins added to the directory during runtime.
For our example we will set external_plugin_directory to C:\UbisensePlugins (this may need to be set to a different value on your machine). Ensure the external plugin directory exists (and is empty). Publishing the example_client project will generate an assembly named DemoExternal.dll along with all its dependencies. The assembly name DemoExternal is set in example_client.csproj. This assembly name is the same as our class implementing the DemoExternalWrapper class above.
For example the easiest way to build our DemoExternal assembly is to run:
dotnet publish -o DemoExternal
This will create a DemoExternal folder under the current directory and this entire folder, containing the host service and all its dependencies, can be moved into the plugin folder we defined to install it. In our example this means moving DemoExternal and its contents into C:\UbisensePlugins.
Its plugin service will load this plugin immediately (or the next time it is started if the service is not currently running) and create an instance of the DemoExternal class, running indefinitely and listening for callbacks.
Unloading a plugin
Plugin files will be locked once loaded. To unload a loaded plugin the service must first be stopped, then the directory removed.
Caching of properties
When an external definition is not acting purely on property changes, but instead has code in the "Run" method, then queries on these properties may return no results in error as not all the properties will have been loaded yet. The method Filtering.WaitForPropertyCache waits for properties to be loaded when the Run method is called before running queries on the properties. This is implemented by overriding the Run method in your implementation. For example:
namespace Ubisense.UDMAPI
{
    public class Exporter: ExporterWrapper
    {
       …
       override public void Run()
       {
		Log.WriteLine($"before waiting for property cache Damped contains {Damped.GetAllRows().Count} rows");
		Filtering.WaitForPropertyCache(IsCellular()) ;
		Log.WriteLine($"after waiting for property cache Damped contains {Damped.GetAllRows().Count} rows");
       }
       …
   }
}
In this example, ensure that Damped contains a large number of rows. You should be able to see in the log messages that before Filtering.WaitForPropertyCache has been called, Damped contains 0 rows. After Filtering.WaitForPropertyCache has been called, all the properties will have been loaded and the log message will show the correct number of rows.
Threading of callbacks
Plugin callbacks are added to an action queue, with a single thread raising callback events per plugin. The process, from property value changed to plugin callback method execution is as follows:
-
A change is made to a UDM property used by a loaded plugin.
-
The main UDM callback manager, shared between all plugins, sees the change and passes the event to each plugin’s callback manager.
-
A plugin callback manager sees the change and adds it to queue of UDM change events to be raised. Each plugin has a single plugin callback manager for all properties.
-
A Timer regullarly raises an event on the ThreadPool at regular intervals to trigger all pending UDM change events. With a plugin, UDM change events are guaranteed to be raised in the order they were received and the next UDM change event will not be raised until the previous UDM change event callback has completed. There will be at most one thread per plugin raising UDM change events at any time, so methods attached to these events should terminate in reasonable time.
-
A UDM change event is raised within an accessor and passed to the attached method(s) in the Wrapper implementation.
In our example, changing a reading value would look like the following:
-
The host service starts, loading our plugin and creating an instance of our DemoExternal class.
-
The DemoExternal’s accessors register their properties with the main UDM callback manager.
-
A Reading value is changed for a DampedObject, e.g. we set a new reading in SmartSpace Config.
-
The main UDM callback manager sees the change and passes it to the callback manager used by our plugin’s classes
-
Our plugin’s callback manager adds an update event to the UDM change events action queue.
-
The timer triggers and an available thread begins executing actions in our UDM change events action queue, raising an update event for the DampedObject:Reading property.
-
The update event is raised and the DemoExternal::Reading_Update method is executed.
Threading for non-event-based processes
There is also support for a plugin to have its own thread procedure so it can do non-event-based things (such as periodically checking/processing something). This is implemented by overriding the “Run” method in your implementation. The host service will call the Run method in a new thread once the plugin has been loaded and the constructor called. For example:
namespace Ubisense.UDMAPI
{
    public class Exporter: ExporterWrapper
    {
       …
       override public void Run()
       {
          while (true)
          {
               DoSomethingPeriodically();
               System.Threading.Thread.Sleep(1000);
           }
       }
       …
   }
}
Monitor Streams
typed_api_host
The External plugin host service prints some useful status messages on the typed_api_host monitor stream. This can be used to see whether the plugin is loaded correctly.
To enable the trace stream, use the command:
and then restart the External plugin host service.
Example messages are:
typed_api_host: initialising plugin C:\Ubisense\plugins\DemoExternal
typed_api_host: creating instance of callback class type DemoExternal
typed_api_callbacks
The invocation of callbacks in the Typed API can be traced using the typed_api_callbacks monitor stream.
Use the command:
and then restart the relevant services (the site- and cell-level typed API hosts). When properties change you should see messages of form similar to some of these:
native callback manager: establish
native callback manager: schema changed
native callback manager: data inserted for <property>
native callback manager: data updated for <property>
native callback manager: data removed for <property>
Callback Manager OnInsert(<property>,..) callback count = <number of invocations>
Callback Manager OnUpdate(<property>,..) callback count = <number of invocations>
Callback Manager OnRemove(<property>,..) callback count = <number of invocations>
Callback Manager OnEstablish
exception in callback: <message>
flushed callback queue, total completed = <completed>, total exceptions = <exceptions>
UbisenseApiBase Interfaces
The generated files will all be in the Ubisense.UDMAPI namespace. The interfaces uses are outlined below.
IKeyRow
Represents a single row of property keys (without value).
Properties
| Keys | Get the collection of keys |
Methods
| ToKeyList() | Get the collection of keys in string form |
IPropertyGetter
Get property rows/values
Methods
| GetValue(TKeyRow, Object) | Get the value of a row with the provided key |
| GetAllRows() | Get all row key/values pairs |
IPropertySetter
Set property values
Methods
| SetValue(TKeyRow, Object) | Set the value of a row with the the provided key to the provided value, overriding if already set |
| DeleteRow(TKeyRow) | Delete a row with the provided key |
IPropertyCallback
Provides property row events
Events
| insert | Raised on creation of a new row |
| update | Raised on a row value being changed |
| delete | Raised when a row is deleted |