Module import and export
The Load and Save capabilities in the Business rules workspace enable the import and export of business rules from SmartSpace. Import and export is achieved via the creation of modules of rules and any additional selected items. These modules can also be used with other parts of SmartSpace to enable the transfer of other configuration elements, such as searches or reports, between Ubisense installations.
This guide describes the capabilities of Business rules export, and the process for loading and saving modules. Additionally, it provides information on other tools available for the transfer of assets between installations.
Requirements
Business rules export requires a license for Business rules version 3.5 or higher.
How Business Rules Export Works
Business rules export enables the creation of modules comprising functionality that is portable between Ubisense installations. Portable items (also referred to as assets) can be identified for inclusion in a module by the use of labels. When saving items for export, you can choose not only rule definitions but any assets that can be included in a module. This allows, for example, the creation of a module comprising a search for display on the web map, the properties and representations used by the search, and the roles that can access it. To make the selection of all required items easier, during module definition, when a label is applied to an item, dependencies are identified by the software and can be labeled accordingly.
Assets that can be included in a module
Which items can be saved using the Business rules workspace?
-
Custom types
All types created based on Ubisense types can be saved
-
Properties
Both simple and complex properties can be included in a module
-
Object names
An asset is available for each user-visible type with at least one named object
-
Property contents
-
Spatial property contents
You can save moving spaces of an object property (relative spaces) and stationary spaces of an object property (absolute spaces)
-
Object locations
There is an asset for each user-visible type with at least one located object. Background objects are not part of this
-
Logged locations
For use in Reporting
-
Logged properties
For use in Reporting
-
Representations
-
Roles
-
Queries
For use in Reporting
-
Searches
-
Business rules
-
Reports
-
Screens
-
HMIs
Saving Reports and Logged Locations and Logged Properties
When saving reports, you might need to label types and properties manually, since report dependencies are not computed automatically.
Loading Modules
You can load
Note: It is important to remember that loading business rule definitions does not make them active in SmartSpace. When you are ready to make them active, you must publish them.
To load
-
Click Load to open a dialog where you can choose the source of the

-
Choose the file or rules to be loaded.
- To load from an external file, select Load file and enter the path and filename for the saved
- To load current or past rule definitions, select Load published rules and select the current rules—labeled active—or a previous set from the dropdown
- To load from an external file, select Load file and enter the path and filename for the saved
-
With the
Note: If the property contents are altered while the load screen is open, refresh the display by pressing F5 to update the view.
Select the items to load.
- Use the Expand all button to display available items
- Selecting a parent item selects all child items in that category
- At <Type here: search by NAME or LABELS> enter text (case sensitive) to search for items whose names
 to remove the filter.
As you select items, information in the STATUS column indicates the result of loading those items, and the number of items currently selected for loading is shown in the Load x item(s) from source button.
If you already have
- Selecting any changed items where otherwise they would be skipped and the current version retained
- Choosing Cancel to abandon the process completely
To help you identify which items to load, you can open a second source for comparison. Choose Compare with another set of items and choose another file or published version (as described in step 2). Items are displayed in categories: Only in source, Only in source for comparison, Identical, Different.
- If you want to have only the items you select loaded and any definitions currently available in the Business rules workspace to be cleared away, select Discard previously loaded rule definitions.
-
When you have selected the items you require, click Load x item(s) from source.
All selected items are loaded and changes relating to non-Business rules assets, such as searches, are applied immediately. However, before any business rule definitions can become active, they must be published. See Publishing definitions.
The load operation ensures the contents of the dataset are identical to the contents of the .ssc file. Therefore, unsaved assets can be removed from the dataset when loading a file.
Saving Modules
Saving modules allows you to keep a copy of selected assets, including definitions currently loaded in the Business rules workspace, and other items the assets and definitions reference. You can use this functionality to create a collection of types, objects, searches, rules and so on to encapsulate specific business processes for use in other SmartSpace installations. Each module is identified by a label and by applying a label to an asset you can identify all dependencies for selection.
The recommended workflow for saving
- Select a file to save the
- Create labels and apply them to assets
- Use the Add suggested labels to selected items button to apply labels to selected items required by labeled assets
- Select the items you want to save
- Save the file
To save
-
Click Save to open a dialog where you can specify the content and destination of a collection of
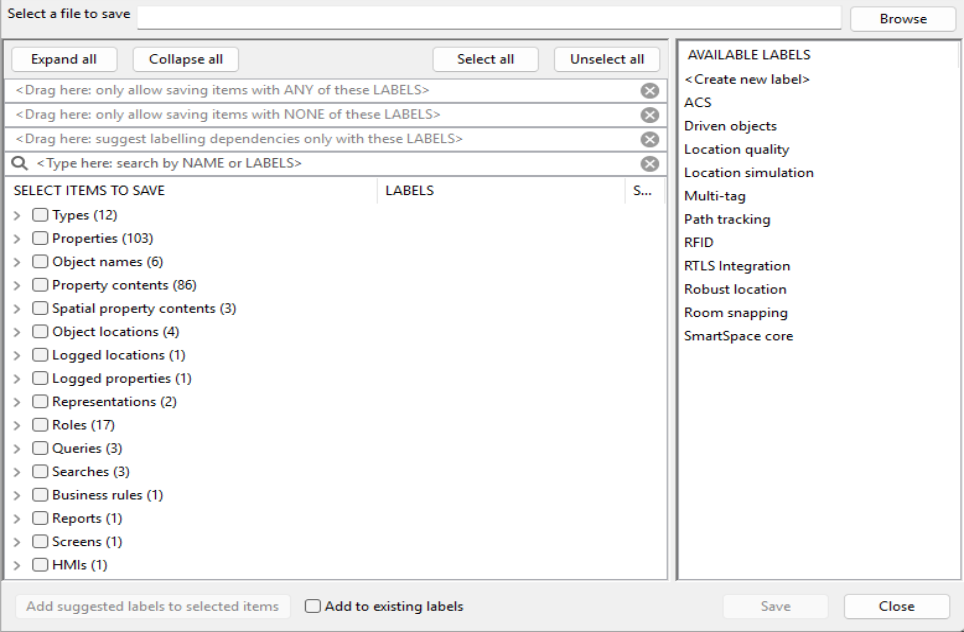
All items available for saving are listed with any previously-applied labels shown in the LABELS column.
At any time you can:
- Use the Expand all button to display available items
- At <Type here: search by NAME or LABELS> enter text (case sensitive) to limit the display to items whose names to remove the filter.
-
At Select a file to save enter the path and filename for the
To save your module in a format compatible with both SmartSpace Config and the ubisense_smartspace_module_admin command-line tool, save it with the .ssc extension.
If there are only business rules and no other object types in your file, you cannot use the .ssc extension. Save a rules-only module with a .rules extension.
-
Create and apply labels.
- Create a label by double-clicking <Create new label>, entering the name for the label and clicking Save.
- Drag labels from the AVAILABLE LABELS list onto assets. Other items required by a labeled asset are indicated by the relevant label appearing in the SUGGESTED LABELS column. Items labeled as suggested are those which are necessary for the module to work and whose omission will cause a future import to fail.
- Slowly double-click an asset's current labels to open a dropdown from which you can select a single label to replace the current ones, or the blank entry to delete all labels from the asset.
- Highlight one or more assets (using Shift+click or Ctrl+click
Suggested labels are automatically created for types and properties generated by the platform. You can add the suggested labels and then exclude them when saving .ssc files. Including autogenerated items in .ssc files doesn't do any harm, but it will often be easier to manage files containing fewer items.
-
While you are adding labels, you can click Add suggested labels to selected items if you want any dependencies
When structuring sets of definitions it can be useful to ensure that each asset gets one single label, corresponding to the activity that 'owns' the asset. If you check Add to existing labels, then a suggested label is always added to every asset; if you leave Add to existing labels unchecked, then a suggested label is only added to assets that had no labels before Add suggested labels to selected items was selected.
-
Select the items to be saved.
-
Drag labels to the filters at the top of the screen to limit the displayed items to those that match the criteria you define
-
Use the Select all and Unselect all buttons to select all or none of the displayed items
-
Selecting a top-level category, such as Roles or Types, selects all items in that category
-
Selecting parent assets to save means that you don't need to save the names of child assets separately
As you add to your selection, the number of items to be saved is shown in the Save x item(s) button.
Make sure all required items are selected to ensure successful import of the module.
-
- When you have specified the destination and selected the items to be saved, click Save x item(s).
Saving modules examples
Saving without labeling
Whilst the recommended method for saving makes use of labels, you can save selected assets without the use of labels. For example, to save just the business rules and no other items you:
- Select the file to save to
- Check Business rules in the list of items to save and all listed rules are selected
- Click Save x item(s)
In this case, no dependencies are saved, and there would be no guarantee that the rules would function if loaded into a different SmartSpace installation.
Note: You cannot use the .ssc extension to save modules containing only rules.
Saving all items
You can save all available items by:
- Selecting the file to save to
- Clicking Select All
- Clicking Save x item(s)
Saving a web form and all dependencies by using a label
With the use of labels, as the following example shows, all dependencies can be identified and (optionally) selected to build a meaningful collection of assets into a module. Here, a form that lists products ready for dispatch to a selected country is to be saved.

First a label is created and is dragged onto the name of the form:

The label is added to the SUGGESTED LABELS column for the following related assets:
- The search on which the form is based
- The types and properties used in the search
- The roles to which the screen and form have been assigned
Additionally, the names of the objects used in the search filter, here a list of countries for selection when the form displays, are available for saving. This is because the Country type has only a name property and inherits an enumeration type. See Assets that can be included in a module
Pressing Ctrl+A and clicking Add suggested labels to selected items adds the label to all the identified items. Note that nothing has as yet been selected for inclusion in the module. The most reliable way to ensure all labeled items are selected is to use one of the filters. Drag the despatch label into a filter:

The list of items now shows only those items with the corresponding label:

Clicking Select all and then Save 19 items adds all the required assets to the module.
Saving a module with space properties
The following example shows how a module that includes types with space properties and a containment relationship requires a little more work to ensure all dependencies are identified and included in a module.
In TYPES / OBJECTS, the Product and Workspace types each have an extent property:

In SPATIAL PROPERTIES, specific spaces have been defined for the area of each workspace, a default space has been created for the product type, and a request to monitor their spatial relationship has been defined. (See Spatial properties for further information.)
A complex property is defined for the spatial relationship between the two types:

A business rule then makes use of the complex property:

To create a module containing this rule and all dependencies, in BUSINESS RULES with the rule loaded, click Save. Creating a label and dragging it onto the business rule and then clicking Add suggested labels to selected items results in dependencies being identified. These are shown filtered by their label below:

Missing from the items identified for saving are extent of 'Product' and extent of 'Workspace'. The easiest way to ensure these properties are also identified is to drag the label onto the autogenerated Business rule for the 'Workspace' extent contains 'Product' extent complex property (remove the filter first). Clicking Add suggested labels to selected items again adds the label to the two properties:

Selecting all the labeled items and saving them will create a module with all dependencies satisfied.
Managing Modules from the Command Line
Before using the command-line tool, ubisense_smartspace_module_admin, label everything in Business rules, publish the labels, then use the command-line tool to manage your .ssc files in source control.
The command-line tool allows you to:
-
Save items from your dataset to .ssc files
-
Diff items from your dataset against .ssc files
-
Load items from .ssc files and sync with your dataset
-
Remove .ssc file assets from your dataset
-
Print a list of all the labels in your dataset
-
Print a list of all the assets in your dataset
-
Print a list of all the assets in your dataset without a label
You can download ubisense_smartspace_module_admin using the Ubisense Application Manager where it can be found in the DOWNLOADABLES task under Ubisense > SmartSpace core > Module admin tools.
For example, to load a module packing-bay.ssc, use the command:
C:\Ubisense>ubisense_smartspace_module_admin load packing-bay

ubisense_smartspace_module_admin (version 3.9 build 8545)
Copyright 2023-2024 Ubisense Limited, all rights reserved.
Please report any bugs to <support@ubisense.com>.
For more information visit <http://www.ubisense.net>.

> Dataset assets labelled 'packing-bay' = 1/281
> packing-bay.ssc assets labelled 'packing-bay' = 3/3
> Loading rule "packing bay" .. OK
> Applying changes .. OK
> Loaded 1 asset; 0 deprecated; 2 skipped
> Published rule and label definitions as version 50
Note: Do not include the .ssc extension of the module's filename when using ubisense_smartspace_module_admin.
To view the information about how to use the command-line tool, use the command:
ubisense_smartspace_module_admin --help
Other Import and Export Tools in SmartSpace
Other tools available for data import and export are:
- For Reporting, the ubisense_ai_config and ubisense_report_config tools can be used to import reports written by third parties. See Loading predefined reports.
- For HMIs, the ubisense_hmi_config tool enables the import and export of HMIs. See Exporting and Importing HMIs.
- For transferring LDAP and email settings, and the connection strings configured for property history, between datasets, a pair of command line tools, ubisense_ldap_and_email_export and ubisense_ldap_and_email_import, is available.
- For transferring shift patterns between datasets, a pair of command line tools, ubisense_shift_pattern_export and ubisense_shift_pattern_import, is available.
- For Paths and queues, a pair of command line tools, ubisense_path_export and ubisense_path_import, is available.
These tools can all be downloaded via the DOWNLOADABLES tab in the Ubisense Application Manager. Additional information on how to use them can be obtained by running the tool with the --help option.