Ubisense Replication
The following information guides you through the steps required to install, configure and run a simple Ubisense replication system. The system consists of a single live machine (where the platform and services are executing) and a single backup machine (which will replicate the live machine).
Installing Replication on Windows
The following provides the steps required to install, configure and run a simple Ubisense replication system on Windows. The system will consist of a single live machine (where the platform and services are executing) and a single backup machine (which will replicate the live machine).
Installing Platform
Ensure the platform software has been installed on both the system being replicated (the live system) and the replicating system (the backup system). Ensure the same version of the platform software is installed on both systems and is version 2.1.8 or newer. Ensure both systems have the required licenses installed.
On the live system, in Platform Control, the dataset setting should be set to the root directory of the Ubisense dataset. This same directory (including drive) will be used as the location of the replicated dataset on the backup system. For example, if the dataset directory on the live system is d:\ubisense\dataset, the replicated dataset directory will be d:\ubisense\dataset on the backup system. Therefore, it is important to ensure the backup system has the same hardware (drives) as the live system.
On the backup system, in Platform Control, set the dataset setting to the same as the dataset setting on the live system. Although this is not necessary for the replication to work, if the backup dataset is correctly set, it will make switching from the live system to the backup system quicker and easier if the live system fails.
See
Installing Ubisense Replication
Ubisense Replication software should be installed on both the live system and the backup system.
To install Ubisense Replication:
- Go to the servers\windows directory of your SmartSpace distribution directory.
- Double-click the UbisenseReplication.msi file and the Ubisense Replication Setup wizard appears.
- Click Next.
- Choose the Destination Folder for the software.
You can accept the default C:\Program Files (x86)\Ubisense 3 or change to another destination. - Click Next and click Install.
- When the installation is complete, click Finish to close the Ubisense Replication Setup wizard.
Set Up the Backup System
A registry setting must be set to configure the backup system. On the backup machine, set the following registry setting.
| Setting | Description |
|---|---|
|
controller_node_name |
The name of the controller. This must match the controller name on the live machine which is running the sender. The name can be any user-specified string, for example ReplicatedSystem1. The name should be unique for each live/backup setup. |
See the Registry Editor section for instructions on using the Registry Editor.
There is an optional setting that should not be set unless necessary. It will only be necessary if the default port is already in use on the backup machine. If this setting is added on the backup system, it must also be added on the live system.
| Setting | Description |
|---|---|
|
replication_receiver_port |
The port number on which the Replication Receiver is listening for connections. This parameter is optional and should not be set unless it is necessary. The default port, 9876, is used if it is omitted. This value must match the sender’s corresponding setting. |
Set Up the Live System
Three registry settings must be set to configure the live system. On the live machine, set the following registry settings.
| Setting | Description |
|---|---|
|
controller_node_name |
The name of the controller. This must match the controller name on the backup machine which is running the receiver. |
|
replication_directory |
The directory where the Ubisense platform services should write their replication information. This is effectively a temporary directory used by the replication process. An example would be c:\ubisense\replication. |
|
replication_receiver_address |
The IP address of the backup machine which is running the receiver. See Get the IP address for instructions on how to get the IP address. |
See the Registry Editor section for instructions on using the registry editor.
There is an optional setting that should not be set unless set on the backup system.
| Setting | Description |
|---|---|
|
replication_receiver_port |
The port number on which the Replication Receiver is listening for connections. This parameter is optional and should not be set unless it is necessary. The default port, 9876, is used if it is omitted. This value must match the Replication Receiver’s corresponding setting. |
Replication and Service security
If you are installing Replication and also intend to use Service security to provide authentication on your dataset, you must ensure that you have identical copies of the credentials.dat file on your live machine and your backup machine.
- To achieve this, after you have generated the credentials.dat file on the live machine, copy the file from the root dataset folder of the live machine to the root dataset folder of the backup machine.
For further information on installing and configuring Service security, see Ubisense Security Manager or the SmartSpace Ubisense Architecture: Schema Security guide.
Starting Replication
There are two methods for starting replication:
- Using the UbisenseFailover application to control the starting and stopping of replication services. This is the preferred method of operation.
- Manually starting the backup and live systems.
Using Failover to Control Replication Services
See
Manually Starting Replication
Manually Starting the Backup System
On the backup machine, start a command prompt with system administrator privileges. See Command Prompt with System Administrator Privileges for instructions on how to start a command prompt with system administrator privileges.
- Change directory to the location where the Ubisense Replication software was installed, most likely one of
- C:\Program Files (x86)\Ubisense 3\bin
- C:\Program Files\Ubisense 3\bin
- Enter the following command to start the replication service on the receiver.
ubisense_native_services -r
After running the command, the following should be displayed.
UbisenseReplicationReceiver 3 started

   Service                          Status
   ~~~~~~~                          ~~~~~~
   UbisenseServiceController 3      not running
   UbisenseCoreServer 3             not running
   UbisenseSiteConnectorClient 3    not installed (or not running)
   UbisenseReplicationSender 3      not running
   UbisenseReplicationReceiver 3    running
Manually Starting the Live System
On the live machine, start a command prompt with system administrator privileges. See Command Prompt with System Administrator Privileges for instructions on how to start a command prompt with system administrator privileges.
- Change directory to the location where the Ubisense Replication software was installed, most likely one of
- C:\Program Files (x86)\Ubisense 3\bin
- C:\Program Files\Ubisense 3\bin
- Enter the following command to start the replication service on the sender.
ubisense_native_services –c –t –s
After running the command, the following should be displayed.
UbisenseReplicationSender 3 started

   Service                          Status
   ~~~~~~~                          ~~~~~~
   UbisenseServiceController 3      running
   UbisenseCoreServer 3             running
   UbisenseSiteConnectorClient 3    not installed (or not running)
   UbisenseReplicationSender 3      running
   UbisenseReplicationReceiver 3    not running
Checking the System is Working
To check the system is working, start the Ubisense Replication Service Monitor. This can be found where the Ubisense Replication software was installed, most likely one of:
- C:\Program Files (x86)\Ubisense 3\bin
- C:\Program Files\Ubisense 3\bin
Double-click UbisenseReplicationMonitor.exe to start the application.
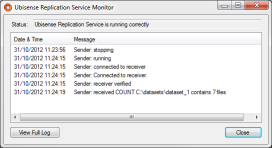
If the replication system is working correctly, the status will show Ubisense Replication Service is running correctly. You should also be able to see directories and files being stored in the dataset directory on the backup system, although this may take a little time to complete.

If the replication system is not working correctly, the status will show Ubisense Replication Service is NOT running correctly. If this is the case, the messages should be checked to find the cause of the problem.
Switching to the Backup System
If the live system fails for some reason, the backup system must take over. It is possible to do this manually but the preferred method of switching to the backup system is to use the Ubisense Failover application. See Ubisense Failover for further information on installing and configuring Failover.
Installing Replication on Linux
The following provides the steps required to install, configure and run a simple Ubisense replication system on Linux. The system will consist of a single live machine (where the platform and services are executing) and a single backup machine (which will replicate the live machine).
Installing Platform
Ensure the platform software has been installed on both the system being replicated (the live system) and the replication system (the backup system). Ensure the same version of the platform software is installed on both systems and is version 2.1.8 or newer. Ensure both systems have the required licenses installed.
On the live system, the dataset setting should be set to the root directory of the Ubisense dataset. This same directory will be used as the location of the replicated dataset on the backup system.
On the backup system, set the dataset setting to the same as the dataset setting on the live system. Although this is not necessary for the replication to work, if the backup dataset is correctly set, it will make switching from the live system to the backup system easier if the live system fails.
See SmartSpace Installation for further information on installing the server software.
Installing Ubisense Replication
Ubisense Replication software should be installed on both the live system and the backup system.
There is no installation package for Linux. The ubisense_replication_sender and ubisense_replication_receiver should be copied to the live and backup machines, as required.
Set up the Backup System
A configuration setting must be set to configure the backup system. On the backup machine, set the following setting in the platform.conf file which is normally found in /etc/Ubisense.
| Setting | Description |
|---|---|
|
controller_node_name |
The name of the controller. This must match the controller name on the live machine which is running the sender. The name can be any user-specified string, for example ReplicatedSystem1. The name should be unique for each live/backup setup. |
There is an optional setting that should not be set unless necessary. It will only be necessary if the default port is already in use on backup machine. If this setting is added on the backup system, it must also be added on the live system.
| Setting | Description |
|---|---|
|
replication_receiver_port |
The port number on which the receiver is listening for connections. This parameter is optional and should not be set unless it is necessary. The default port, 9876, is used if it is omitted. This value must match the sender’s corresponding setting. |
Set up the Live System
Three configuration settings must be set to configure the live system. On the live machine, set the following settings in the platform.conf file which is normally found in /etc/Ubisense
| Setting | Description |
|---|---|
|
controller_node_name |
The name of the controller. This must match the controller name on the backup machine which is running the receiver. |
|
replication_directory |
The directory where the Ubisense Platform Services should write their replication information. This is effectively a temporary directory used by the replication process. An example would be /home/ubisense/rep. |
|
replication_receiver_address |
The IP address of the backup machine which is running the Replication Receiver. |
There is an optional setting that should not be set unless set on the backup system.
| Setting | Description |
|---|---|
|
replication_receiver_port |
The port number on which the receiver is listening for connections. This parameter is optional and should not be set unless it is necessary. The default port, 9876, is used if it is omitted. This value must match the receiver’s corresponding setting. |
Replication and Service security
If you are installing Replication and also intend to use Service security to provide authentication on your dataset, you must ensure that you have identical copies of the credentials.dat file on your live machine and your backup machine.
- To achieve this, after you have generated the credentials.dat file on the live machine, copy the file from the root dataset folder of the live machine to the root dataset folder of the backup machine.
For further information on installing and configuring Service security, see Ubisense Security Manager or the SmartSpace Ubisense Architecture: Schema Security guide.
Starting the Backup System
On the backup machine, change to the directory where the replication files were installed. Enter the following command to start the replication service on the receiver.
ubisense_replication_receiver &
Alternatively, the service can be started and stopped as any other service, for example with an init.d script. The service can be started as daemon by providing the –d command line argument.
Starting the Live System
On the live machine, change to the directory where the replication files were installed. Enter the following command to start the replication service on the sender.
ubisense_replication_sender &
Alternatively, the service can be started and stopped as any other service, for example with an init.d script. The service can be started as daemon by providing the –d command line argument.
Checking the System is Working
The Linux services produce the same error and progress messages as the Windows services (except for the omission of Windows-specific messages). The Linux services log their messages to syslog. On most Linux systems /etc/syslog.conf will indicate where syslog output is written to. For example, on some systems, it is written to /var/log/messages. In this case the most recent messages can be seen, as they arrive, with the following command:
tail –f /var/log/messages
Switching to the Backup System
If the live system fails for some reason, the backup system must take over. It is possible to do this manually, as described below, but the preferred method of switching to the backup system is to use the Ubisense Failover application. See for descriptions of failover in use.
To manually switch to the backup system, on the backup machine, stop (kill) the ubisense_replication_receiver process and then start the core server and local controller by entering the following commands.
/etc/init.d/ubisense_core_server start
/etc/init.d/ubisense_local_control start
Registry Editor
The following give instructions on how to add and edit Ubisense registry settings.
Ubisense registry settings are stored under one of:
-
HKEY_LOCAL_MACHINE\SOFTWARE\WOW6432Node\Ubisense 3\Config
-
HKEY_LOCAL_MACHINE\SOFTWARE\WOW6432Node\Ubisense 2.1\Platform\Config
- Start the registry editor. (Click start, type regedit.exe, and press Enter).
- In the tree on the left, from the top, expand HKEY_LOCAL_MACHINE, then expand SOFTWARE, and so on down the tree until you select Config.
-
With the registry editor open and config selected in the tree on the left, the registry settings are displayed in the panel on the right.
- To add a new setting, select the “Edit” menu, select “New” and select “String Value”. A new value will appear in the panel on the right and the value's name is being edited. Enter the name of the setting (e.g. controller_name_node).
- To edit a settings value, select the setting in the panel on the right. Select the “Edit” menu, then select “Modify…”. This will display an editor window where the setting can be edited. Type in the setting value (e.g. ReplicationSystem1) and press Enter. The registry setting has now been set.
Get the IP address
The following give instructions on how to get the IP address of a Windows PC.
- Start a command prompt. Click start, then type command and press Enter.
- Enter the command ipconfig and press Enter.
- For the output of this command, look for the section “Ethernet adapter Local Area Connection”. Find the line that starts with IPv4. The end of the line will be four numbers like 12.34.56.78. This is the IP address. See the example output below where the IP address is highlighted.
Windows IP Configuration
Ethernet adapter Local Area Connection:
   Connection-specific DNS Suffix  . : ubisense.local
   Link-local IPv6 Address . . . . . : fe80::d529:b237:e3e8:ec43%13
   IPv4 Address. . . . . . . . . . . : 10.42.5.126
   Subnet Mask . . . . . . . . . . . : 255.255.0.0
   Default Gateway . . . . . . . . . : 10.42.1.1
Command Prompt with System Administrator Privileges
The following give instructions on how to start a command prompt with system administrator privileges.
In Windows, click Start, then type command. At the top of the list being displayed you should find “Command Prompt”. Right click on “Command Prompt” and select Run as administrator.