Ubisense Security Manager
This document describes the security techniques used to protect Ubisense services from unauthorized data access and unauthorized modification.
The document introduces the protocols relevant to security in a Ubisense system, and the protection levels that can be given to individual Ubisense schemas; it then outlines how the Ubisense encryption and key exchange protocols work to protect the Ubisense protocols.
The document then goes on to outline how the basic protection levels can be combined with a conventional role-based security model to achieve a flexible and configurable security schema for a complete system.
Ubisense schema protocols
As described in
Remote Operations Protocol
The remote operations protocol provides a mechanism for a schema to expose an interface to external clients. This interface is primarily used to modify data managed by the schema; it is also possible to query the schema’s data via a remote operation, but in practice this is achieved by using the event channel protocol.
For more information on the remote operations protocol, see
Event Channel Protocol
The event channel protocol distributes data from schemas to consumers of schema data in an efficient and low-latency manner. It only permits read access to the data in a schema; there is no mechanism to modify data using the event channel protocol.
For more information on the event channel protocol, see Ubisense Architecture and Protocols, which includes a detailed description and diagram showing the protocol message sequence.
Schema security and integrity
Ubisense schemas can be given one of three protection levels. These protection levels are achieved by encrypting the two different protocols introduced above.
Open Access
When a schema is given open access, the schema uses no encryption or authentication. Any network user can read and update the schema. This level is suitable for a schema that contains no secure data, and whose contents should be modifiable by any user.
Update Protection
When a schema is given update protection, the event channel protocol is not encrypted, but the remote operations protocol is encrypted and requires authentication. This is a useful model when only the modification of schema data should be protected; it is typically used when the schema contains no secure data, but its contents must be protected against unauthorized modification.
Full Protection
When a schema is given full protection, the event channel protocol and the remote operations protocol are both encrypted and require authentication. This model is typically used when the schema contains secure data, which must not be viewed by any unauthorized user.
Encryption and authentication protocols
Encryption
When a protocol is configured to use encryption, the data sent over the network is obscured to make it unreadable by clients that do not have the keys required to decrypt it. It is also impossible to send meaningful protocol traffic without the keys required to encrypt it.
The Ubisense platform uses the Advanced Encryption Standard (AES) cipher with 128 bit keys. The keys are distributed to clients through the authentication process (see below).
The Ubisense platform implementation of AES uses the AES library from Dr Brian Gladman – an open source AES implementation available at https://github.com/BrianGladman/aes.
The data encryption keys used by the services change each time services are restarted.
Authentication and Key Exchange
For the key exchange process, an implementation of the AMP standard (four-pass) is used, as described in IEEE P1363.2 (see http://grouper.ieee.org/groups/1363/). The AMP protocol is a password-authenticated key agreement method, which allows two parties to establish cryptographic keys based on their shared knowledge of a secret, without ever needing to exchange the secret itself. The parties both create a large secret integer by using the
In the Ubisense authentication process AMP is used to establish a one-time key for an AES-128 channel, which is then used to transmit the data encryption keys for the encrypted protocol (which will be either the event channel or the remote operations protocol).
Schema security model
Ubisense supports a multi-level role-based security model in which:
- a user can be a member of one or more groups
- a user’s group membership can vary across cells, to support high and low security areas
- groups have a hierarchy – i.e. membership of one group can imply membership of another
- groups are assigned permissions for accessing schemas
The configuration data for this model is managed centrally by the Ubisense schema UPerm::Config and stored in the data file UPerm%Config.udata on the server.
Cells
The Ubisense platform is based on a cellular architecture, where each cell covers some area of a site or sites. Each cell has a number of schema services running on it that implement the state and functionality required for that type of cell.
Users
A user has a name and a password as credentials. When a client authenticates with a schema service it must provide a matching set of credentials that have the appropriate permission on that service. When a user is created, the corresponding password is encrypted before storage in the UPerm%Config.udata file.
Permissions for a user are defined by the groups of which they are members.
There is a user called default, which represents an unauthenticated user. If required this user can be deleted.
Groups
A group is a set of users to which permissions can be assigned for accessing schema services. A group is assigned a given permission for schema services underneath a given cell.
A group can also imply another group, so users that are members of a group are also members of all implied groups.
A group has an associated description, and this is the text that is used to prompt the user when a login is required. The login dialog starts with a line indicating which groups can be used to allow the action that is being attempted. This line is formed from the set of group descriptions that have the required permission for the action. Hence it is important to provide a group description of the form [indefinite article] [noun], for example, "an administrator" or "a power user".
Assignment of Users to Groups
A user is assigned to groups underneath a given cell. This allows the administrator to partition the platform spatially so that different parts of the site are accessible for different sets of users. To assign a user a group across the entire site, use the Site cell.
Schema Permission Rules
As described in Schema security and integrity, schemas have three protection modes: open access, update protection or full protection.
A group of users can be assigned a set of permission rules. Each rule consists of:
- A module and schema, which may be "default" to indicate all modules and schemas for which the group has not been assigned any other permission
- The access rights for that module and schema, which may be "read only" or "update"
The "read only" permission allows the user to access the data in instances of the schema, and to receive notification of changes to the data. The "update" permission allows the user to access data, receive notifications, and to call operations on instances of the schema.
Permissions for a module, schema and group have the following order of precedence:
- Permissions for the exact module and schema for the group.
- Permissions for the exact module, and default schema for the group.
- Permissions for default module and default schema for the group.
- none
Note that a rule with default module but exact schema is not used, and will be ignored.
How to set up a simple security policy in Security Manager
In this section we set up a simple example security policy to illustrate the practical application of the security features in Ubisense. This policy will prevent modification of any configuration data used by the DIMENSION4 sensor system; every user will be able to view data, but only administrators will be able to modify it.
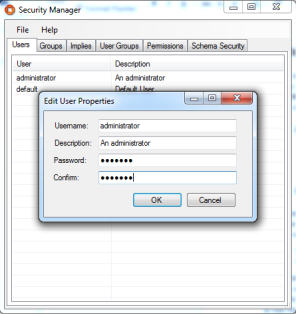
Create an Administration User and Restrict Admin Rights to It
Using the “Users” tab in the Ubisense Security Manager tool, create a new user called “administrator” which will have administration rights.
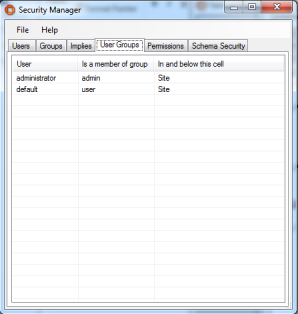
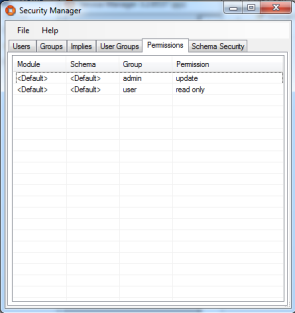
Then using the “User Groups” tab, ensure that the “administrator” user is the only user to be in the group “admin”, and using the “Permissions” tab ensure that only admin users have the update permission by default:
Cache Administration Credentials for Services
In general Ubisense services may require special permissions to ensure that they can still operate together with other Ubisense services to invoke operations in ways guaranteed correct by the specifications of those services. Considering the example of DIMENSION4 configuration, we can see why this is valuable. There will be important reasons why sensor configuration might be updated by other Ubisense services. For example, the “Location sink registration” service seamlessly connects DIMENSION4 RTLS to the SmartSpace software platform by looking for advertised location sinks for each location cell and enters their IP addresses into the sensor configuration, so that sensors send their data direct to those sink addresses; if it were not able to set the location sink address configuration then this would need to be done manually by an authenticated user.
This special treatment for services is achieved by caching service credentials in a file which can be read by services but not by other users. The location of the file depends on the platform:
- On Windows it is credentials.dat in CSIDL_LOCAL_APPDATA for the user SYSTEM
- On Linux it is credentials.dat in the root of the dataset directory
To cache service credentials, use the program ubisense_cache_service_credentials that is distributed in the tools folder of the software distribution. On Windows it will generate a dialog – enter the relevant username and password, and the corresponding credentials will be stored in the locations described above.
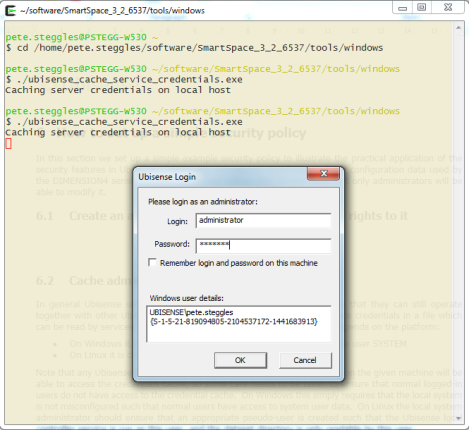
Ubisense services on that machine will now all be able to run with admin privileges.
Authentication using Cached Service Credentials on Linux
If you are running on a Linux server and configure a security policy in Security Manager that requires services to authenticate as a user, using ubisense_cache_service_credentials, then you must run the core and controller software with the -d flag. Otherwise all services will still have a connected stdin/stdout and will attempt to prompt for credentials rather than reading the cached service credentials. See your installation guide for an example.
Security Configuration for SmartSpace Web with Security Manager
If you are using a non-trivial security manager configuration to force authentication for services (as is the case for ACS installations) then you must run the ubisense_cache_service_credentials tool on the web server host. This is because the credentials.dat file created by the tool (in the latest version) allows IIS_IUSRS as a reader. Without this, the web site code cannot read the credentials, and therefore cannot connect to the platform services it needs.
For a Windows server, you must use the version of the ubisense_cache_service_credentials tool from the 3.4 sp1 distribution or above.
Service security and Replication
If you intend to use authentication on your dataset and you are also installing Replication, you must ensure that you have identical copies of the credentials.dat file on your live machine and your backup machine.
- To achieve this, after you have generated the credentials.dat file on the live machine, copy the file from the root dataset folder of the live machine to the root dataset folder of the backup machine.
For further information on installing and configuring Replication, see Ubisense Replication or the SmartSpace Replication Guide.
Add Security to the Appropriate Schema
The sensor configuration data is all controlled via the ULocationSystem / ConfigurationUpdate schema. To prevent unauthorized access to this schema, use the Schema Security tab to add a security scheme to it:
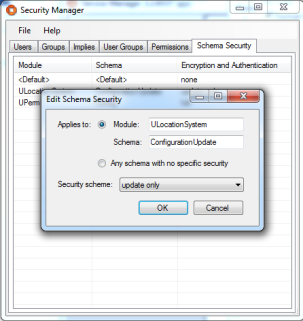
Now restart the services so that they now operate under the new security policy.
If you now run the Location System Config tool, select all the sensors and try to reboot them, you will get a dialog prompting for appropriate credentials:

If you enter the credentials correctly, the schema connection will be established and the sensors will be rebooted – the connection will continue with the same privileges for as long as the program runs.
Create other Administration Users
It is now possible to create other users and assign appropriate group memberships to them. One particularly useful case on Windows platforms is the ‘Windows-authenticated user’. On Windows platforms, when the authorization dialog comes up, it includes this information:
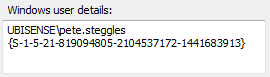
The

If the new Windows user is now given membership of the admin role, the direct login requirement will be eliminated because the credentials will now be derived from the logged-in Windows user credentials.
Compatibility of ACS version 2.7 and earlier with Windows User Authentication
There can be an authentication compatibility issue for a Ubisense platform running:
- Core and controller version 3.5.7350 and above
- Security Manager version 3.5.7350 and above
- ACS version 2.7
In this situation, if a user tries for example to open Service Manager 3, and it requests authentication, it will provide a GUID to be given to the administrator to create a Windows user. A Windows user created with this GUID will work for Service Manager 3, and for any other tools from version 3.5.7350 or later, but will not work with ACS 2.7.
To prevent this, if you create a new Windows user, it is important to do so using the authentication SID provided by the ACS 2.7 user interface, not the newer GUID provided by any other platform user interface. The newer GUID will not work to authenticate with ACS 2.7 services.