Overview of Room snapping
Room snapping eliminates through wall error where tagged objects close to the edge of a defined area are incorrectly located.
Room snapping manages the location of tags in a predefined area, called a room, by snapping them inside the room's extent until they have moved a specified distance outside it. SmartSpace achieves this by applying a room-based hysteresis to adjust tag locations. Hysteresis defines the radius around the tag location that must be completely outside a room’s extent for the tag to leave a room. With Room snapping operational, tag locations remain snapped to the room they are in until either they move outside the room by a distance greater than that defined by the room's hysteresis or they move into a defined area, called a doorway, where snapping for a tag is disabled. Thus doorways allow you to define valid routes for tags to move between rooms.
Rooms and doorways are contained in a building of which at least one must be defined. Whilst you can use a single building only, it is best practice to create several buildings to isolate areas where room snapping is active from ones where it is not used or to separate different areas within a room snapping scheme where there are no connecting doorways. In normal use each physical building will have a corresponding building object in the room snapping configuration.
Room snapping requires you to configure objects and their extents based on the following Ubisense types:
- Room: an area with a perimeter wall/boundary, within which tag locations are snapped
- Doorway: an area where tags can move between/exit rooms. Doorway extents can overlap rooms
- Building: used to group doorways/rooms together. All rooms and doorways must be contained in a building
You can control how far inside the extent of a room objects are snapped by defining spacing. This also eliminates the possibility of tags being located inside walls.
Requirements
You will need SmartSpace 3.3.6854 or later with a license for Location rules.
Installing Room snapping
To install the Room snapping feature:
- Make sure that the SmartSpace platform includes a license for
- Install the Room snapping feature using Service Manager.
Note: Room snapping needs real tag locations from sensors in order for objects to snap to rooms in SmartSpace Config. If you do not have real tag locations, follow the steps below to see the effect of Room snapping without using real tag locations.
For further information, see SmartSpace Installation.
Configuring Room snapping
The following steps describe how to configure Room snapping using the SmartSpace Config application.
-
Create the room snapping objects. You will need to define:
- Room instances for each snapped area
- Doorway instances where snapping is disabled
- At least one building instance to contain the rooms and doorways
In TYPES / OBJECTS, drag out the snapping type into the right-hand pane. In the dialog, double-click <Create new object> and enter the name of the snapping object. Click Save.

Creating a snapping object
Do the same for every room, doorway and building in your room snapping scheme. You can create all the snapping objects of the same type by typing the name of each one on a new line in the create objects dialog:

Example of adding several rooms
For more information on creating new objects, see
-
After you have created the objects, you need to define their extents. For each snapping object, in the SPATIAL PROPERTIES tab, select the snapping type and the Extent spatial property. Under Specific Spaces double-click <Create new specific space> and select the area you are creating in Choose an object, then use Shift + left mouse to place points for the boundary of the extent. Ensure that Stationary is selected as the type of shape. Click Save.

Adding a room extent
-
When configuring extents for doorways, you should keep the following in mind:
- Doorway extents can overlap room extents or be distinct. When there is an overlap, the doorway will supersede the room (as if the room extent had the doorway extent cut out of it).
- Doorway extents should be large enough so that whenever a tag moves between rooms via this doorway, it is seen in the doorway extent.
- Doorway extents should be as small as possible, while still satisfying the above criteria, to reduce the chances of tags changing rooms incorrectly.
-
Doorway extents need to account for sensor inaccuracies near doorways.
- Inaccuracies can be identified by walking the perimeter of each room with a tag, past the doorway, and reviewing the raw location path.
-
If locations jump into the wrong room immediately after leaving a doorway, the tag will get snapped to the wrong room. Assuming the doorway extent is already as small as possible and this area of inaccuracy cannot be avoided, the extent will need to be extended to include the inaccurate area to avoid cases like the following.
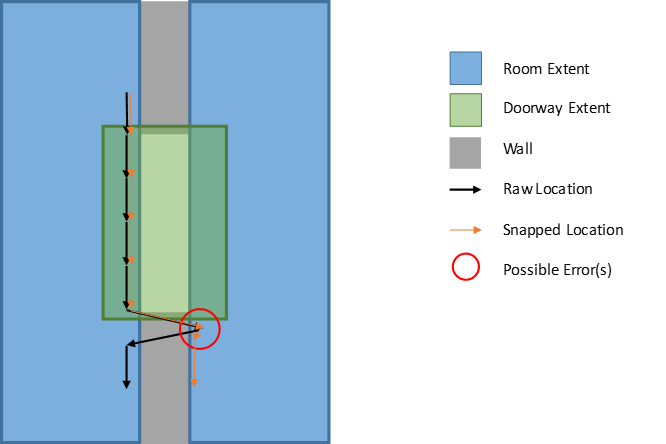
In this case, the doorway should cover the entire area of "room uncertainty", and will need to be extended down.
-
To ensure buildings are defined correctly, in the OBJECT PLACEMENT tab select Building extent contains Doorway extent and Building extent contains Room extent in Show spatial relationships. The extents of your room snapping objects are displayed in the workspace.

Checking rooms and doorways are contained within a building
In the example above, a single building has been defined along with a number of rooms and doorways. The extents that satisfy the selected spatial relationships are highlighted in blue; the one room that is not completely contained is shown in brown and will need its spatial extent correcting in the SPATIAL PROPERTIES tab.
-
Configure parameters for the rooms in the SERVICE PARAMETERS tab.
The following parameters are available for the Room snapping:
- hysteresis: The maximum swappable distance. Tags seen more than this distance away from the room are considered to have left the room and will not be snapped to it, even if the tag was not seen leaving through a doorway.
- spacing: The perimeter spacing or wall thickness of a room. Snapped locations are placed this distance inside the perimeter of your room extents. This avoids tags being located in walls.

Parameters for Room snapping
- When room snapping is configured, locations sent to the location cells will be the (possibly) snapped locations. You can view these locations in the OBJECT PLACEMENT tab in SmartSpace Config or, if licensed, in Web maps.
-
If you are running the Location System services and have access to location logging, the locations seen in the event viewer will be raw, unsnapped locations. To log snapped locations,
Room snapping without tag locations
Room snapping uses the data from the location sink, the part inside location cells that receives location events from sensors, which then allows Room snapping to filter the locations of tags as they come in from sensors and attempt to snap those tag locations.
If you are not using real tag locations in your data model, you will not see the effect of Room snapping in SmartSpace Config. To see the effect of Room snapping without tag locations, you need to enable the room_snapping_test_mode parameter. When room_snapping_test_mode is enabled, the location sink is applied to locations of tags being set inside SmartSpace Config. The room_snapping_test_mode parameter takes the location of a tag that has already been set and feeds it through the snapping algorithm to the location of another tag with the ID that is generated by adding FF to the beginning. For example, whenever tag 00:00:00:01 is located, tag FF:00:00:01 will be located as well. The FF tag will then be snapped to the room through this algorithm, while tag 00:00:00:01 will continue to move without snapping.
To enable the parameter, you need to add "ubisense_configuration_client.exe" to your path.
Once "ubisense_configuration_client.exe" is in your path, open PowerShell and run the following command:
To remove room_snapping_test_mode, run the following command and restart Location Cell data:
After setting or removing the parameter, you must restart Location Cell data in Service Manager.

Creating a New Object
With room_snapping_test_mode enabled, you need to create a new object to represent the object you want to see snap to a room. This new object will have a new tag, with FF added to the beginning of the ID, associated to it.
-
Create a new object to represent the object you wish to apply Room snapping.
-
Assign your new object to a tag with an ID beginning with 'FF'. The rest of the tag ID should match the original tag ID.

In this example, whenever tag 00:00:00:01 is located, tag FF:00:00:01 is also located. You will now see the effect of Room snapping on the object associated to tag FF:00:00:01.