Users and roles
Use the Users and roles workspace to create and manage roles and their associated permissions, and to associate users, groups and email addresses with them. For a detailed explanation of users and roles in SmartSpace,
With the licensing of the Visibility component, authorized users can manage users and roles using the browser-based
The Users and roles workspace
The Users and roles workspace is a configuration interface for creating roles, adding members to those roles and assigning the searches, editable properties and views visible to the members of a role.
Click on USERS / ROLES to display the workspace.

The workspace is divided into three main areas which are described in the following sections:
A list of roles currently available in SmartSpace is displayed.
- Clicking on a role name displays the users currently assigned to the role
- Double-clicking <Create new role> allows you to create a new role and give it a name. See Adding a New Role
A list of users, roles and groups that are currently assigned to the role.
- Double-clicking <Add new member> allows you to add a new member to the role. See Adding Users, Groups, Roles and Email Addresses to a Role.
Three tabs are available for Searches, Properties and Views. See Access Control Management for further information.
Searches
- Clicking Searches displays a list of available searches on the left-hand side with those searches currently assigned to the role on the right.
- Dragging a search from the left-hand list into the right-hand list adds it to the role.
- You can delete a search from the role by selecting it in the right-hand list and pressing Delete.
Properties
- Clicking Properties displays a list of available properties.
- Double-clicking a property allows you to specify if and how a role can interact with that property. See Making properties editable by roles for further information.
Views
- Clicking Views displays a list of available views on the left-hand side with those currently assigned to the role on the right.
-
Dragging a view from the left-hand list into the right-hand list adds it to the role.
- You can delete a view from the role by selecting it in the right-hand list and pressing Delete.
Working with users and roles
Adding a New Role
To add a new role in the Users and roles workspace:
- Double-click <Create new role>.

- Give the role a name and click Create. The new role is added to the list of existing roles.
Default Roles
SmartSpace is supplied with the following roles which control access to different parts of SmartSpace Web:
- System.Operator: members of the System.Operator role can access the Tag and Battery Status screen and the Sensor Status screen.
- System.Manager: members of the System.Manager role can access the Roles screen and the Shifts screen.
- Ubisense.SmartSpace.Administrator: if Reports engine developer is licensed, members of the Ubisense.SmartSpace.Administrator role can view all reports and create and edit new ones.
These roles are nested: System.Manager is a member of System.Operator; and Ubisense.SmartSpace.Administrator is a member of System.Manager. This means that the permissions are inherited so that by default the different roles can access screens in SmartSpace Web as follows:
| Report Creation | HMI Creation | Roles | Shifts | Tags | Sensors | |
|---|---|---|---|---|---|---|
| System.Operator |
|
|
|
|

|
|
| System.Manager |
|
|
|
|
|
|
| Ubisense.SmartSpace.Administrator |
|
|
|
|
|
|
From SmartSpace 3.7, additional default roles are available that enable finer control of access to different parts of SmartSpace Web including the Automated tag association feature from Location rules. These new permissions do not change the System.Operator, System.Manager and Ubisense.SmartSpace.Administrator roles. The additional roles are organized as follows:
| Role | Has members... | Allows you to... |
|---|---|---|
| System.Web.AssociationAdmin | System.Operator |
|
| System.Web.AssociationViewer | System.Web.AssociationAdmin | View the Association screen in SmartSpace Web |
| System.Web.HMIAdmin | Ubisense.SmartSpace.Administrator | Create HMIs, and add roles to control access |
| System.Web.ReportAdmin | Ubisense.SmartSpace.Administrator | Create reports and their constituent parts, add roles to reports |
| System.Web.RolesAdmin | System.Manager |
|
| System.Web.RolesViewer | System.Web.RolesAdmin | View roles |
| System.Web.SensorsAdmin | System.Operator |
|
| System.Web.SensorsViewer | System.Web.SensorsAdmin | View the status of sensors |
| System.Web.ShiftsAdmin | System.Manager |
|
| System.Web.ShiftsViewer | System.Web.ShiftsAdmin | View shifts, shift patterns, and overrides |
| System.Web.TagsAdmin | System.Operator |
|
| System.Web.TagsViewer | System.Web.TagsAdmin | View the Tags screen in SmartSpace Web |
Adding Users, Groups, Roles and Email Addresses to a Role
To add groups from a connected directory service, ensure that you have first configured a connection as described in Directory services.
To add a new user, group or role to a role, select the role and then double-click <Add a new member>.

You can only select the Send notification emails and Display notifications on map check boxes if you are adding a group to the role.
This is the expected behavior.
Notifications are generated when you use the Notify action in the Business rules engine.
Notify accepts several different inputs:
- Named user
- Email address
- Group name
For the first two, notify generates a web map popup or an email notification respectively. It’s obvious what is being requested at the rules engine level because of the type of input.
Groups, however, could contain both users and email addresses, so you have to tell the system if you want one or both (maps notifications and emails) explicitly. Otherwise you run the risk of sending alert emails to everyone in an active directory group when all you wanted was popups on the web map.
Managing Roles and Members
Editing the membership of roles is a matter of adding new members in the same way as described in Adding Users, Groups, Roles and Email Addresses to a Role. You can delete existing members by selecting them in the members list and pressing Delete.
Roles can be added as described in Adding a New Role or removed by selecting them in the roles list and pressing Delete.
Access Control Management
Access control for roles determines what users are allowed to see and do with features of the SmartSpace web, including which searches they can see, which properties they can edit, and which views are used to return located objects to the web map.
Adding searches to roles
You can add searches in different combinations to the roles that you have configured. To add searches that have been defined in the Web searches workspace (see Configuring web searches), drag them into the Search list owned by the currently selected role.

Making properties editable by roles
You can define how users interact with the value in a property by assigning editable properties to one or more roles. All other properties returned by a search or on web form will be view only. To define how a role can interact with a property, select the role from the Role list and double-click the name of a property.
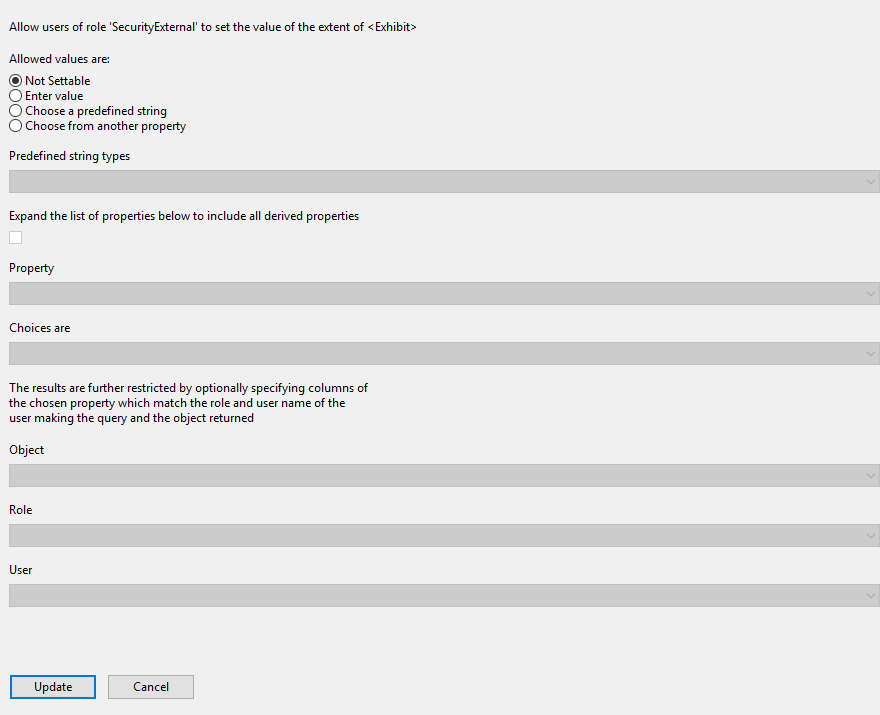
Depending on the type of access you wish to give the role, enter the required information and click Update to save the details.
If a property is not settable by a role, members of the role can view, but not edit, the value of the property. This is the default for all properties.
If members of a role are allowed to enter a value for the property, click Enter value.
If members of a role can choose from a list of predefined values, click Choose a predefined string and choose from the list of string types that becomes available.
If members of a role can choose from a list of values taken from a different property to the one they are editing, click Choose from another property.
- Property: choose the property from which the value can be chosen.
- Choices are: which column from the property should be used to get the values offered as choices
- Additional constraints: you can further restrict the values by choosing Object, Role and User.
Adding views to roles
You can define regions of your site that can be viewed by the different roles you have configured. You use areas of your site that have been defined using the Cells workspace (see Cells for further information) and these are displayed in the list of views. To configure views, drag them into the Views list of the currently selected role.
