Ubisense Tool Tags
UbisenseTool Tags are small, sturdy devices that you can attach to tools such as torque wrenches.
When you attach a Tool Tag to a tool, depending on your system configuration and environment, you can locate the tool to an accuracy of 15 cm in 3D in real-time. You can use Tool Tags in different types of environments, including industrial sites.
Types of Tool Tags
Ubisense supplies the following types of tool tag:
-
Integrated Tool Tag (D4TAG30TOOL-INT): A Battery Unit and Head Unit are combined in a strong casing
-
Head Unit Tool Tag (D4TAG30TOOL-HD): The Head Unit is supplied with a micro-USB B socket for connection to a suitable power bank or device
-
Cabled Head Unit Tool Tag (D4TAG30TOOL-EXT): The Head Unit is supplied with 0.5m cable terminated in a micro-USB B plug for connection to a suitable power bank or device
Features of Tool Tags
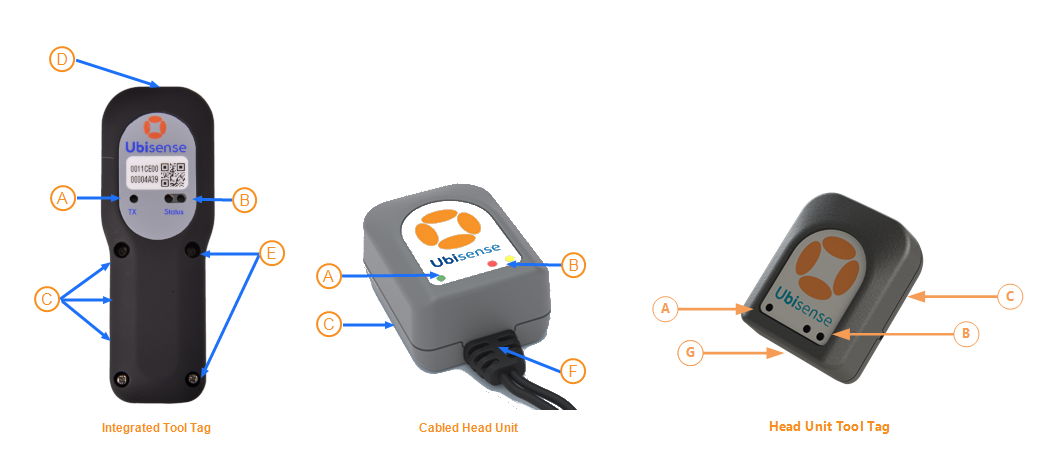
The features of the Integrated Tool Tag, Cabled Head Unit Tool Tags and the Head Unit Tool Tag are shown in the following figures.

Features of Tool Tags
| Feature | Description |
|---|---|
|
A. Power LED (yellow) |
Indicates that the tag is receiving power and is communicating with the DIMENSION4 Real-time Location System. |
|
B. Programmable LEDs (green and red) |
By default, these LEDs are not used. |
|
C. Strapping Slots |
You can mount Tool Tags by using straps. The strap apertures have the following dimensions:
|
|
D. Power Cord Connector |
The Integrated Tool Tag has a micro USB power cord connector on the top. This cord connector is used for transferring power to the Head Unit. |
|
E. Philips Head Screws |
Screws that connect the body of the tag to its front case. |
| F. Micro-USB Cable | The Cabled Head Unit Tool Tag comes with a 0.5 m cable terminated with a micro USB B plug used for transferring power to the unit. |
| G. Micro-USB socket | The Head Unit Tool Tag has a Micro-USB B socket for connection to a suitable power bank or device |
Preparing a Head and Battery Unit Tool Tag
Activating an Integrated Tool Tag
The Integrated Tool Tag includes a battery. To reduce the loss of battery life, the tag is supplied in the deep sleep (deactivated state). For activation you need a paper clip or a screwdriver to access a button inside the tag.
To activate the tag, insert the paper clip or screwdriver into the slot on the side of the tag and hold it there for more than three seconds. See the following figure for the location of the slot.

The yellow LED on the head unit slowly increases in brightness, indicating that the tag has been activated. After a few seconds the LED starts flashing to indicate that it is communicating with the DIMENSION4 Real-time Location System.
Checking that a Tool Tag is Activated
To check that a Tool Tag has been activated, insert a paper clip or wire on the side of the unit for less than 3 seconds.
If the LED is constantly lit when you press the button, the tag is still in the deep sleep (deactivated) state. Repeat the process described above to activate.
Putting a Tool Tag into Deep Sleep
If a Tool Tag is activated, you can put it back into the deep sleep state at any time to preserve the battery.
To put the tool tag into deep sleep you need a paper clip or a screwdriver to access the button inside the tag.
-
Insert and hold a paper clip or screwdriver into the slot on the side of the tag, shown in the following figure.

- The LED first stops blinking in readiness for the first challenge. It then starts blinking again.
- Count the number of times the LED blinks brightly. This can be from one to five blinks.
- Using the paper clip or screwdriver, press the button on the tag the same number of times.
- Carry out the second challenge:
- Count the number of times the LED blinks brightly.
- Using the paper clip or screwdriver, press the button on the tag the same number of times.
-
If you are successful, the LED blinks brightly and switches off. The tag is now deactivated.
If you are unsuccessful, the green LED on the tag will continue to blink at a lower intensity, at the programmed UWB beacon rate.
Replacing the Battery of an Integrated Tool Tag
Tag parameters are retained when the power source is removed from the tag.
Tool Tags are supplied with a connectorized A-size 3.6 V battery (Part number: TOOLBAT). Tool Tags regularly report their battery status to the DIMENSION4 Real-time Location System through the UWB Sensors.
To replace the battery in an Integrated Tool Tag:
-
Remove the screws on the front cover of the tag.
-
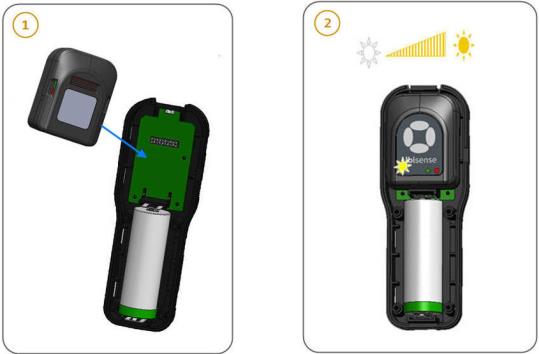
Remove the old battery by unplugging the battery connector. Insert a new battery, and then plug the connecter into the battery socket, as shown in the following figure.

Replacing Battery of an Integrated Tool Tag
-
Replace the front cover of the tag by fixing the screws. The yellow LED on the tag gradually lights up to indicate that it is working correctly. The DIMENSION4 Real-time Location System can then find the location of the tag.
If the LED does not flash after you have replaced its battery, remove the battery and then reinsert the battery. Wait for 30 seconds.
Connecting a Head Unit to an Integrated Tool Tag
You may occasionally need to connect the Head Unit inside an Integrated Tool Tag. This requires you to detach the front cover of the tag and connect the tag correctly.
Note: Connecting the Head Unit also activates the tag.
To connect the Head Unit:
-
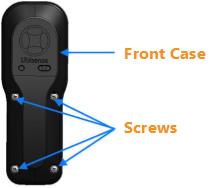
Separate the body of the tag from the front cover by unscrewing the four screws on the front case of the tag, shown in the following figure.

Front Case of the Integrated Tool Tag
-
Connect the Head Unit of the tag to the twenty-way pin connector on the printed circuit board of the tag, as shown in the following figure.

Activating an Integrated Tool Tag
The yellow LED on the head unit slowly increases in brightness, indicating that the tag has been activated. After a few seconds the LED starts flashing to indicate that it is communicating with the DIMENSION4 Real-time Location System.
- Replace the front case of the tag by connecting the four screws.
Disposing of Batteries
After you have replaced batteries, dispose of the old batteries according to the manufacturer’s instructions, available at: Guidelines for Disposal of Lithium Cells and Batteries.
Resetting the Battery History
After you have replaced the battery in a DIMENSION4 tag, you must reset the battery history of the tag. This enables you to:
-
Clear all previous battery usage history
-
Restart the battery history data collection process for the new battery
You can reset the battery history:
-
If you have a license for the SmartSpace Visibility feature, on the Tag and Battery Status screen of SmartSpace Web. See Resetting Battery Status on the SmartSpace website.
-
For tags which have been associated with a SmartSpace object, in SmartSpace Config on the TAG ASSOCIATION tab.
-
By using the command-line tool ubisense_tag_battery_replaced and specifying the <tag> ID
For example:
ubisense_tag_battery_replaced 00:11:ce:00:00:De:ad:Be:efOr, by running ubisense_tag_battery_replaced without the <tag> argument and reading tag IDs from standard input
Note: This tool was introduced with version 3.6 and replaces the use of the ubisense_battery_monitor_config command-line tool in earlier 1.x versions.