Configuring the ObjectView API
This guide describes the implementation of the SmartSpace ObjectView API, how to install necessary services and how to define views. A final section provides a worked example showing the complete process of using the ObjectView API to develop a solution to a real-world problem.
Installing the ObjectView API
The ObjectView API requires SmartSpace version 3.8 or above.
ObjectView Services
The ObjectView API is included in SmartSpace Web, and can be accessed provided the ObjectView services have been deployed to SmartSpace. These are installed if you have the HMIs feature ticked in Service Manager during installation. See Installing the HMIs feature for further information.
Installing the ubisense_object_view_config tool
Views are defined by loading a JSON file into the SmartSpace configuration, using the ubisense_object_view_config tool.
To get the tool, run Application Manager, open the DOWNLOADABLES task, and expand Visibility/Object view admin tools. Select ubisense_object_view_config.exe and click Download selected items. Optionally, change the download destination directory, and then click Start download.
Enabling WebSockets
In order for the website to efficiently serve multiple clients with minimal activity, it is necessary to enable WebSockets. If WebSockets are not supported, the clients will fall back to less efficient methods such as long polling, but the results should still appear identical at the client end, with immediate notifications of updates.
Enabling WebSockets on a Windows Server
For IIS, the WebSocket protocol needs to be added as a feature. For example, on Windows Server 2012 and above:
-
On the Windows taskbar, click Server Manager.
-
In Server Manager, click the Manage menu, and then click Add Roles and Features.
-
In the Add Roles and Features wizard, click Next. Select the installation type and click Next. Select the destination server and click Next.
-
On the Server Roles page, expand Web Server (IIS), expand Web Server, expand Application Development, and then select WebSocket Protocol. Click Next.
-
If no additional features are needed, click Next. Click Install.
-
When the installation completes, click Close to exit the wizard.
Enabling WebSockets on a Windows desktop machine
For a Windows desktop machine, the WebSocket feature needs to be turned on.
For example, for a Windows 10 machine, enable WebSocket as follows:
-
Go to the Apps & features section of Settings, by choosing Settings from the Start menu and then choosing Apps; or by typing "Add or Remove Programs" at the Start menu.
-
Click Programs and Features (under Related settings).
-
In Programs and Features, click Turn Windows features on or off.
-
In the Windows Features dialog, expand Internet Information Services, expand World Wide Web Services, expand Application Development Features, and then select WebSocket Protocol.

-
Click OK to save the setting, and then close any other windows you opened.
Enabling WebSockets on Linux
For Linux, if you are using a reverse proxy such as Apache, this needs to be configured to allow WebSockets. The mod_proxy_wstunnel module can be used to support this. See the Apache website for instructions on how to configure this module.
An example configuration section for Apache is shown below:
        # ObjectView rewrites
        RewriteEngine On
        # LogLevel alert rewrite:trace6
        RewriteCond %{HTTP:Upgrade} =websocket [NC]
        RewriteCond %{HTTP:Connection} =Upgrade [NC]
        RewriteRule ^/SmartSpace/ObjectView(.*) "ws://127.0.0.1:5000/SmartSpace/ObjectView$1" [P,L]
Installing the Client Side Library
Clients use SignalR to connect to ObjectView. There is a JavaScript ObjectView client API which wraps the basic SignalR methods and messages to provide a more convenient interface. This JavaScript module is open source and is accessible from GitHub and npmjs.
The client library is available at https://github.com/Ubisense/objectview, where there is a node package published on both npmjs, and on GitHub's package repository. So for npm you can use:
npm install @ubisense/smartspace.objectview
The default is to use npmjs, which requires no authentication to install the package.
Views in the ObjectView API
A view in the ObjectView API is essentially a map from object IDs to objects ("documents") containing their properties. This is analogous to the model used in document-oriented databases, such as MongoDB. Clients can request the document for a given object key, or can get a complete dump of the view, which is kept up-to-date by push notifications from the server. For example, a view of the properties of Workspace objects might look like this:
{
  "04007zRgDRO3m1LP000Pi000046:UserDataModel::[Custom]Workspace": {
    "extent": {
      "type": "Feature"
      "geometry": {
        "type": "Polygon"
        "coordinates": [ [[-11,20],[-1,20],[-1,10],[-11,10]] ],
      },
      "properties": {
        "stationary": true,
        "zmax": 3,
        "zmin": 0
      },
    },
    "name": "Wheel Alignment",
    "order": "0",
    "products": [
      "04007zRgDRO3m1LP000Pi0000J5:UserDataModel::[Custom]Product",
      "04007zVMVGa1Tk1r000SNG0004R:UserDataModel::[Custom]Product",
      "04007zVMVGa1Tk1r000SNG0004T:UserDataModel::[Custom]Product",
      "04007zXDZkN88Dnz000E5G000Br:UserDataModel::[Custom]Product"
    ]
  },
  "04007zRgDRO3m1LP000Pi000049:UserDataModel::[Custom]Workspace": {
    "extent": {
      "type": "Feature"
      "geometry": {
        "type": "Polygon"
        "coordinates": [ [[10,20],[20,20],[20,10],[10,10]] ],
      },
      "properties": {
        "stationary": true,
        "zmax": 3,
        "zmin": 0
      },
    },
    "name": "Headlight Alignment",
    "order": "1",
    "products": [
      "04007zRgDRO3m1LP000Pi0000J3:UserDataModel::[Custom]Product"
    ]
  },
...
}
The properties of each document are the named fields "extent", "name", "order" and "products". Here "extent" is a space property, returned as a polygon GeoJSON feature. "name" and "order" are both simple value properties. The "products" property has an array value, because it is based on a complex property in SmartSpace, i.e. there can be more than one row in SmartSpace containing the given key object. In this case, products indicates the set of Product objects currently contained within a given Workspace.
Views can also be used to send messages to Kafka. See Kafka integration with ObjectView for details of how to configure data and location views that can be published to Kafka.
Defining Views
Views are defined by loading a JSON file into the SmartSpace configuration, using the ubisense_object_view_config tool. The tool operates in two primary modes: import and export.
Usage: ubisense_object_view_config.exe export [OPTIONS]
   or: ubisense_object_view_config.exe import [OPTIONS]
   or: ubisense_object_view_config.exe remove <view>

Export and import view definitions.

PARAMETERS
  view                      view


OPTIONS
  -i, --input <input>       The input JSON file

  -o, --output <output>     The output JSON file

  -v, --view <view>         The view name to export, otherwise export all
                            views

  --help                    Display this help and exit

  --version                 Display version information and exit
The import method takes the -i option, and export takes the -o option. If neither is specified, standard in and standard out are used.
The file must be a valid JSON file, containing either a single view definition object, or multiple view definitions in an array. Each view definition object has the following properties:
|
Property |
Meaning |
Example |
|---|---|---|
|
view |
The name of the view. Must be unique across views – two views cannot share the same name even if they have different roles. |
"view": "Workspaces" |
|
key |
The type of the objects that this view will contain. This can be:
|
"key": "Workspace" "key": "UserDataModel::[Custom]Product" "key": "ULocationIntegration::Tag" |
|
roles |
An array of role strings, defining which roles can access this view. |
"roles": [ "General User", "Operator" ] |
|
properties |
An object which defines the properties of the key type that will be included in the view. Each key in the object is the name that will appear in the view, and each value defines the source property, and optionally column mapping. See the properties definition discussion below. |
"properties": {
  "name": "name",
  "order": "order",
  "products":
 {
  "source": "'Product' is in 'Workspace'",
  "key": 1,
  "value": 0
 }
}
|
| update | An object which defines the details of updateable properties in the view. This has two fields: the roles which are entitled to update the view, and the properties which are updateable. The updateable properties must be properties that are already present in the view. See the update definition discussion below. |
"update" : {"roles" : [ "Operator" ], "properties" : [ "name", "order" ] }
|
|
reps |
Special field for including object representations. If present, then the value is the name for the representations property that will appear in the view. See the representations discussion below. |
"reps": "reps" |
|
tags |
Special field for including associated tags. If present, then the value is the name for the tag property that will appear in the view. See the tags discussion below. |
"tags": "tags" |
|
name |
Special field for including the external object name. If present, then the value is the name property that will appear in the view. See the name discussion below. This is useful for object types which do not have a name property defined the TYPES / OBJECTS tab of SmartSpace Config. |
"name": "name" |
|
locations |
Special field to make this a location view. This cannot appear with "properties", "reps", "tags" or "name". The value is an object with one key "period", which defines the number of seconds between locations being pushed to clients of this view. This is only used to define a cellular location view. See the discussion on location views below. |
"locations": {
  "period": 1
}
|
Here is an example of a valid view definition JSON file, defining three views in a single file, one of which is a data view, and the other two location views.
[
   {
      "view": "Products",
      "key": "Product",
      "properties": {
         "name" : "name",
         "crate": "crate",
         "stale": "stale flag",
         "marked": "marked",
         "workspaces": "'Product' is in 'Workspace'",
         "spaces" :
         {
        "source": "'Product' has entered into workspace 'Workspace' with request reason 'String'",
        "key": 0,
        "value": { "space": 1, "reason": 2 }
         }
      },
      "reps": "rep",
      "tags": "tag",
      "roles": [ "General User" ]
   },
   {
      "view": "ProductLocations",
      "key": "Product",
      "locations": {
         "period": 1
      },
      "roles": [ "General User" ]
   },
   {
      "view": "TagLocations",
      "key": "ULocationIntegration::Tag",
      "locations": {
         "period": 5
      },
      "roles": [ "General User" ]
   }
]
Data views and Location views Compared
A view can only have one of "locations" or "properties" defined. If "properties" is set, then the view is a data view; otherwise if "locations" is set, then it is a location view. Location views ignore the values of "reps", "tags" and "name".
Data views and location views have different update behavior. When a property included in a data view changes, the change is sent out to all clients immediately. But this behavior would be problematic for location views if there were many objects getting locations at a high update rate. Instead, location views define a period (in seconds) which is the frequency with which the most recent position for all objects that have moved is sent out as a change.
For example, if a single object is being located twenty times per second, and the period is one second, then only one change will be sent for that object per second. This behavior gives a fairer allocation of available network bandwidth to all objects, and scales better to large numbers of objects getting located at high update rates.
Location views are also instantiated for each cell configured in SmartSpace. A client can ask for the view at any of the cells, including geometry and site. The view at an individual location cell will contain fewer objects than at a geometry cell, or at the site cell, and will therefore use less network bandwidth at the server, per connected client.
Data view definition
To create data views, use "properties", "reps", "tags", "update" or "name" in the view definition.
Properties
"properties" should be an object, where each key in the object is the name of the property that will appear in the view, and each value is a property definition. A property definition configures the source, column mappings, and whether the values are basic types or objects. The full form of a property definition looks like this:
"view property name":
       "SmartSpace property name"
       |
       {
              "source": " SmartSpace property name",
              "key": columnNumber,
              "value": columnNumber | {
                     "value field name": columnNumber,
	              …
              }
       }
We will consider the most complicated case first, then work back to the simplified forms. To define a property where the value is itself an object with fields taken from the SmartSpace property, we use the form shown in this example:
"spaces" : {
   "source": "'Product' has entered into workspace 'Workspace' with request reason 'String'",
   "key": 0,
   "value": { "space": 1, "reason": 2 }
}
Here the source SmartSpace property is a complex property with the columns: 'Product' at column 0, 'Workspace' at column 1, 'String' at column 2, and a Boolean value at column 3 (not used in this example). The above definition says each 'Product' in the SmartSpace property will have a document in the view, and the "spaces" property in that document will be an array of objects, one for each row in which the product appears. The objects will have fields "space": 'Workspace', and "reasons": 'String'.
For the definition to be valid, the type of the column specified as the key must match the type of the view itself. This is checked when the view definition is loaded.
Note that if a given key object instances does not have any matching rows in the source property, then the view field will not be defined in that object's document. Empty properties are always cleaned up.
If we just provide a column number for "value", then the property values will not be objects, but will just be a simple value taken from that column. So the definition below will result in an array of Workspaces as the "spaces" property of each Product. A Workspace could appear multiple times in the array (with a different reason, but the reason has been ignored).
"spaces" : {
   "source": "'Product' has entered into workspace 'Workspace' with request reason 'String'",
   "key": 0,
   "value": 1
}
The key and value default to 0 and 1 respectively, if not provided, and this means that the above definition is equivalent to this:
"spaces" : {
   "source": "'Product' has entered into workspace 'Workspace' with request reason 'String'"
}
However, there is an even shorter form of this, because you can provide just a string instead of an object, so the above is also equivalent to:
"spaces" : "'Product' has entered into workspace 'Workspace' with request reason 'String'"
If the source property is a simple property of the view key object type, instead of a complex property, then there will only be one row per key object, and in this case the value in the view will not be an array, but just that one value. As with the complex properties, if the key object doesn't have a value for the property in SmartSpace, then the view document for that object will not have that property.
This is particularly useful (with the default key and value) for simple properties. For example, if a Workstation object has a name property "name", you can write:
"name": "name"
This will add a name field with a non-array value being the name of the workspace.
Representations
The field "reps" can be added to a view definition, and should take a string value which is the name of the view property that will contain representations within each object document.
The value of this property will be an array of representation objects, each of which contains the mode and the rep details. The rep details include the mode "M", the name of the representation file "N", and the 2D transform "T" to apply to that file so that it is correctly scaled and offset relative to the object origin. For example:
"rep": [
      {
        "mode": "<default>",
        "rep": {
          "M": "<default>",
          "N": "5B0100007F5BA8D6D80F005564000066C0000000F45D000E555265703A3A4D6F64656C324400.svg",
          "T": {
            "A": 0.003906,
            "B": 0,
            "C": 0,
            "D": 0.003906,
            "E": -0.48764,
            "F": -0.491362
          }
        }
      }
]
If an object has a specific representation model defined (using Representations assigned to objects in MODEL ASSIGNMENT in SmartSpace Config), then that will appear as the value of the named property in the object's document. If a representation is defined for the type of the object (using Representations assigned to types in MODEL ASSIGNMENT in SmartSpace Config), then it will appear in a special document with key "type". Only representations with "Show in 2D" are included.
The 2D transform is an affine matrix that goes from the representation coordinates to the object coordinates:

Tags
The field "tags" can be added to a view definition, and should take a string value which is the view property that will contain associated tag IDs within each object document.
The value of this property will be an array of tag IDs that are associated to the key objects.
Update
From version 3.8, the view definition has been extended with an 'update' clause as follows:
"update": {"roles" : [UpdateRole1, ... , UpdateRoleN], "properties" : ["p_1", ... ,"p_N"]}
The members of the 'roles' array must be legal roles, and the members of the 'properties' array must be fields of the view such that:
-
The view is a data view, and each field in the 'properties' array refers to one of the fields of the data view
-
The property of each field is owned by the site-level data store and is not an assertion
-
Each field contains a value for each of the values mentioned in its corresponding property; that is, the field does not discard any information that exists in the row of the property. As a special exception to this requirement, if the property has a Boolean value, then the field does not need to include that value (because it would always be true).
Name
The field "name" can be added to a view definition, and should take a string value which is the view property that will contain the external name of each object document. This is useful for object types which don't have a name property defined within SmartSpace. It will also work for object types which do have a name property, as this is automatically synchronized with the external name.
The value of this property will be string containing the name of the key object.
Type Mappings
The following type mappings are always used from SmartSpace to ObjectView document values.
|
SmartSpace Type |
ObjectViewJSON |
|---|---|
|
Object |
Stringified object ID |
|
Bool |
true | false (or undefined if the value of the property) |
|
Double |
number |
|
Int |
number |
|
Space |
GeoJSON feature – see the description in Space Properties |
|
String |
string |
|
Time |
milliseconds UTC |
Space Properties
When a space property is configured as the source of a property in a data view, the configured extents of that space are added to the view. If an object has a specific space defined, then that will appear as the value of the named property in the object's document. If a default space is defined for the property, then it will appear in a special document with key "type".
The value of the space property is a GeoJSON feature, with the following properties:
|
Property |
Description |
|---|---|
|
"stationary" |
If true, then the shape is fixed in place. If false or not present, then the shape is positioned relative to the origin of the object's location. |
|
"zmax" |
The top of the space, in meters. |
|
"zmin" |
The bottom of the space, in meters. |
|
"radius" |
If the geometry is a Point, then this radius defines the cylindrical extent of the space. This will not be present if the space geometry is a Polygon. |
All coordinates of the space are in meters, and if stationary are in the site coordinates.
Location view definition
To create location views, use "locations" in the view definition. The locations value should be an object containing the period field, which specifies the number of seconds between each push of location updates to clients of the view. For example, the following defines a location view containing the locations of all tag objects, where the updated locations are pushed every five seconds.
   {
      "view": "TagLocations",
      "key": "ULocationIntegration::Tag",
      "locations": {
         "period": 5
      },
      "roles": [ "General User" ]
   }
Connecting the ObjectView client
Clients use SignalR to connect to ObjectView. Import the module and then use the ObjectView class that is exported to connect and access views.
import { ObjectView } from './ObjectView'

…

let objectView = new ObjectView()
      .onError(this.onerror.bind(this))
      .onConnected(this.onconnected.bind(this))
      .connect()
An optional parameter is available in the ObjectView client constructor which, when set to "true", allows the anonymous user to access the view. See Using Anonymous and Authenticated Connections in ObjectView for further discussion.
You can also pass a string to attempt to connect to a different hub. For example
new ObjectView('http://localhost/SmartSpace/ObjectView')
will cause the ObjectView client to connect to the SmartSpace view running on port 80 even if the ObjectView client used in a web page is served on a development server running on port 3000. If anonymous access is required, then the string should be
new ObjectView('http://localhost/SmartSpace/ObjectViewAnon')
If no string argument is provided, then the ObjectView client will attempt to connect to a SmartSpace instance running on the same hostname and port that the web page is served from.
The onError method is used to add a callback that is called when an error occurs connecting or maintaining the connection. The callback is passed an error string and some optional extra internal information.
onerror: function (err, reason) {
      this.status = err
      if (reason) this.status = err + ': ' + reason.toString()
}
The onConnected method registers a callback that is called when the connection is established or reestablished.
Using Anonymous and Authenticated Connections in ObjectView
In order for anonymous authentication to work, you need to:
-
Point to the ObjectViewAnon endpoint.
-
Configure a valid role in SmartSpace Config to use in ObjectView configuration. The role can have any name, but the role must have an anonymous user as a member of the role. The role can then be given in the ObjectView definition.

   {
      "view": "Internal-TagLocations",
      "key": "ULocationIntegration::Tag",
      "locations": {
         "period": 1
      },
      "roles": [ "Anonymous User" ]
   }
If all users of an SPA are anonymous then you can use the "anon = true" parameter in the ObjectView client constructor.
However, if the same SPA should be accessible to both anonymous and authenticated users, it is good practice to write the SPA to explicitly determine whether the user is anonymous and reconfigure itself appropriately. You could do this by looking at the current page URL to see if it has "/GetAuth/" in it, but a better approach is to use the "get_user_groups" method of the HMI interface to inspect the user or roles. For example:
fetch('/SmartSpace/hmiapi/hmipublic/get_user_groups')
      .then((response) => response.json())
      .then(((data) => {
        let isAnonymous = (data.User == 'Anonymous');

        // HMI could react to this data and reconfigure appropriately.
        this.anonymousUser = isAnonymous;

        // Connect to anonymous hub or not, based on this.
        this.objectView = new ObjectView(isAnonymous)
            .onError(this.onerror.bind(this))
            .onConnected(this.onconnected.bind(this))
            .connect()

        // Then subscribe for views depending on whether anonymous or not.
        ...
      }).bind(this))
Adding a view
To subscribe to a view, with or without a local cache of the contents, use the ObjectView.subscribe() method. This takes a view definition object that describes how to subscribe. This can be built using the ObjectView.View() method. For example:
objectView.subscribe(
      ObjectView.View('Products')
        .setTargetProperty(this, 'products')
)
The View method takes the name of the view, and returns an object which has the following methods to be called to configure the view subscription.
- setTargetObject(target)
-
Populate target with the contents of the view, and maintain this as the view changes. It is recommended to populate target with a deeply reactive object. To create a deeply reactive object in the Vue3 Composition API, use ref(). For example:
-
Copy
const orders = ref({});
let objectView = null;

onMounted(() => {
  objectView = new ObjectView(true).connect();
  objectView.subscribe(
    ObjectView.View("Orders")
      .setTargetObject(orders.value)
  );
}); -
For very large views, shallowRef() can be used for performance optimization by avoiding deep reaction of the object. If using shallowRef() you must add callbacks for onChange() and onEstablish() to trigger the target reaction. For example:
-
Copy
const orders = shallowRef({});
let objectView = null;

onMounted(() => {
  objectView = new ObjectView(true).connect();
  // Callback to trigger reactions to the changes.
  var update = () => triggerRef(orders);
  objectView.subscribe(
    ObjectView.View("Orders")
      .setTargetObject(orders.value)
      .onChange(update)
      .onEstablish(update)
  );
});
- setTargetProperty(target, propertyName)
-
Populate the target[propertyName] with the contents of the view. This is useful if target.propertyName is a reactive object, such as Vue data, as this will correctly add and remove reactive behavior from each key document in the view.
If no target is specified, then the subscription will only pass change and establish events, and will not get a dump or cache the contents of the view.
- setCell(cell)
-
Connect to the view at the given cell ID. This is for use with location views. See the getCells method for a way to get possible cell IDs to pass in this argument. If not specified, the site cell will be used. There are two special cell IDs that can be passed:
Cell ID
Meaning
site
The top level site cell, containing all objects in the regular cell hierarchy.
fallback
The fallback cell, which contains objects outside the cell extents, and background representation objects of type "URep::ModelInstance".
- setFallbackCell()
-
Connect to the fallback cell without requiring the fallback cell ID. This method is available from version 3.9.
The fallback cell contains the positions of objects not inside the extents of other cells, and of background representations.
- onEstablish(cb)
-
The callback will be called when some view changes may have been missed, such as at the initial connection of the client, or if the client was disconnected and then reconnected. If a target was specified, the contents of the target will have been updated to be current before the establish callback is called.
- onChange(cb)
-
This callback is called when a view property changes. The callback takes a change object which can be used to maintain cached view contents. If a target has been specified, it will have already been updated appropriately when this callback is called.
The change object is either an insert, an update, or a delete, as indicated by the "type" property. The fields of the change object are as follows:
Field
Value
type
'ins' | 'upd' | 'del'
_id
the document key that the change applies to
prop
the property name within the document
idx
if the property is an array values property, the index of the value that has changed in that array
val
the value being inserted, updated or deleted
old
if this is an update, the value being replaced
Getting a document from a view
If only a single view document is required, rather than subscribing to updates, the ObjectView.getValue method can be called.
async getValue(params)
This is an async method that returns the current document from the view on success, and can throw an exception on error. The params argument should be an object containing:
{ view: '<view name>', cell: '<cell id>', _id: '<object id>' }
The cell should only be used if the view is a location view.
Getting cells covering an area
The cells that cover an area of space can be returned by using the ObjectView.getCells method. This async method takes a Polygon GeoJSON feature as an argument, with properties zmin and zmax defining the vertical extent.
objectView
   .getCells({
     type: 'Polygon',
     coordinates: [
       [
         [0, 0],
         [100, 0],
         [100, 100],
         [0, 100],
       ],
     ],
     properties: {
       zmin: 0,
       zmax: 10,
     },
   })
   .then((cells) => this.applyCells(cells))
The method returns an array of cell information . Each cell is returned as a GeoJSON polygon feature, including properties zmin and zmax. The feature also includes following properties:
|
Property |
Description |
|---|---|
| "id" | the ID of the cell |
| "name" | the name of the cell |
| "level" |
the level of the cell, where 1 is a location cell, 2 is a spatial cell, and 3 is the site cell |
The "id" property can then be passed as the cell parameter when subscribing to a location view, or getting a value from such a view.
Getting Background Representations
To get background objects and their representations, you can define two views as follows:
   [
   {
      "view": "Background",
      "key": "URep::ModelInstance",
      "locations": {
         "period": 60
      },
      "roles": [ "General User" ]
   },
   {
      "view": "BackgroundReps",
      "key": "URep::ModelInstance",
      "reps": "rep",
      "properties": {
      },
      "roles": [ "General User" ]
   }
   ]
The first can be subscribed with cell "fallback" to get the positions of all background rep objects configured in SmartSpace, and the second can be queried or subscribed to get the reps defined for those objects.
Updateable Views
An updateable view is anything that has an update field. Described below are the two methods for working with updateable views.
Low-level commitChanges method
The commitChanges member function on the ObjectView instance takes a list of commands and commits them all in one transaction. So, if objectView is an instance of an ObjectView type, then this example will set a single property value, and call the ".then" function on success and the ".catch" function on failure.
var commands = [
  {
    property : "__<[Custom]Asset>test__<Int>status",
    args : [asset_1,this.count/2],
    value : (pass ? "PASS" : "FAIL")
  }
] ;

this.objectView
    .commitChanges(commands)
    .then((res)=>console.log(res ? "Changes made" : "No changes made"))
    .catch((res)=>console.error("Failed to commit",res));
High-level interface
It is useful in some circumstances to construct commands programmatically and commit them using commitChanges as described above, but the normal usage model is expected to be via a higher-level interface provided by the static ObjectView functions update and copy, which respectively generate the commands required to change an object's values in a view target and generate a copy of an object's data suitable for modification.
ObjectView.copy(this.assets,asset)
will return a copy of all the updateable fields that are present in this.assets[asset]. This provides a convenient way of getting hold of the data from a view in a form that can be modified. To modify data, it is important that it be a copy of the data in the view target, rather than references to the view target itself, and ObjectView.copy ensures that every part of the nested document denoted by this.assets[asset] is copied.
ObjectView.update(this.assets,asset,new_asset_values)
generates a list of the commands necessary to change the updateable fields in this.assets[asset] that are mentioned in new_asset_values to have the values they have in new_asset_values. The generated commands will need to be committed to take effect. Note that if there are updateable fields in the view that are not mentioned in new_asset_values then they will be unchanged. Note also that if the view doesn't actually have a value for asset (i.e. there are no current values to diff with) then ObjectView.update will create the commands necessary to create such an entry, with the values as defined using new_asset_values.
Committing the results of update
The ObjectView.update function returns objects of the form
{commands : CommandList, commit : <function>}
where CommandList is in a form suitable for submission to the objectView.commitChanges function, but the normal usage is to call the convenience member function commit, which does the submission itself, by invoking the commitChanges operation. Then this invocation:
let updates = ObjectView.update(this.assets,asset,new_asset_values)
updates.commit()
will both generate and submit the list of the necessary commands.
The ObjectView.createObject function provides a method to create an object. Once created, ObjectView.update can be used to set its properties:
v.newObject = ObjectView.createObject("UserDataModel::[Custom]Product");
let updates = ObjectView.update(v.cars,v.newObject,{"name":"Hammer","model":"black"});
updates.commit();
Transactional writes of object properties
The property changes committed by a call to commitChanges or commit are all done in one transaction and, if any operation in the transaction fails, they are all rolled back
All event handlers triggered by changes in the transaction are queued up until the commit, so that they are not done if the transaction is rolled back, and, if they are done, they are evaluated in the context of the state that has received all the changes made in the transaction (this is what you would always want, and is also necessary because the command generation doesn't give you control over the order of the changes made).
ObjectView API worked example
The following describes a simple application scenario and its implementation using SmartSpace, focusing especially on how to use the ObjectView API feature to provide an up-to-date view of application data that is integrated with the Vue reactive framework.
Application scenario
Tasks, Stations and Assets
In a manufacturing company, various tasks are performed in different physical stations. There is a work plan for each task, requiring the use of various assets, each for a certain period of time. For example, an inspection task on a vehicle is performed in a specific inspection pit, and requires the use of a mobile microscope for 2 hours.
Measuring asset usage on tasks
To optimize the manufacturing process we want to monitor the use of assets for tasks, so that we can build up more accurate data about real task requirements, make more efficient use of assets, and also detect when there are problems emerging (e.g. if an asset has been in use on a task for much too long, then this might indicate that something is wrong).
To do this monitoring we will track the locations of the assets, and work out which task they are in use for by finding out which station they are in. When we detect that an asset has started being used for some task, we will open a ‘usage period’, which will be closed again when the asset stops being used on the task. By looking at the durations of the usage periods we can build up the analytical information we need.
Visibility of the data
It is clearly possible to view the resulting usage information in many different ways: filtered by time period, task, or asset; summed over some set of identical tasks; used as a basis for generating some dashboard indicators, and so on.
So, we need to be able to build a web user interface to present various views of the usage information, with the underlying data presented in a flexible way that is easily used by web developers, but also ensuring that the data is up-to-date in real time for many simultaneous users, even for large amounts of data and users. This is the motivation for the ObjectView API feature in SmartSpace Visibility.
Implementation
Data model
The data model below just formalizes the English description from the application scenario. It is in a form suitable for import using the ubisense_udm_admin tool.
// The basic entities in the model
declare type Task ;
declare type Station ;
declare type Asset ;

// Task details created by configuration user or imported from task database
declare name property name<Task> ;
declare property station<Task> : Station ;

// Status, changed by user or external system to indicate that the task
// is actively assigned to its corresponding station.
declare property <Task> is active : Bool ;

// Name created by configuration user
declare name property name<Station> ;

// Name created by user or imported from asset database
declare name property name<Asset> ;

// Data created by a user to record a task asset dependency
declare type Asset Requirement ;
declare property task<Asset Requirement> : Task ;
declare property asset<Asset Requirement> : Asset ;
declare property hours<Asset Requirement> : Double ;

// Maintained by rule using spatial containment between asset and station:
declare property <Asset> is in <Station> : Bool ;

// Maintained by an event handler on Asset is in Station:
declare property station<Asset> : Station ;

// Maintained by a rule:
declare property <Asset> is in use for <Asset Requirement> : Bool ;

// Data for asset usage periods maintained by an event handler on 'in use for':
declare type Asset Usage Period ;
declare property start time <Asset Usage Period> : Time ;
declare property end time <Asset Usage Period> : Time ;
declare property requirement<Asset Usage Period> : Asset Requirement ;
Business rules and event handlers
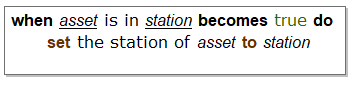
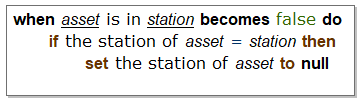
Some of the state is set by business rules and event handlers. First, the ‘<Asset> is in <Station>’ relation is set using a spatial containment relationship:

In general, station extents will be disjoint, so we can set a station property for each asset when the ‘is in’ relation is set or unset, as follows:
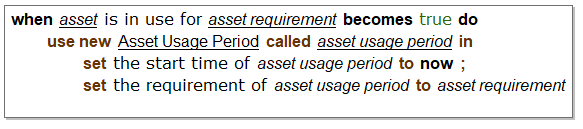
We can then define the conditions for an asset to be in use on a task, as a relationship between the asset and the relevant task requirement. In terms of assets and tasks, this states that an asset is in use on a task if and only if it is in the station to which that task is assigned, the task has a dependency on the asset, and the task is active.

Having detected the conditions for assets to be in use on tasks, we can respond to the relevant events by creating a new asset usage period when an asset begins to be used,
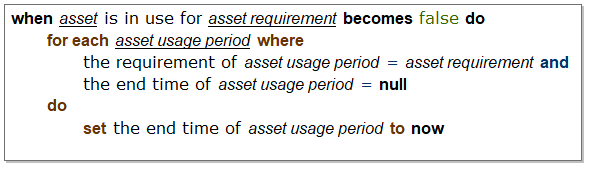
and closing that period by setting its end time when the asset ceases to be used.
Models, searches and representations
-
Create and import suitable models to represent the asset and station objects. For example, we used SVG Editor (svgeditoronline.com) to create some simple SVGs and import them
-
Assign the representations to the asset and station types
-
Create a role for maintaining the application state, and a role for browsing it, and give the state maintenance role rights to set the appropriate properties (i.e. all the properties defined above but not set by rules or event handlers)
-
Configure web searches for Stations, Tasks, Assets and Asset Requirements
-
Configure web forms for creating and modifying the station, task, asset and asset requirement data
-
Create some appropriate data using the web forms, and position stations using the SmartSpace configuration tool
These are all standard configuration activities in SmartSpace and we won’t describe them in detail here because they are fully covered in the existing documentation. In practice, most of the data would be imported in bulk from external systems using the SmartSpace RDBMS map or External data connector features.
All the configuration steps above (data model, business rules, web searches and web forms) are available for loading into a dataset using the file ObjectViewExample.ssc. The fully-configured dataset now provides various simple web interfaces to maintain the data and show it on a map.
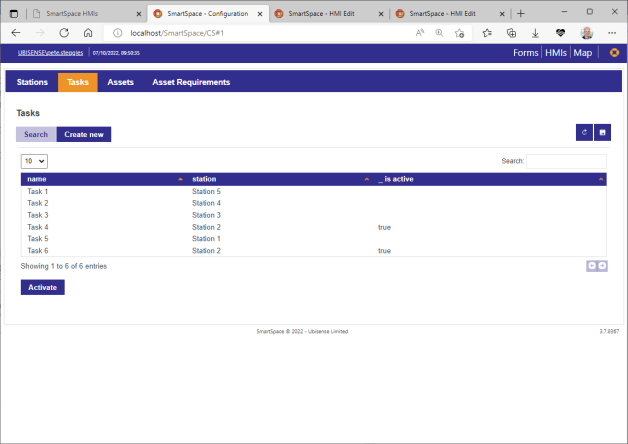
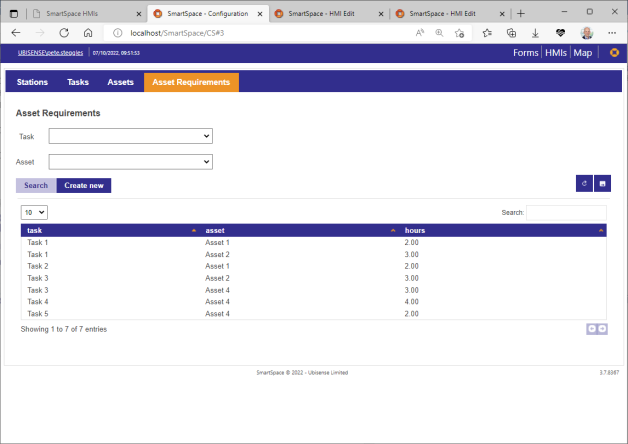
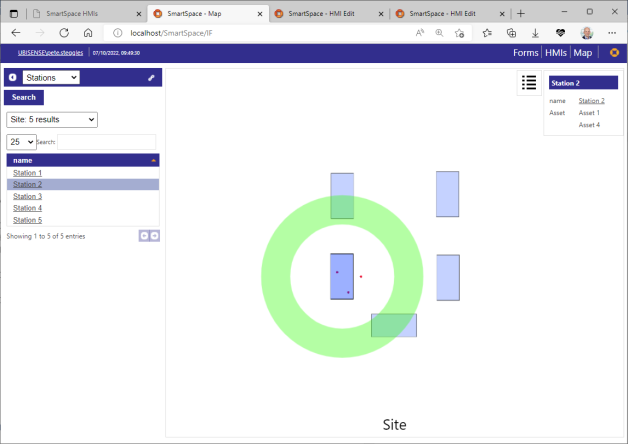
For example
-
a screen for maintaining tasks
-
a screen for maintaining asset requirements
-
a web map showing stations and assets
Document views
Of course, the zero code approach can only go so far, and there will normally be a need for a range of web user interfaces that are tailored to specific customer needs. The easiest way of generating these is by coding them using JavaScript.
The ObjectView API feature makes it easy to code web UIs in a reactive framework, by presenting a set of up-to-date document views to the JavaScript programmer. In our example, we define views containing details for each of our types (Stations, Tasks, Assets, Asset Requirements, and Asset Usage Periods), which will be presented as document views.
[
    {
        "view" : "Stations",
        "key" : "Station",
        "roles" : ["Browse Task And Asset Data"],
        "properties" : {
            "name" : "name",
            "tasks" : {
                "source" : "station of 'Task'",
                "key" : 1,
                "value" : 0
            }
        }
    },
    {
        "view" : "Tasks",
        "key" : "Task",
        "roles" : ["Browse Task And Asset Data"],
        "properties" : {
            "name" : "name",
            "station" : "station",
            "requirements" : {
                "source" : "task of 'Asset Requirement'",
                "key" : 1,
                "value" : 0
            }
        }
    },
    {
        "view" : "Asset Requirements",
        "key" : "Asset Requirement",
        "roles" : ["Browse Task And Asset Data"],
        "properties" : {
            "task" : "task",
            "asset" : "asset",
            "hours" : "hours",
             "usage periods" : {
                "source" : "requirement of 'Asset Usage Period'",
                "key" : 1,
                "value" : 0
            }
        }
    },
    {
        "view" : "Assets",
        "key" : "Asset",
        "roles" : ["Browse Task And Asset Data"],
        "properties" : {
            "name" : "name",
            "requirements" : {
                "source" : "asset of 'Asset Requirement'",
                "key" : 1,
                "value" : 0
            }
        }
    },
    {
        "view" : "Asset Usage Periods",
        "key" : "Asset Usage Period",
        "roles" : ["Browse Task And Asset Data"],
        "properties" : {
            "requirement" : "requirement",
            "started" : "start time",
            "ended" : "end time"
        }
    }
]
These view definitions are loaded using the ubisense_object_view_config tool described in Defining Views.
A simple reactive HMI built using document views
Now we are ready to create an HMI using our document views. We will be using the HMI external development tool support, so the first step is to create a basic Vue HMI according to the documentation for the HMI external development tool support.
To add ObjectView support to the HMI, follow these steps:
-
Ensure that the web server for your dataset is version 3.8 or above, so that it supports the ObjectView server side.
-
Add ObjectView to your project by executing:
npm i @ubisense/smartspace.objectview
Depending on your versions of Vue and node.js, if this works you should find some new content in node_packages/@ubisense/smartspace.objectview, node_modules/@ubisense/smartspace.objectview, or similar.
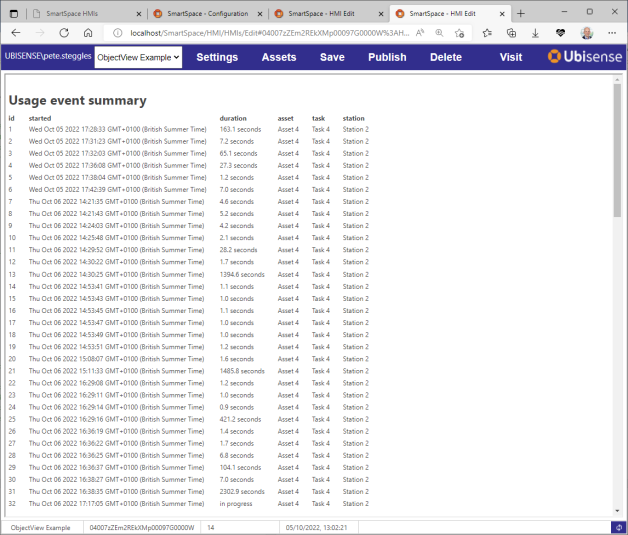
Now we are ready to create some example code. Create a new component called ‘AssetUsage.vue’, and add the code below. This code does the following:
-
Declares reactive data elements which will hold the values of each of the views
-
Ensures that when the component is mounted, the data elements are bound to views, so that they will be guaranteed up-to-date with data from the application server side in document format
-
Defines a function ‘usage_event_details’, that takes the properties of an individual object from the ‘Asset Usage Periods’ view, and fills in details for the start time, the duration, and the task, asset and station names
-
Defines a computed property ‘usage_view’ that maps the ‘usage_event_details’ function over all usage periods, to create a summary view of all usage events
-
Defines a document template that contains a table, which will show the summary view. Under the table the JSON for each of the individual views is also shown.
<template>
  <div>
    <h1>Usage event summary</h1>
    <table v-if="usage_view.length > 0">
      <thead>
        <tr>
          <th v-for="col in Object.keys(usage_view[0])" v-bind:key="col">
            {{ col }}
          </th>
        </tr>
      </thead>
      <tbody>
        <tr v-for="row in usage_view" v-bind:key="row.id">
          <td v-for="[key, col] in Object.entries(row)" v-bind:key="key">
            {{ col }}
          </td>
        </tr>
      </tbody>
    </table>

    <h1>Tasks state</h1>
    <div>{{ tasks }}</div>

    <h1>Assets state</h1>
    <div>{{ assets }}</div>

    <h1>Usage state</h1>
    <div>{{ usage }}</div>

    <h1>Stations state</h1>
    <div>{{ stations }}</div>

    <h1>Requirements state</h1>
    <div>{{ requirements }}</div>
  </div>
</template>

<script>
import ObjectView from "@ubisense/smartspace.objectview";

export default {
  name: "AssetUsage",
  computed: {
    // An example of a reactive computed property that creates a view
    // showing details of all the usage events that have occurred, with
    // their timing details, asset, task and station
    usage_view: function () {
      var result = [];
      var id = 0;
      for (const value of Object.values(this.usage)) {
        try {
          var details = {};
          details["id"] = ++id;
          this.usage_event_details(value, details);
        } catch (error) {
          // If not all the details are available yet, then leave
          // this usage event out of the list (see the comment on
          // usage_event_details below).  When all relevant data
          // have been updated, this view will be re-evaluated, and
          // the correct data for the detail will be inserted.
          console.log(error);
          continue;
        }
        result.push(details);
      }
      return result;
    },
  },
  // Reactive data which will be bound to object views
  data() {
    return {
      tasks: {},
      assets: {},
      usage: {},
      requirements: {},
      stations: {},
    };
  },
  methods: {
    // Fill in the details of an individual usage event.

    // Note that this method could throw an exception if the data from views are out
    // of sync with each other, or if the data in an individual row has not yet been
    // completely applied (e.g. in this case it may turn out that the 'started'
    // and 'ended' properties are set before the 'requirement' property, and then
    // the reactivity framework kicks off some re-evaluation before the 'requirement'
    // property has been set on a new row, which would cause the 'usage.requirement'
    // reference below to be undefined, and thereby cause an exception to be thrown
    // by the 'this.assets[requirement.asset]' expression).
    usage_event_details: function (usage, details) {
      var requirement = this.requirements[usage.requirement];
      details["started"] = new Date(usage.started);
      details["duration"] =
        usage.ended != undefined
          ? ((usage.ended - usage.started) / 1000).toFixed(1) + " seconds"
          : "in progress";
      details["asset"] = this.assets[requirement.asset].name;
      details["task"] = this.tasks[requirement.task].name;
      details["station"] =
        this.stations[this.tasks[requirement.task].station].name;
    },
    // Subscribe to a data view, storing it in the specified data field
    subscribe: function (view, field) {
      if (this.objectView == undefined) {
        this.objectView = new ObjectView(true)
          .onError((m) => console.error("error", m))
          .connect();
      }
      this.objectView.subscribe(
        ObjectView.View(view).setTargetProperty(this, field)
      );
    },
  },
  mounted() {
    // When the component is mounted, subscribe to the views, binding them
    // to the corresponding reactive data items in the component
    this.subscribe("Tasks", "tasks");
    this.subscribe("Assets", "assets");
    this.subscribe("Stations", "stations");
    this.subscribe("Asset Requirements", "requirements");
    this.subscribe("Asset Usage Periods", "usage");
  },
};
</script>
Now edit your App.vue file to load the AssetUsage component:
<template>  <div id="app">
    <AssetUsage/>
  </div>
</template>

<script>
const AssetUsage = () => import("./AssetUsage.vue");

export default {
  name: 'App',
  components: {
    AssetUsage
  }
}
</script>
Now when the HMI is loaded, you will see the table containing the asset usage view (with the underlying data presented below).
Assuming your network and web server support this, in the console you should see information that a web socket has been opened, for example:

If you move assets into and out of stations using SmartSpace Config, you will see the table data being updated instantly.
Example of an updateable property
Suppose we extend the above example, so that we include a new field 'labels', which maps to a complex property, and make the Assets view updateable, as follows:
	{
		"view" : "Assets",
		"key" : "Asset",
		"roles" : ["Browse Task And Asset Data"],
		"properties" : {
			"name" : "name",
			"requirements" : {
				"source" : "asset of 'Asset Requirement'",
				"key" : 1,
				"value" : 0
			},
			"labels" : {
				"source" : "'Asset' has 'Int' 'Double' cm long labels saying 'String'",
				"key" : 0,
				"value" : {
					"count" : 1,
					"length" : 2,
					"content" : 3
				}
			}
		},
		"update" : {
			"roles" : ["Browse Task And Asset Data"],
			"properties" : ["name","labels"]
		}
	},
and suppose we have rows in the database like this:
'Asset 1' has 3 4.0 cm long labels saying 'hello'
'Asset 1' has 4 6.0 cm long labels saying 'goodbye'
and our view target is called this.assets, then it will have contents for the object id of 'Asset 1' with values something like:
{
   name : "Asset 1",
   requirements : [],
   labels : [{contents : "hello", count : 3, length : 4.0},
             {contents : "goodbye", count : 4, length : 6.0}]
}
Now, this code:
var new_values = ObjectView.copy(this.assets,asset_1);
new_values.labels[0].length = 8.0;
new_values.labels[1].length = 12.0;
ObjectView
  .update(this.assets,asset_1,new_values)
  .commit()
  .then((res)=>console.log(res ? "Changes made" : "No changes made"))
  .catch((res)=>console.error("Failed to commit",res));
will generate and execute the minimum set of commands ensure that the view target is changed to
{
   name : "Asset 1",
   requirements : [],
   labels : [{contents : "hello", count : 3, length : 8.0},
             {contents : "goodbye", count : 4, length : 12.0}]
}
Dealing with races in reacting to view updates
Unlike the server-side parts of SmartSpace used for real-time control (e.g. the site level and cellular rules engine), ObjectView updates are not applied to the target data in a transactional way. Instead, updates are applied as a sequence of individual operations. For example, when a new asset usage period is created, the following operations are executed:
-
A new entry “<object id>” : {} is added to the ‘usage’ object
-
A new field “started” : <start date> is added to the entry
-
A new field “requirement” : <requirement object id> is added to the entry
Because the reactivity framework is executed asynchronously to these changes, it is possible that the computed term ‘usage_view’ is evaluated after the entry has been added, but before the ‘requirement’ field has been added, so that the newest object in the view is incomplete. This is why the ‘usage_event_details’ function can throw an exception (see the code comments for more details).
In this case the function could throw as a result of a race between state update and the application updates triggered by reactivity, but it would also be possible to generate arithmetic errors (e.g. if there are two separate numeric state items both changed in the same transaction. When using multiple views, there is also no guarantee of synchronization between separate views. In general, application programmers need to be aware that their views may transiently inconsistent, but in normal use this does not create problems because the transients are quickly resolved.