RDBMS map configuration
Introduction to RDBMS map
The relational database integration feature is used to export and import SmartSpace data to and from external databases. The data to be exported and imported can be defined in configuration pages within the SmartSpace Config application. Imports and exports can be configured simultaneously to and from multiple databases, as required.
This guide describes the RDBMS map features of SmartSpace, and how they should be configured, tested and deployed.
The intended audience is those installing and configuring a SmartSpace system or application, who need to exchange application data with third-party database systems.
Features
This section introduces the basic functionality of the RDBMS map feature. For more details see the specific configuration sections below.
Database connections
A database connection describes the type of database and the connection string used to connect to that database. The database server types supported are:
SQL Server
Database versions: 2012 or higher.
-
Windows servers using ODBC and
-
Linux servers using Microsoft ODBC Driver 17 for SQL Server
Oracle
Database versions: 11G R2 or higher.
-
Windows servers using Oracle Instant Client 21.x library
-
Linux servers using Oracle Instant Client 21.x library
Exporting
Exporting from application data to a database connection
The basic export functionality is to select properties of application objects to export, and to build export SQL statements to run on a database connection, which include the property fields (keys and value).
Binding columns into queries
The export SQL statements can also include other properties of the application objects in the property to be exported.
Scheduled execution
Execution can be triggered every time an included property is changed.
Changed properties can be accumulated and applied periodically in a batch.
Exports can also be executed when a trigger property changes.
Importing
Importing from a database connection to application data
SQL queries can be executed against a database connection, and the results loaded into properties of application objects.
Multiple properties per query
Imports can be configured to map specific columns returned by the SQL query to different properties of a single application object type.
Bound import queries
Import queries can include properties of the application object type, in which case they are executed once for each instance of the object type determined by execution conditions.
Controlling the insertion and removal of rows
When new rows are returned by the query, the import can create new property rows or ignore them. Similarly, when old rows are no longer returned by the query, the import can delete the property rows or ignore them.
Creating/deleting objects
When the import property is the name property of the imported object type, then the insert and remove behavior causes object instances to be created or deleted.
Scheduling execution
An import can be executed periodically. Periodically executed imports can include a test query which returns a string (a "hash" or change control value) that changes only when the main query needs to be executed. This test query can be skipped occasionally if there is a chance of hash collisions.
An import can also be executed at specific times every day.
An import can be executed when any of its bound properties change.
Finally, an import can be executed when another trigger property changes.
Installation
The Relational Database Integration feature comprises three service packages:
- URelationalDatabase.xml: Installs the configuration service which allows imports and exports to be configured in the SmartSpace Config application. This should always be installed.
-
URelationalDatabaseSQLServer.xml: Installs the service that executes imports and exports with database connections of type "Sql".
See Creating a Database with SQL Server for installation requirements for connections of this type.
-
URelationalDatabaseOracle.xml: Installs the service that executes imports and exports with database connections of type "Oracle".
See Creating a Database with Oracle for installation requirements for connections of this type.
All three service packages can be safely installed if integration is required with both database server types.
The configuration user interface is the RDBMS MAP task of the SmartSpace Config application. To install this, use the Ubisense Application Manager as described in SmartSpace Installation. This will ensure that the correct version of SmartSpace Config will be executed to match the platform you are connected to. Thus for the 3.5 features you must have also deployed the USmartFactoryConfigUI.xml package from the 3.5 SmartSpace release.
Note: Use of SmartSpace Config to configure RDBMS map means that even if you are installing your database on a Linux server, you must have access to a Windows client machine in order to run the configuration software.
Creating a Database with SQL Server
Installing the ODBC Driver for SQL Server on Windows
For SQL Server on Windows, a suitable ODBC driver for SQL Server should be installed on the same controller server. For example,
Installing the ODBC client for SQL Server on Linux
For SQL Server on Linux, you must install the official ODBC client. Instructions are available on the Microsoft website: Microsoft ODBC Driver 17 for SQL Server
Ensure the driver in odbc.ini matches the string in odbcinst.ini.
cat /etc/odbcinst.ini

[ODBC Driver 17 for SQL Server]
Description=Microsoft ODBC Driver 17 for SQL Server
Driver=/opt/microsoft/msodbcsql17/lib64/libmsodbcsql-17.4.so.2.1
UsageCount=1
cat /etc/odbc.ini

[MSSQLServerDatabase]
Driver=ODBC Driver 17 for SQL Server
Description=Connect to my SQL Server instance
Trace=No
Server=sqlserverinstance.domain
Creating a Database with Oracle
Installing the Oracle Client on Windows
In order to use this service, the Oracle Instant Client 21.x should be installed on the same controller server, and the system PATH environment variable should include the folder containing the oci.dll library.
This guide uses the example of installing a connection for Oracle 12.1. Other versions of Oracle will follow a similar procedure.
Oracle Client
The 32-bit version of Oracle Instant Client is required for compatibility with Ubisense services.
- Download the 32-bit Oracle Instant Client 21.x zipfile from https://www.oracle.com/technetwork/topics/winsoft-085727.html.
- Unzip the file, placing the contents in a suitable folder, for example C:\Oracle\instantclient_12_1.
-
Append this folder location to the system PATH environment variable.
Windows has two path variables, system and user: make sure you update the system environment variable.
- Start Control Panel and choose System and Security > System> Advanced system settings.
- Click Environment Variables....
- Select Path from the system variables in the lower pane, click Edit and amend the path by adding the location of the Oracle Instant Client.
Microsoft Visual C++ Redistributable
Oracle Instant Client 21.x requires that the redistributable package for Visual Studio 2010 is installed.
- Download the redistributable package for Visual Studio 2010 from Microsoft from https://support.microsoft.com/en-us/help/2977003/the-latest-supported-visual-c-downloads.
- Make sure to download the 32-bit version of this software: the downloaded file will be called vcredist_x86.exe.
- Run vcredist_x86.exe to install the redistributable library.
Disabling Automatic Diagnostic Repository
Recent Oracle database versions include the Automatic Diagnostic Repository (ADR) feature which is turned on by default when you deploy
Therefore ADR should be disabled on the machine that will be running the “Ubisense/Reporting/Report client interface Oracle” service.
-
Open the sqlnet.ora file.
This file is found in the TNS admin folder, which is usually pointed to by the environment variable TNS_ADMIN.
-
Append the following line to the file:
DIAG_ADR_ENABLED=off
Installing the Oracle Client on Linux
Requirements
To get Oracle reporting or RDBMS services to work, you must:
-
install libnsl using your preferred package manager
-
disable the Automatic Diagnostic Repository (ADR) feature included in recent versions of Oracle
Installation Process
Note: You need an Oracle account to download the Oracle client.
Download instantclient basic 12.2 x86-64 rpm from Oracle.
Ensure the prerequisites for instantclient are installed:
sudo apt-get install libaio1
For Debian-based systems, use alien to install the rpm:
sudo apt-get install alien
sudo alien -i oracle-instantclient12.2-basic-12.2.0.1.0-1.x86_64.rpm
Ensure that the dynamic linker can find the Oracle libraries by updating the runtime link path. For example, place the path to the instantclient libraries into a config file:
cat /etc/ld.so.conf.d/oracle.conf

/usr/lib/oracle/12.2/client64/lib/
Now update ldconfig:
sudo ldconfig
Disabling Automatic Diagnostic Repository
Recent Oracle database versions include the Automatic Diagnostic Repository (ADR) feature which is turned on by default when you deploy
Therefore ADR should be disabled on the machine that will be running the “Ubisense/Reporting/Report client interface Oracle” service.
-
Open the sqlnet.ora file.
This file is found in the TNS admin folder, which is usually pointed to by the environment variable TNS_ADMIN.
-
Append the following line to the file:
DIAG_ADR_ENABLED=off
Configuration
Background concepts
Later we will refer to "simple" and "complex" properties. For reference, these are defined in separate parts of the Types and objects workspace in SmartSpace Config.
- A "Simple" property is one which has a single object as key, and a corresponding value. For example "country code of <Product>: <String>" or "<Product> delivery date <Time>". Given an instance of the key object type, there is at most a single value of the property.
- A "Complex" property is one where the key includes several columns, or there can be multiple values for each key. For example "<Product> is in <Function>: <Bool>" where the functions can overlap, or "<Product> entry time in <Function>: <Time>", where the key has multiple columns <Product> and <Function>.
A "name" property is a simple property of an object type with a string value. It is used to uniquely identify the instance of the object. This might be an unique identifier such as the build number of a Product, or the process step name of a Function. An object type can have at most one name property, which may be inherited from its parent types. Thus for a given type of object, there is either no way to look up the object by its name string, or just one way. This property is used during import execution.
Database connections
Creating a connection
To create a database connection, double-click <Create new database> in the top pane of the database integration task in SmartSpace Config. This will bring up the editor.
- Enter a new database name. This must be distinct from any existing connections. Otherwise the new database connection configuration will replace the existing one, which is unlikely to be the desired behavior.
- Select the type of database to connect to: SQL Server or Oracle.
- Enter a connection string suitable for the database type.
Testing a connection
To test that a connection can be made, click Test.
Editing a connection
To edit a database connection, double-click the row in the top pane of the database integration task in SmartSpace Config. If you change the name, this will be ignored.
Deleting a connection
To delete a connection, select the row, then press Delete.
If the database connection is currently in use within a configured import or export, this will be indicated and deletion will be canceled. Otherwise a confirmation dialog is displayed: click Delete to confirm deletion.
Connection examples
SQL Server
For ODBC Driver for SQL Server, using Windows authentication, the database MESDB must allow connection with role db_datareader (for imports) or db_datawriter (for exports) for the NT AUTHORITY/SYSTEM user (assuming that is the account under which the Ubisense Local Controller service is executed):
Driver={ODBC Driver 18 for SQL Server };Server=LOCALHOST\SQLSERVER2008;Database=MESDB;Trusted_Connection=yes;
SQL Server on Linux
For SQL Server on Linux, use a connection like this (assuming the above odbc.ini was created):
DSN=MSSQLServerDatabase;Database=RFID;UID=sqlserveruser;PWD=PASSWORD
Oracle
For Oracle, the connection string format is the same for Windows or Linux and takes the format:
username/password@oracleserver:1521/oracleinstance
For
MESDB/unsafepassword@ORACLE01:1522/mes.production.internal
or
MESDB/unsafepassword@(DESCRIPTION=(ADDRESS_LIST=(ADDRESS=(PROTOCOL=TCP)(HOST=ORACLE01)(PORT=1522)))(CONNECT_DATA=(SERVER=DEDICATED)(SERVICE_NAME=mes.production.internal)))
Filtering imports and exports by type and property
Between the database connection pane and the test of the task there are two filter dropdowns. These can be used to restrict the displayed exports and imports to only those with the matching type and/or property. These controls also restrict the choices available in some other dropdowns within the interface, to make it easier to configure exports or imports relating to a specific part of the application data model.

If an item you wish to edit is not visible, make sure that the current filter does not exclude it.
Exports
Creating, editing and deleting
To create a new export, double-click on the <Create new export> line in the exports pane. To edit an export, double-click the export line. In both cases the Export editor is displayed.
To delete an export, select the row and then press Delete. A confirmation dialog is displayed.
Export editor

In the Export editor, no changes are made to the current configuration until the Save button has been clicked. It is safe to edit the export upserts and deletes without any impact on the current configured system. The Cancel button discards any pending changes.
Choose the property to export
At the top of the Export editor is a drop-down which selects the primary application data property to be exported. Each property can be in only one export definition, but there can be several "upsert" and "delete" statements in an export, so it is possible to export from a given property to multiple destination databases, or tables within a database. The primary property must be selected before any SQL queries can be added, because the columns and value of the property determine the other related properties which can be embedded into the queries. The property cannot be changed once it has been saved.
Construct Upsert and Delete queries
An upsert query is executed with current values of the exported properties, and should update or insert the row in the database to match the current values in the SmartSpace application data.
A delete query is executed when a specific row is removed from the SmartSpace application data.
One important question in database export is: what happens if changes occur within SmartSpace while the RDBMS map service is stopped? Similarly, what happens if the target database connection fails, or one of the statements fails to execute? From version 3.4, behavior on service startup and establish has been improved to ensure the RDBMS module is robust to such events. The service keeps track of the changes to business objects and properties that have been successfully applied to the database. In this way it will automatically retry statements that have failed to execute, and it is able to detect the set of changes that have occurred since it was last running, and immediately executes the corresponding upsert or delete statements to reflect these changes in the target database.
To edit or create a query, double-click the appropriate line in the Upsert SQL or Delete SQL list boxes. This will display the query editor.
Example Upsert
Whilst any SQL statement can be used in both upsert and delete actions, a typical upsert can be written using the MERGE statement in SQL. For example, in SQL Server:
MERGE FunctionMilestone WITH (HOLDLOCK) AS target
USING (SELECT
[[name<Function>]]
,
[[milestone<Function>]]
) AS source (Name, Milestone)
ON (target.[Function] = source.Name)
WHEN MATCHED THEN
UPDATE SET Milestone = source.Milestone
WHEN NOT MATCHED THEN
INSERT ([Function], Milestone) VALUES (source.Name, source.Milestone)
Here the target table in the database is FunctionMilestone. The export would be of a property called "milestone <Function>: <String>", which is a simple property of the "Function" type. The source table of the merge statement is formed by directly creating a single row from the exported properties bound into the query—this is represented here in pseudo-code by the syntax "[[property]]".
A very similar statement is available in Oracle.
Example deletion
To make delete statements robust, they should only use a single property value, such as the name or unique ID of an object in SmartSpace. This is because the changes to business object properties are processed asynchronously in the RDBMS map service, so by the time they are executed the other property values for the object may have already been removed.
Consider, for example, an exported property "comment<Product>:String".
We could set the delete statement to be:
Now if a given product is deleted in SmartSpace, the name and comment will be removed. When the change to remove the product name is processed, the comment of the product has already been removed, so the delete statement will not work.
Instead, we could use the simpler statement:
Now the statement can be evaluated as the product name is removed, because the service knows the name that has been removed, and doesn't have to look up the comment of the same product.
The query editor
The query editor allows a database connection to be selected, and then a sequence of alternating "SQL Text" and "Property" entries to be configured. These are concatenated to build the SQL statement to be executed.
The property selection drop-down includes the value of the primary property of the export (at the very bottom of the list) and also all possible properties of objects otherwise included in the primary exported property. For example, if the primary property is "<Product> has <Attribute>", where both Product and Attribute are object types, then the drop down will include all "simple" properties of Product; all simple properties of Attribute; and the value 'Product' has 'Attribute'.
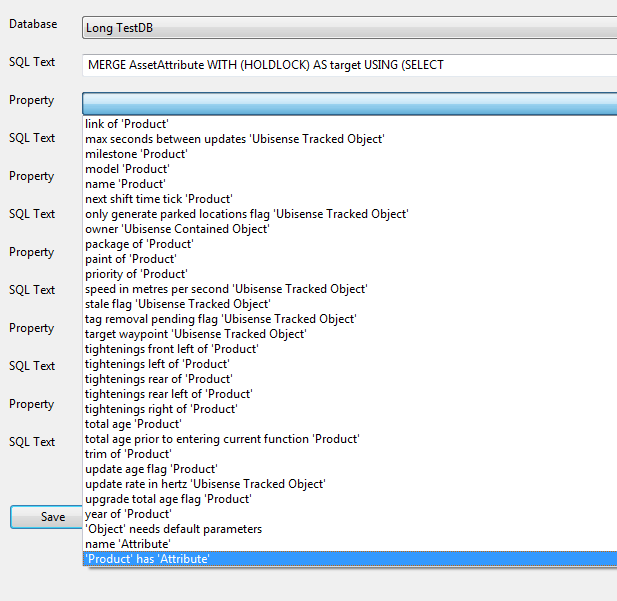
When there are multiple columns in the property with a given object type, they will be distinguished in the drop-down by a number, where the first object of the type will be "1", and the second "2", etc. For example, if there was a property '<Function> is prerequisite of <Function> in <Process Map>', then the available properties would include "name 'Function': 1" and "name 'Function': 2"
When the export is executed for each row of the primary property, the text and selected property values will be used to create the SQL statement to be executed.
Scheduling exports
An export will by default be executed when any property in the export is changed. When a row is inserted or updated, the upserts will be executed. When a row is deleted, the deletes will be executed.
If an update period is specified, then changes will be accumulated by the service until that period expires, and then all changes will be executed at once as a single batch. This is useful if a SmartSpace property changes frequently, but the integration only requires occasional updates to the database table, because it reduces the database server load.
It is also possible to specify a trigger property. If a row of the trigger property is inserted, deleted or changes, then the upserts for the corresponding objects will be executed. If the trigger property does not share any object types with the exported property then it will have no effect.
Finally, when the specific database engine service starts, all export upserts are executed for all current rows of their primary properties.
Export errors
When an error occurs executing an export upsert or delete, the error will be logged to the "rdb_exception" platform monitor stream. Enable this stream while configuring exports to view errors in the current configuration. See Tracing for information on other streams.
Unlike imports, there is no Test button.
Imports
Creating, editing and deleting
Double-click on <Create new import> to add a new import definition, and double-click an existing import to edit it. In both cases the Import editor will be displayed. To delete an import, select the row and press Delete. A confirmation dialog is displayed.
Import editor

In the Import editor, no changes are made to the current configuration until the Save button has been clicked. It is safe to edit the import and test without any impact on the current configured system. The Cancel button discards any pending changes.
Select the import type
Each import has a primary object type, which is selected in the Import type drop-down, at the top of the editor. This cannot be changed once an import has been defined, because the type chosen determines the properties available to import into, and those that can be bound into queries. If the import is configured to create and delete objects, then those objects will be this type.
It is not possible to define the query or any imported property mappings until the import type has been selected.
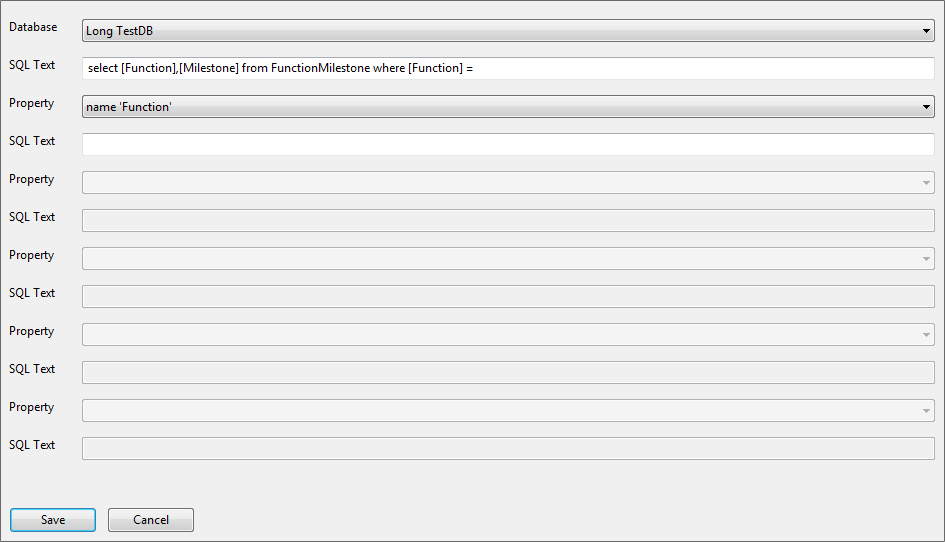
Define the query
The query definition can be edited by clicking the Edit query button. You cannot directly type into the query definition text box as this is just for reference. The query editor is the same window as in the Export editor. Select a database connection to use, and then query is built up from an alternating list of SQL text and (optional) bound properties.
There are two forms of import query, and they are executed differently.
- Unbound: When no property drop-downs are configured, and the entire query is contained in the first "SQL Text" line, then the query will be executed once each time it is triggered, and all rows applied to the current application data as defined by the property column mappings.
- Bound: When at least one property drop-down is configured, the query will be executed separately for each object instance for which it is triggered. See the Execution conditions section below. The results for each execution will then be applied to the current application data as defined by the property column mappings. The query shown above is a bound import query.
In the import configuration, the properties available will all be simple properties of the import type.
Each query can import into one or more properties of the import type. The "Import to property" section of the editor is used to set up these property mappings, including which properties are imported to, and which result columns returned by the SQL query map to each column in the properties.
Double-click <Create new result> to add a new mapping, or double-click an existing mapping to edit it. To delete a mapping, select a row and press Delete. No confirmation dialog is shown, but recall that no changes are actually applied until the "Save" button is clicked in the Import editor.
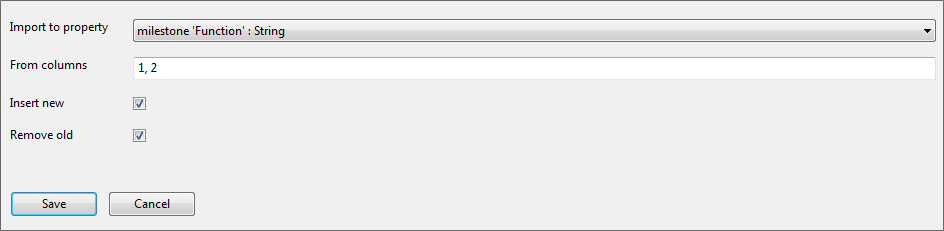
Select the property to which the result columns should be imported. Note that each property can only appear in a single import mapping, so if the property you wish to import to does not appear in the drop-down, it is probably already mapped in another import. To track down other uses of a property, use the filter controls in the main task pane.
Then type a comma-separated list of column numbers in the SQL query results to use for that property. The column numbers start at 1, so to use the first and second result column, type "1,2".
The number of columns that must be specified depends on the type of property selected.
- For a "name" property of the import type, only a single result column should be selected. Importing to a name property can be used to create and remove instances of objects, in combination with the "insert new" and "remove old" flags.
- For a "simple" property of the import type, two columns should be selected, one for the object and one for its column.
- For a "complex" property, one column must be defined for each key of the complex property, and one for the value.
Any property columns which are objects must be mapped to a string result column which is the name of the object. When importing the results, the result column string is looked up using the name property of the object type in the corresponding property column. See below.
Next specify the insertion and removal behavior for this property.
- Insert new: Check this box to insert property rows returned by the query for which the property key is not currently contained in the SmartSpace application data. If the mapped property is the name property of the import type, this causes the object to be created with the given name.
- Remove old: Check this box to remove property rows not returned by the query for which there is a current property key in the current SmartSpace application data. If the mapped property is the name property of the import type, this causes the object instance to be deleted when no longer returned by the query. For an unbound query, all current property rows are expected to be returned by the query. For a bound query, only the property rows for the triggering object are expected to be returned. Any expected rows which are not returned will be removed if this box is checked. Thus this flag can be used correctly with bound queries.
Testing the query
The import query and mappings can be tested before they are saved. Click the Test query button at the bottom of the Import editor. To test a query, the service for the database type must be running (Relational Database SQL Server, or Relational Database Oracle), otherwise an error will be shown. This is the only part of configuration which requires the database specific service to be deployed and running.
When a query is executed, a text window is displayed showing the result and technical details.
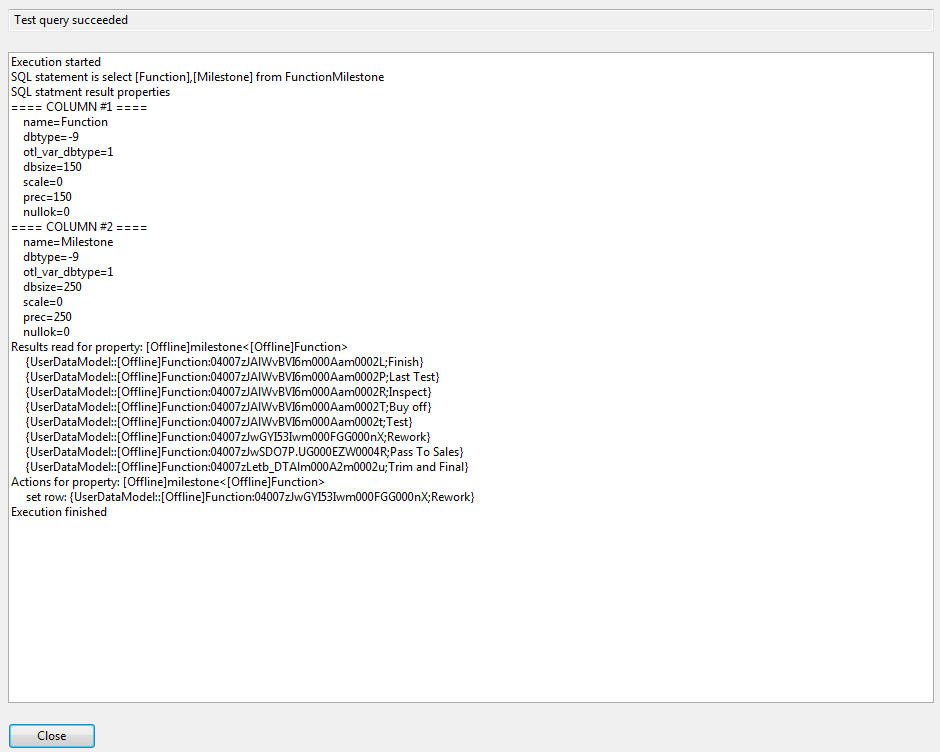
The test output includes:
- The SQL statement generated from the configured SQL query.
- Any errors or exceptions generated when the SQL was sent to the database.
-
The output columns of the SQL statement, and their internal types and precision. For reference, the otl_var_dbtype field of each column is one of:
Code
Type
1
null terminated string
2
8-byte floating point number
3
4-byte floating point number
4
signed 32-bit integer
5
unsigned 32-bit integer
6
signed 16-bit integer
7
signed 32-bit integer (for 32-bit, and LLP64 C++ compilers), signed 64-bit integer (for LP-64 C++ compilers)
8
data type that is mapped into Oracle date/timestamp, DB2 timestamp, MS SQL datetime/datetime2/time/date, Sybase timestamp, etc.
9
data type that is mapped into LONG in Oracle 7/8/9/10/11/12, TEXT in MS SQL Server and Sybase, CLOB in DB2
10
data type that is mapped into LONG RAW in Oracle, IMAGE in MS SQL Server and Sybase, BLOB in DB2
11
data type that is mapped into CLOB in Oracle 8/9/10/11/12
12
data type that is mapped into BLOB in Oracle 8/9/10/11/12
16
DB2 TIME data type
17
DB2 DATE data type
18
Oracle timestamp with timezone type
19
Oracle 9i/10g/11g TIMESTAMP WITH LOCAL TIME ZONE type
20
MS SQL Server, DB2, MySQL, PostgreSQL, etc. BIGINT (signed 64-bit integer) type
23
RAW, BINARY, VARBINARY, BYTEA, VARCHAR BYTE, CHAR BYTE, etc.
27
unsigned 64-bit integer
- The results read when the query was executed, after looking up internal object IDs for any object names read. Note that if the query is a bound query, it is tested with an arbitrarily chosen instance of the import type picked from the current application data.
- Any type conversion errors when the query results are applied to the mapped properties.
- The actions that would be applied to the SmartSpace properties if the query were actually executed right now. Actions are insert row, set row and delete row, and also show creation and deletion of objects. No actual actions are applied during the test.
Forcing columns to match property types
Sometimes the database binding may have a default type for the results of a query that does not match the property it is being imported into. For example, if the property has a bool value, and you are attempting to return '1' from a query as "true", the result is incorrectly converted to a numeric (i.e. floating point) type by the default Oracle binding. However, it is possible to force a specific type (and column order) for each return column, using the following syntax:
SELECT COLUMN2 :#1<type>, COLUMN2 :#2<type> FROM ...
The number after the '#' character determines the column number for this result column. The above statement returns them in the order they are declared. The 'type' in angle brackets determines how the column is bound. The following set of types is supported:
 <char[XXX]>
 <double>
 <float>
 <int>
 <bigint>
 <ubigint>
 <unsigned>
 <short>
 <long>
 <raw[XXX]>
 <raw_long>
 <timestamp>
 <varchar_long>
If you cannot get an import to load correctly because of type errors, try using a suitable type from the list above for the column which is not working. For example, to return a product name and a bool 'true' from a table ProductIsActive, we need an integer type for the bool property value:
SELECT Name, 1 :#<int> FROM ProductIsActive
Importing objects and date/times
Special processing occurs when importing to object and date/time properties.
- For Object columns in a property, the SQL result must be a string column, and this is looked-up in the name property of the type to find the instance of the object. If the instance is not found, then it will be skipped, unless the mapping is to a name property for the import base type, and the "insert new" flag is set, in which case a new object instance of that type will be created.
- For Time columns in a property, the importer assumes that the column in the results will be readable as a datetime (otl_var_dbtype = 8), and will be in UTC. If this is not so, convert the column within your SQL statement, for example:
CAST(SWITCHOFFSET(datecolumn, '+00:00') AS DATETIME)
Calling stored procedures
In SQL Server connections, you can use the ODBC call markup, and pass parameters too, in your query.
{ call dbo.MyStoredProcedure( [[bound_property]], [[bound_property]] ) }
The final part of configuring an import is to set the execution conditions. There are a number of options, which can be combined as required. Check the box next to each method you want to use to trigger execution, and then fill in any parameters for that method.

-
Periodic execution: the query is executed at regular intervals, specified in seconds, minutes, hours or days.
- An optional test query can be specified, which should return a single row with a single string column. This should be a "hash" or sequence number used to detect changes to the database. The service records the last value returned by the test, and if it is the same as the last time it was executed, the import is skipped. Typically this query will either use some sort of binary table hash, or a grouped maximum of some change management column on the table.
- If the test query uses a hash function, then there may be a small chance of a hash collision, where the data changes but the hash does not. The test can be skipped occasionally to get around hash collisions.
- At given times during each day: a list of times are specified in 24-hour clock, in the local time zone.
- When any of the bound properties change: the query is executed when any property included in the import query definition changes, including inserts and deletes.
- When another trigger property changes: you can specify any other property of the import type. When a row changes, or is inserted or deleted, the query is executed.
All queries are also executed at startup of the database specific service.
When a bound query is triggered by a property change, it is executed once for each of the import type object instances in the changed property rows.
When a bound query is triggered by any other method, it is executed once for each current object instance of the import type in the SmartSpace application data.
When an unbound query is triggered, it is executed once.
Tracing
The following platform monitoring streams are available:
- rdb: Messages about basic functionality such as initialization of the services
- rdb_query: Messages about each query execution, including the statements executed, and any application data errors.
- rdb_exception: Errors encountered during execution of SQL queries.
Trace parameters can be set using the ubisense_configuration_client application. The command
sets the configuration parameter <parameter name> to the value <parameter value>.
For example, use the command:
to enable the three monitoring streams and then restart the RDBMS services.
Deployment tool
The RDBMS map feature comes with a deployment tool which can be used to save and load relational database imports and exports to/from a file. The tool can be used to move configuration from integration to production, or the reverse.
E:\temp\> ubisense_relational_database_config.exe
You need to specify a mode
Usage: ubisense_relational_database_config.exe export [OPTIONS]
   or: ubisense_relational_database_config.exe import [OPTIONS]
Export and import relational database integration definitions.

OPTIONS
  -c, --clear               Remove configuration not in the input
  -i, --input <input>       The input file
  -o, --output <output>     The output file
  --help                    Display this help and exit
  --version                 Display version information and exit
In export mode, the tool writes all current relational database definitions to the output file (or the standard output if not specified). The output is a JSON format file, and can be edited with a text editor if needed. Definitions include databases, imports and exports, and all their properties.
In import mode, the tool reads the input file (or the standard input if not specified) and applies the definitions to the current relational database configuration, updating matching existing configuration. If the -c option is given, it also removes any other databases, imports and exports not in the current input.
For example, to save the configuration to file defs.js:
ubisense_relational_database_config.exe export -o defs.js
To load the configuration from defs.js, clearing any existing configuration:
ubisense_relational_database_config.exe import -i defs.js -c
To get the tool, run Application Manager, click DOWNLOADABLES, and select Application integration > RDBMS admin tools > ubisense_relational_database_config.exe. Click Download.