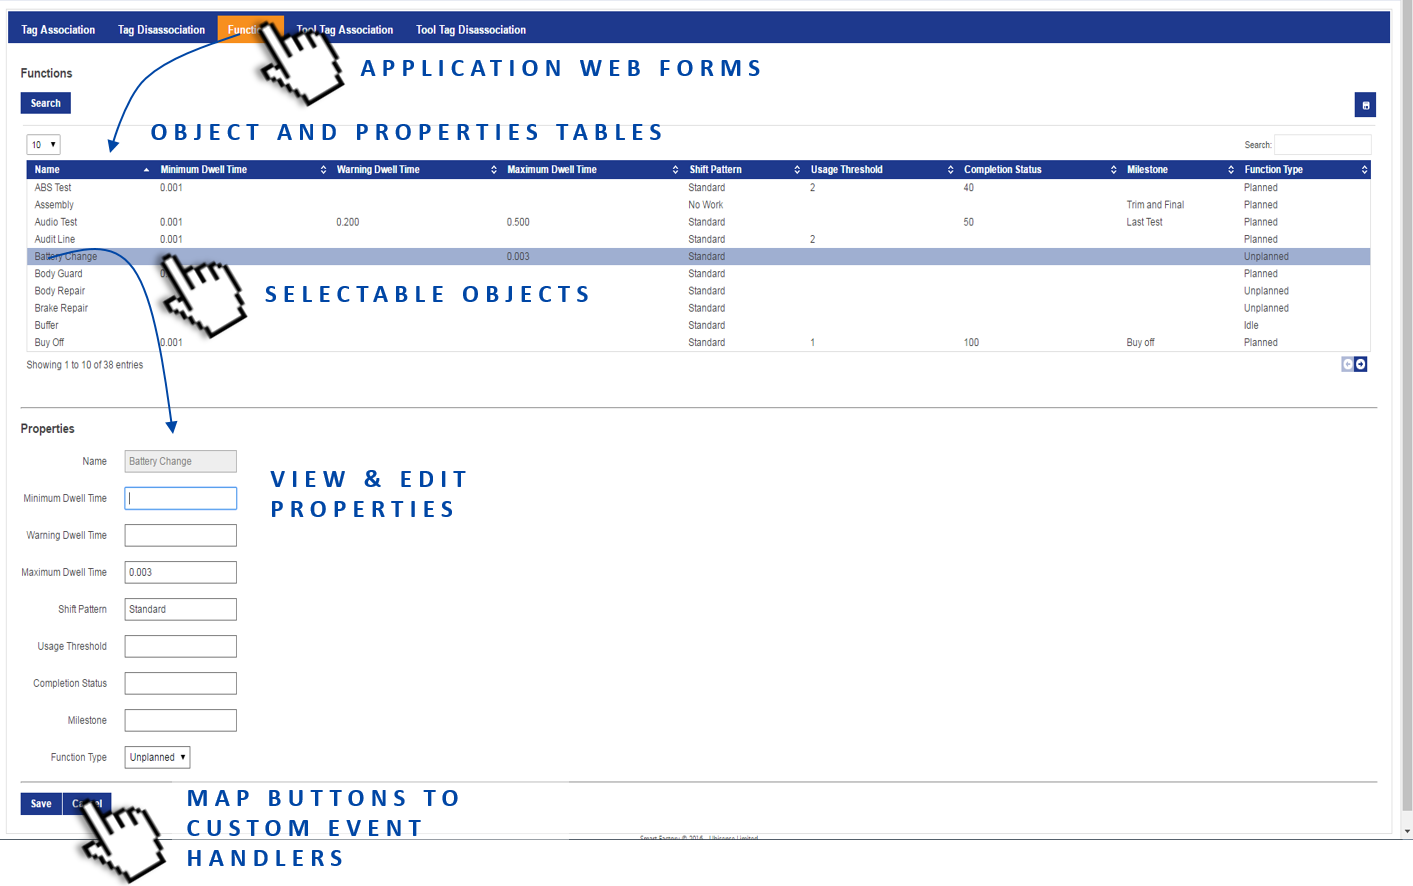
Web forms
Customizable screens showing role-specific lists and forms based on current data objects, types and business object properties
Summary
Web forms are a browser-based interface that display textual data from the Ubisense data model to end users, and optionally allow the entry of data.
Features
The set of interface screens shown to a user is configurable based on their role memberships. Similarly, users can be allowed to enter data into these screens using configurable forms, and this data is written into the data model. The screens update dynamically, and columns and rows can be also be colored based on data.
Web forms can be accessed from a wide variety of client devices, ranging from desktop computers to tablets and phones, and do not require installation.
Configuring Web forms
Searches and Web Forms
The data displayed in a web form or "screen" is retrieved by a search in the same way as it is for web maps (described in Web maps). Hence, the first part of creating a web form is choosing or creating an appropriate search. Detailed information about configuring searches is available in Web searches.
When configuring searches for use in forms, you specify an object (the subject of the search) and properties for display in a table. Additionally, you choose which properties are displayed, and optionally edited, when an object is selected in the table.
When you create a search for use with a web form, you must also ensure that the search has been added to the roles who will be using the web form. Also, if you want users to edit properties on the screen, you must make them "settable". Use the Users and roles workspace to assign searches to roles and to make properties editable. See Access Control Management.
Defining Screens
When you have chosen your search, create the screen using the Web forms workspace. Here you can give the screen a name, assign the search, and determine how users interact with it. Once created, you can refine the basic configuration as discussed in the sections below. See Configuration options for Web forms for how to define these options for your screen.
To include your screen on the Configuration screen in SmartSpace Web, you must assign it to the roles who require access to it. See Assigning a screen to a role.
Tag association/disassociation
One of the key features of web forms is to allow manual association and disassociation of tags and objects. This is configured by selecting the tag association mode when defining the form.
There are four possible choices of tag association for a web form:
- Not Allowed: No tag association fields will be available in the form. This is the default.
- Allowed: When a row is selected, or Create new is clicked, so that the form is displayed, there will be a section “Tag Association” containing tag id and position fields. The user may leave the tag id as the default, in which case no tag will be associated with the object.
- Compulsory: As Allowed, but if the user leaves the tag id as the default and clicks Save, then the form will display the error Some compulsory values not entered.
- Disassociation: The form is used to disassociate tags from objects. The Save button becomes Disassociate. See Buttons in Web forms for how to configure a form to disassociate a tag and also delete an object.
For examples of configuring forms for the manual association and disassociation of tags, see Creating forms for manual tag association and disassociation
Default Tag Types
When a web form is used for tag association, it allows the input of a tag type. The default tag type to assign can be set using the tag_default_type configuration parameter, which is set to the name of one of the DIMENSION4-supported tag types: Industrial tag (C cell), Minitag, Powered tag, Tool tag (A cell), UBTag (no energy count), UBTag (with energy count). Manual input of tag types can be turned off with the web form option Hide tag types. See Configuration options for Web forms for further information. If a default type is configured, and Hide tag types has been set, the default type will be used automatically.
Default Prefix for Tag IDs
The configuration parameter tag_default_prefix is set to 00:11:CE:00: by default. When creating a new tag association, the tag ID field is prefilled with this prefix. This allows the user to fill in the rest of the tag ID, if manually entering it. If the tag ID is scanned using a barcode reader, the prefix is automatically ignored, so the correct tag ID will be assigned without having to clear the prefix before scanning.
Data input in Web forms
You can configure web forms to allow users to edit the properties of existing objects or to add completely new instances of objects. Properties must have been made settable for the role(s) who will carry out data input and must have been added to the details view of the search on which the form is based. Additionally, properties can be made mandatory, and specific formats can be enforced for object names (see Configuring input constraints).
One important use of the mandatory setting is to prevent the creation of objects with no names. To ensure that any objects that are created or edited in a web form have a value entered for the property that is the object's name, it is advisable to make that name property mandatory.
Buttons in Web forms
Web forms can also be configured to include custom buttons that set properties of existing objects. The buttons are linked to a Bool valued property of the object, and when clicked, set the value to true for the selected object. Business rules, or integration code, can then perform some action based on that Bool property being set for the object. See Adding buttons to a screen for further information.
Manually deleting objects
One built-in Boolean property of objects that can be set using a button is the “delete pending flag”. Creating a button based on this property is the recommended way to allow certain web site users to manually delete objects from the system. The “delete pending flag” follows the correct sequence of actions by first disassociating any tag from the object, then deleting the object from the data model, so it avoids any race condition where the object could receive a location after it has been removed. If additional clean up actions are required before deleting the object, then another Boolean property should be used along with business rules/integration code to do the clean-up and then set the delete pending flag to finally remove the object.
Colors in Web forms
Web forms can be configured to use object properties to set the color of parts of the result list. To do this, there must be a string valued property of the object type that contains valid HTML5 color strings. See Defining colors for a screen for how to configure colors in web forms.
Web forms at runtime
SmartSpace web forms are browser-based tables each displaying data based on a predefined search (described in Web searches).
Each form is accessed via a tab at the top of the Configuration screen in SmartSpace Web. Only forms available to your role(s) will be shown (configured in the Web forms workspace).

In order to display object data, you must belong to a role which is authorized to run the search associated with the form (configured in the Users and roles workspace). For searches that do not run automatically, click the Search button to run the search. Once displayed, data updates dynamically. Click the Refresh button to refresh the data manually. Click the Download button to export the tabulated data to a file in CSV format.
You can sort on one or more columns in the table. Click the heading of the first column to sort on. Click a second time to reverse the sort order. To sort on additional columns, hold down Shift and click the relevant headings.
Clicking on an object's details causes additional information about the object's properties to be displayed below the table. If your role permits, you can edit the object's properties here. Click Save to update the data model with your changes.

New objects can also be added to the data model, again if your role permits this: click on Create new to open a blank form for data entry. Properties marked with an asterisk (*) are mandatory. Any rules constraining the format of object names will be enforced.
When inputting or amending dates, click the date

Here you can:
- Select the date from the calendar, and set the time using the sliders
-
Type a date and time directly (not available in mobile device mode):
- Use / to separate parts of the date and : to separate hours and minutes
- Time is in 24-hour format
-
Seconds are permitted if the details format (in WEB SEARCHES in SmartSpace Config) has seconds precision.
- Click Now to select the current date and time
Click Done to save the changes.
There may also be custom buttons on the form (see Adding buttons to a screen for how to add buttons). Click on the button to trigger the custom event associated with it.
Creating forms for manual tag association and disassociation
Tags can be associated with objects in a number of ways. The following describes how to configure web forms for manual association and disassociation of tags. You can also manually associate tags with objects using the Tag association workspace in SmartSpace Config and, with the licensing of the Location rules component, Automated tag association becomes available to you.
Before you can associate and disassociate tags in SmartSpace Web, you need to define a search that includes the relevant tags and objects, and then create forms for association and disassociation.
Creating a Search for Objects and Tags
In SmartSpace Config, open the WEB SEARCHES tab and define a search. The example below shows a search, vehicles and tags, based on the Product type and including the Associated Tag property.

Remember to use the USERS / ROLES tab in SmartSpace Config, or the Roles screen in SmartSpace Web, to add the search to roles that are to use it.
Creating Forms for Association and Disassociation
In SmartSpace Config, open the WEB FORMS tab and create forms for association and disassociation. The example below shows the Tag Association form which uses the vehicles and tags search and has been configured to allow users to Modify existing objects and for Compulsory tag association. The Tag Disassociation form is set up similarly, but with Disassociation as the tag association setting. (Additional association and disassociation settings shown in the lower part of the screen are discussed in Configuration options for Web forms.)

Remember to use the Available to Roles tab in the Web forms workspace, or the Roles screen in SmartSpace Web, to add the forms to roles that are to use them.
Define a Tag Position
If the tag will be offset from the origin of the object, define a tag position. In SmartSpace Config choose the TAG ASSOCIATION tab and in Tag Positions for Types define a new tag position.

Using Web forms to Associate and Disassociate Tags
On the Configuration screen in SmartSpace Web you should now see two tabs for the two forms you created. The Tag Association screen is shown below.

Use the form in the lower part of the screen to input the Tag Id (a compulsory item, indicated by an asterisk), and the tag's position and type if these have been made available in the form.
If you display the Tag Disassociation screen, you should see the following.

Note that you cannot change any details in the Disassociate Tag form and you are offered a single Disassociate button.


