Operations web interface
Web user-interfaces for the operation of applications and maintenance of tags in the Ubisense location system
Summary
Operations and maintenance users can use browser-based interfaces to perform or monitor associations, configure application users and working time, and perform periodic tag maintenance such as battery changes.
Operations web interface provides a browser-based interface to the following areas of operations:
Shift Configuration UI
Users can update and modify working time schedules through a browser-based calendar and shift pattern editor. Shifts and working time are immediately updated in the underlying data model.
Manual Tag Association and Disassociation UI
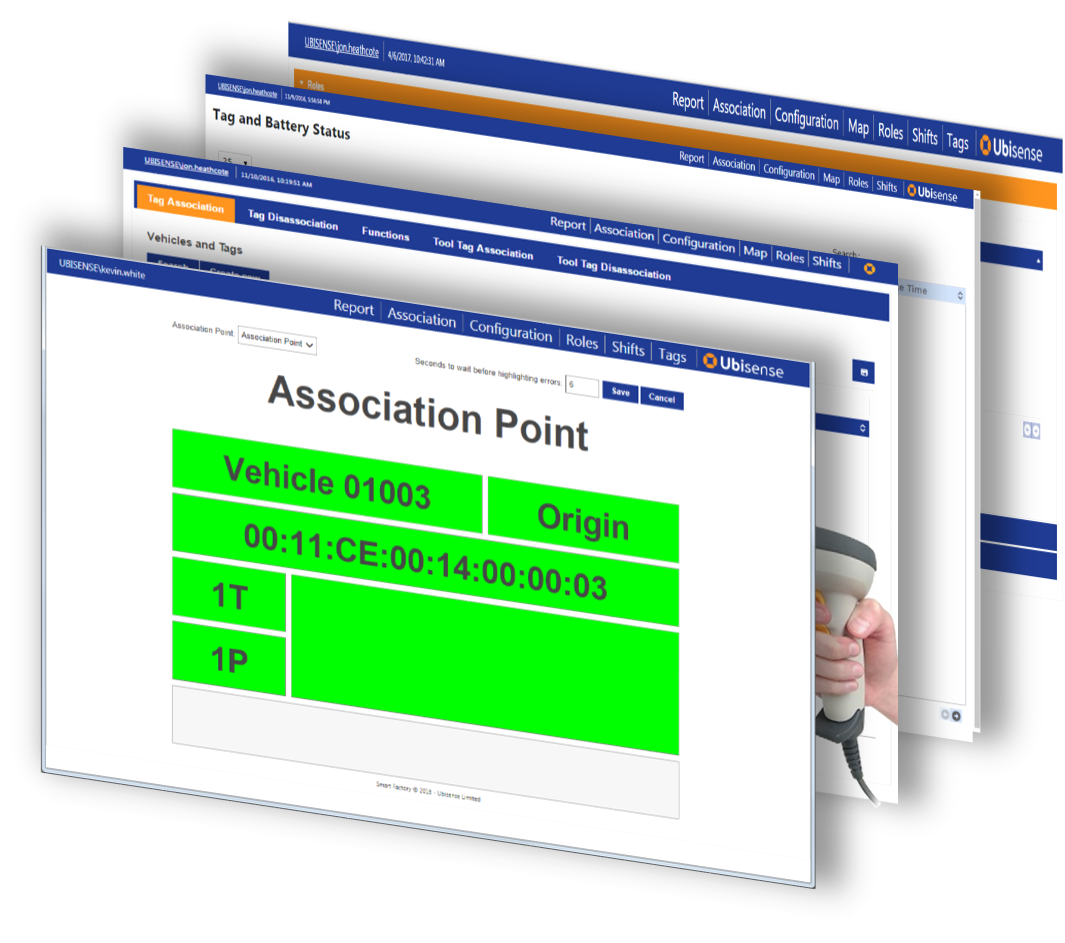
Manual tag association requires the operator to enter a tag identifier and the name of an object. This can be done by typing them in manually or using a barcode scanner. The interface can also be configured to create new objects at tag association time.
Automatic Tag Association UI
The user can see the status of automatic tag association. This is useful if an operator is attaching a tag to an object, say a car, and wishes to know whether automatic association has happened correctly.
Tag Status UI
The user can see the status of all tags, including whether they are owned, i.e. assigned to, an object, whether they are currently active, and the status of the battery (whether it is OK or running low). The user can also reset the tag battery status after the battery has been replaced by an operator.
Users and Roles UI
A browser-based view of the underlying users and roles model, giving system administrators simple access for editing or extending the underlying user and group allocations.
Introduction to Operations web interface
The Operations web interface provides browser-based access for authorized users to the following:
- Role and user configuration
In SmartSpace Web click Roles to display and update details of users and roles and access to searches and forms. See Roles for further information. - Shifts
In SmartSpace Web click Shifts to display and update details of shift patterns and shifts. See Shifts in SmartSpace Web for further information. - Tag and battery status
In SmartSpace Web click Tags to display the status of individual tags and to record battery changes. See Tag status for further information. - Status of automated tag association
If you have licensed the Location rules component, then you can click Association to display the progress of automatic tag association. See Web Site Operation for further information. - Sensor status
If you have DIMENSION4 services licensed and installed, then in SmartSpace Web click Sensors to display the status of sensors and to reboot therm. See Sensor status for further information.
Other screens in SmartSpace Web provide access to Web reports (if the Reporting component is licensed), and to Web maps and Web forms.
Roles
The Roles screen in the Operations web interface allows you to create and manage roles, assign searches and screens, and add members to them. For a detailed explanation of users and roles in SmartSpace, see Users and roles.
Other aspects of configuring roles–making properties editable, and assigning views–can only be carried out by using the Users and roles workspace in SmartSpace Config.
Click on Roles to display the screen in SmartSpace Web.
Only members of the System.Manager role can access this screen.
Managing Roles
In the Roles screen, click on Roles to open a tab where you can view and manage roles.
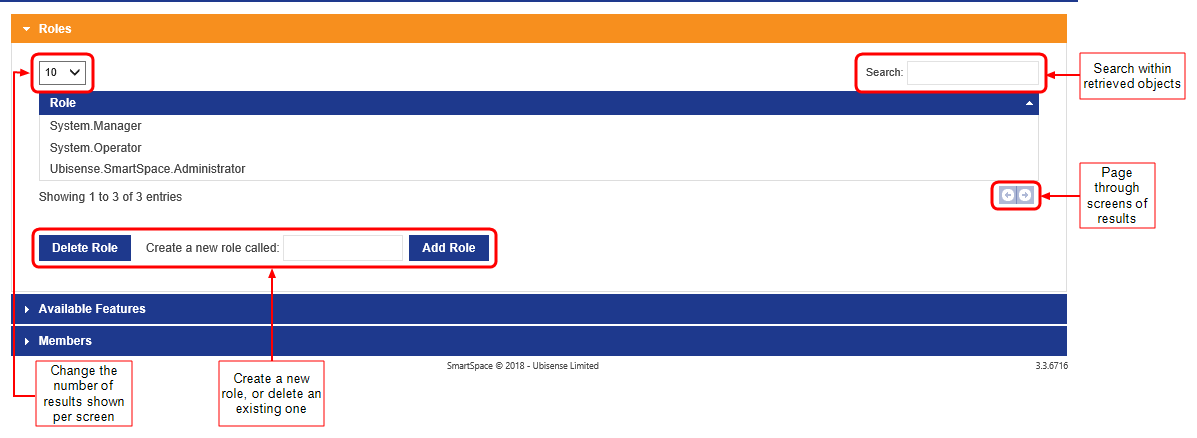
A list of roles currently available in SmartSpace is displayed.
To add a new role:
- Type a name for the role at Create a new role called.
- Click Add Role. The new role is added to the list of existing roles.
To delete a role, select it from the list of roles and click Delete Role. You will be asked to confirm the deletion.
Assigning Searches and Web Forms to Roles
Click on Available Features to open a tab where you can make searches and web forms previously defined in SmartSpace Config available to roles.
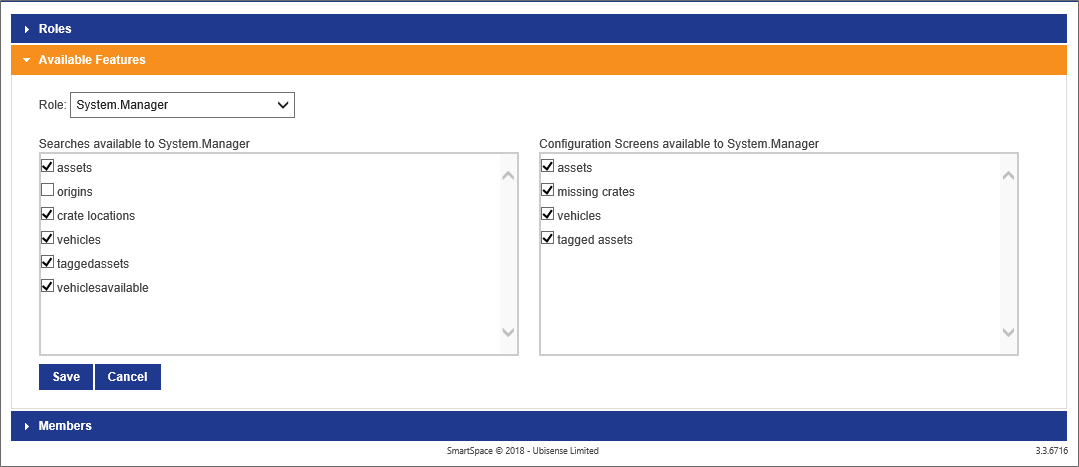
To assign searches and web forms to a role:
- Choose the role from the Role dropdown.
- Select the searches and configuration screens the role can access.
- Click Save.
Adding Members to Roles
Click on Members to open a tab where you add members to roles and configure their email notifications.

To add a member to a role:
- Choose the role from the Role dropdown.
-
Click Add Member.
-
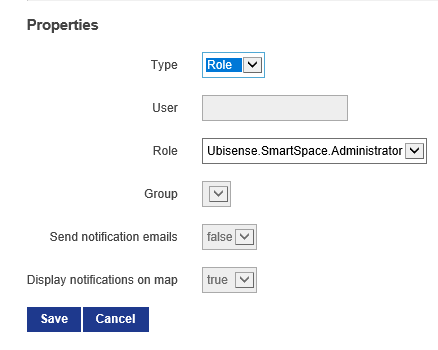
Enter details of the new member in the Properties form.
- Choose whether to add a new or existing user, an existing role, or a directory service group.
- Select the user (or add a new one), role or group.
- When adding a group only, you also specify whether the group receives emails, notifications, or both.
See How Notifications Work for Users, Roles and Groups for an explanation of how emails and notifications work for different kinds of role member.
- Click Add Member to save the details.
To remove a member from a role, choose the role from the Role dropdown, select the member to remove, and click Delete Member. You will be asked to confirm the deletion.
How Notifications Work for Users, Roles and Groups
The Send notification emails and Display notifications on maps check boxes are not accessible when you add a user, or another role, to a role. They are only available when adding a group.
This is the expected behavior.
Notifications are generated when you use the Notify action in the Business rules engine.
Notify accepts several different inputs:
- Named user
- Email address
- Group name
For the first two, notify generates a web map popup or an email notification respectively. It’s obvious what is being requested at the rules engine level because of the type of input.
Groups, however, could contain both users and email addresses, so you have to tell the system if you want one or both (maps notifications and emails) explicitly. Otherwise you run the risk of sending alert emails to everyone in an active directory group when all you wanted was popups on the web map.
Default Roles in SmartSpace Web
SmartSpace is supplied with the following roles which control access to different parts of SmartSpace Web:
- System.Operator: members of the System.Operator role can access the Tag and Battery Status screen and the Sensor Status screen.
- System.Manager: members of the System.Manager role can access the Roles screen and the Shifts screen.
- Ubisense.SmartSpace.Administrator: if Reports engine developer is licensed, members of the Ubisense.SmartSpace.Administrator role can view all reports and create and edit new ones.
These roles are nested: System.Manager is a member of System.Operator; and Ubisense.SmartSpace.Administrator is a member of System.Manager. This means that the permissions are inherited so that by default the different roles can access screens in SmartSpace Web as follows:
| Report Creation | HMI Creation | Roles | Shifts | Tags | Sensors | |
|---|---|---|---|---|---|---|
| System.Operator |
|
|
|
|

|
|
| System.Manager |
|
|
|
|
|
|
| Ubisense.SmartSpace.Administrator |
|
|
|
|
|
|
From SmartSpace 3.7, additional default roles are available that enable finer control of access to different parts of SmartSpace Web including the Automated tag association feature from Location rules. These new permissions do not change the System.Operator, System.Manager and Ubisense.SmartSpace.Administrator roles. The additional roles are organized as follows:
| Role | Has members... | Allows you to... |
|---|---|---|
| System.Web.AssociationAdmin | System.Operator |
|
| System.Web.AssociationViewer | System.Web.AssociationAdmin | View the Association screen in SmartSpace Web |
| System.Web.HMIAdmin | Ubisense.SmartSpace.Administrator | Create HMIs, and add roles to control access |
| System.Web.ReportAdmin | Ubisense.SmartSpace.Administrator | Create reports and their constituent parts, add roles to reports |
| System.Web.RolesAdmin | System.Manager |
|
| System.Web.RolesViewer | System.Web.RolesAdmin | View roles |
| System.Web.SensorsAdmin | System.Operator |
|
| System.Web.SensorsViewer | System.Web.SensorsAdmin | View the status of sensors |
| System.Web.ShiftsAdmin | System.Manager |
|
| System.Web.ShiftsViewer | System.Web.ShiftsAdmin | View shifts, shift patterns, and overrides |
| System.Web.TagsAdmin | System.Operator |
|
| System.Web.TagsViewer | System.Web.TagsAdmin | View the Tags screen in SmartSpace Web |
Sensor status
If you have the DIMENSION4 services licensed and installed, the Sensor Status screen becomes available to display details of sensor statuses. You can also use this screen to carry out the following sensor managements operations on a selected sensor:
- reboot
- activate or deactivate
- swap a new sensor for the old one
- add a comment
Only members of the System.Operator role can access this screen.
Click on Sensors to display the screen in SmartSpace Web.
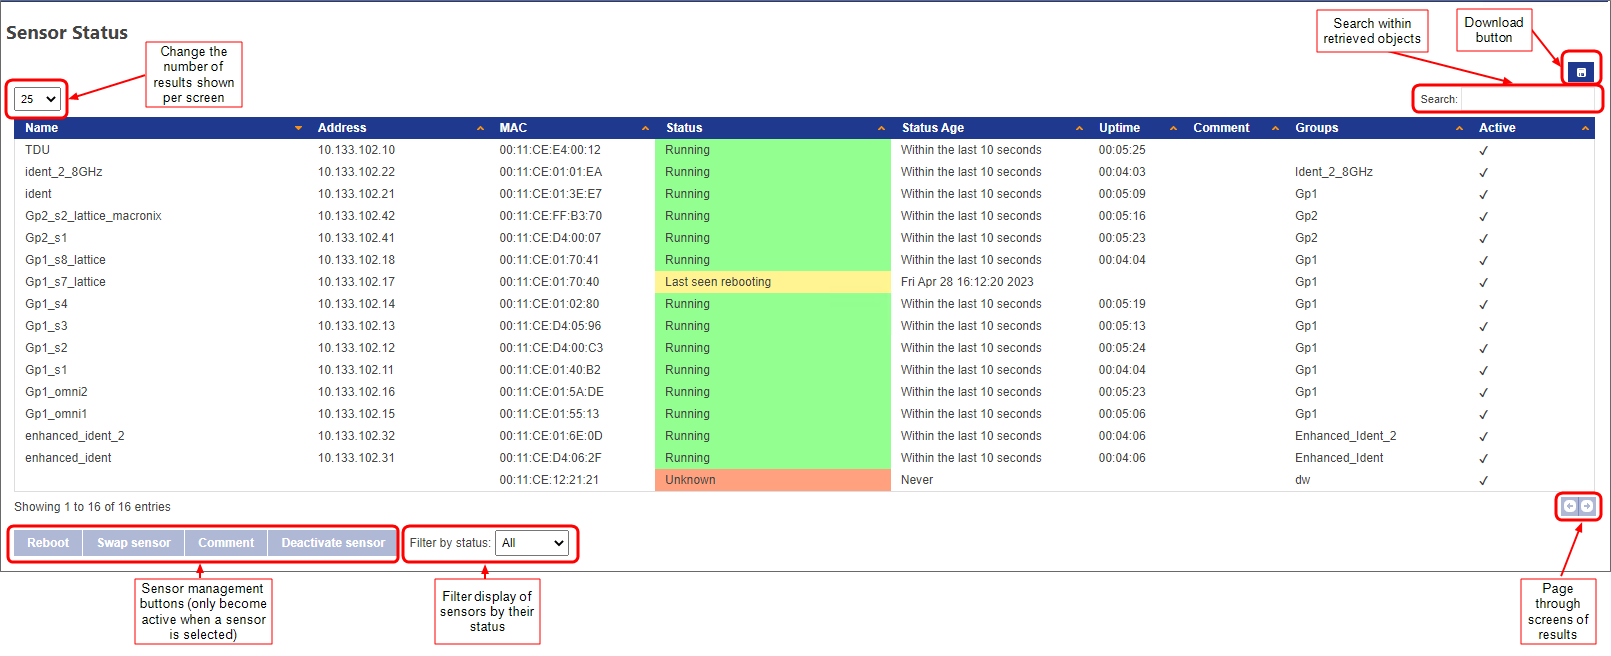
Once displayed, you can click the Download button to export the tabulated data to a file in CSV format. The export includes all data regardless of any filters you may have applied. Note: Uptime is exported as a value in seconds.
You can sort on one or more columns in the table. Click the heading of the first column to sort on. Click a second time to reverse the sort order. To sort on additional columns, hold down Shift and click the relevant headings.
For each sensor, details shown are: name, IP address, MAC address, status
Entries in the Status column are displayed on a color-coded background. Status can be:
- Running
- Initializing
- Unknown
- No timing signal
- Rebooting
- Last seen running
- Last seen initializing
- Last seen with no timing signal
- Last seen rebooting
Status Age indicates how long the sensor has been in its current state.
You can filter sensors by status. Options are:
- All
- Running
- Warning
- Error
You can also filter the retrieved sensors by typing a search term. For example, in the screen below, the sensors have been filtered on the search term "eng".

Sensor Management
Select a sensor from the table by clicking anywhere in its row of details, and the sensor management buttons become active. Operations you can perform on a selected sensor are described in the following sections.
Rebooting Sensors
You can reboot a sensor by selecting it in the table and clicking Reboot. You are asked to confirm the operation.

Click Reboot to reboot the sensor.
Swapping sensors
Swap a new sensor in place of an old one by selecting a sensor from the table and clicking Swap sensor.

In the Swap sensor dialog, the MAC address of the old sensor is shown. Enter the MAC address of the replacement sensor and click Swap sensor.
Adding comments
Add a comment to a sensor by selecting a sensor from the table and clicking Comment.

Enter the comment and click Save.
Deactivating/Activating Sensors
Deactivated sensors do not receive UWB data. You may want to deactivate a sensor if it has been knocked out of alignment and is giving bad data.
Deactivate an active sensor by selecting it in the table and clicking Deactivate sensor. You are asked to confirm the operation.

Click Deactivate sensor to deactivate the sensor.
You can activate an inactive sensor in a similar way: select it in the table, click Activate sensor and confirm.
Shifts in SmartSpace Web
The shifts screen in the Operations web interface allows you to view and modify shift patterns to enable the Business rules engine to define working times, and for use in Reporting. These activities can also be carried out in the Shift patterns workspace in SmartSpace Config. For a fuller description of how shift patterns work, see Shifts
Click on Shifts to display the screen in SmartSpace Web.
Only members of the System.Manager role can access this screen.
Creating Shift Patterns
Click on Shift Patterns to open a tab where you can view and define shift patterns and their associated working times.

A shift pattern defines the working times within a 24-hour time period. More than one period of work can be input for each shift pattern, for example to enable the scheduling of break periods.
To add a new shift pattern:
- Type a name for the shift pattern at Create a new shift pattern called.
- Type in the working times:
- Enter time spans using the 24-hour clock
- Use -> to separate start and end times
- There can be several time spans, for example to indicate scheduled breaks in the working day, separated by a space
- Time spans cannot extend over midnight
- Click Add.
Defining Shifts
Click on Shifts to open a tab where you can display shifts and view and update the shift patterns associated with each day of the week.

To add shift patterns to the days of the week for a defined shift:
- Choose the shift from the dropdown.
- Set the shift pattern for a day by choosing from the Working Times dropdown for each day. The dropdown lists None (for a non-working day) and all shift patterns defined in the top part of the screen.
- Click Save.
Overriding a Shift Pattern for a Single Day
You can assign a specific shift pattern to a single date overriding its usual shift pattern. Click on Non-standard Days to open a tab where you can amend the shift pattern for a selected shift and date.

To assign a specific shift pattern to a single date:
- Select the shift from the Shift dropdown.
- Select the month and year, and click on the date.
- Choose the shift pattern from the dropdown or choose <No Override> to remove a previously-applied override.
- Click Save.
Any date that has been overridden is underlined on the calendar display.
Importing Shift Pattern Overrides
You can import a number of overrides from a text file rather than entering them individually. This can be useful, for example, to import a year's public holidays in advance.
The text file must be in CSV format organized as in the following example (the header row is optional):
date,shift,shift pattern
09/09/2019,Standard Week,None
10/09/2019,Standard Week,None
12/09/2019,Standard Week,Early lunch
16/09/2019,Standard Week,Early lunch
17/09/2019,Standard Week,Early lunch
18/09/2019,Standard Week,Early lunch
19/09/2019,Standard Week,Early lunch
20/09/2019,Standard Week,
The date field must be in a suitable locale-based format, or YYYY-MM-DD. Any lines without a valid date in the first column will be ignored.
Leave the third column blank to clear a date override.
The format of the shift and shift pattern must match those configured in the Shifts screen (or in SmartSpace Config).
To import shift pattern overrides:
- Create a CSV file containing the dates and overrides, as described above.
-
In the Shifts screen, open the Non-standard Days tab and click Import:

- In the Import dialog, click Choose file, select the CSV file, and click Open.
-
Click Import to start the process.
When the import is complete, the message Completed displays.
Tag status
Use the Tag and Battery Status screen to display information about tags. Details shown are:
- ownership and the last time this was updated
- activity and the last time activity was updated
- battery status and the last time this was updated
- tag type: used to determine the battery capacity of the tag
- firmware: the software version each tag is running (DIMENSION4 only)
From the Tag and Battery Status screen you can:
- set or change the tag type of a tag
- update the status of a tag's battery when the battery has been replaced
Other screens in SmartSpace Web may allow you to manually associate or disassociate tags with objects and this can also be done in the Tag association workspace in SmartSpace Config. A built-in search allows you to display the locations of tags on the web map.
Only members of the System.Operator role can access this screen.
Click on Tags to display the screen in SmartSpace Web.

When you first open the screen, no tag details are displayed. You can:
-
Type all or part of a tag ID and click Search to display one or more tags matching your input (recommended)
-
Click the Search button without entering search criteria to display all
We recommend you search for specific tags to reduce loading when there are tens of thousands of tags to search through.
In the example below, the search term 68:13 has retrieved a single tag:

You can filter tags by their battery status. Options are:
- All
- Warning and Failing
- Failing
- Replaced — indicates an operator has asserted that the battery has been replaced, but the battery has not yet been replaced or the tag has not yet generated a new battery energy count since it was replaced
Similarly, you can filter by tag type by choosing a tag type from the dropdown:

You can further filter retrieved tags by typing a search term. For example, in the screen below, the tags have been filtered to display those whose ownership is set to "Spare".

You can sort on one or more columns in the table. Click the heading of the first column to sort on. Click a second time to reverse the sort order. To sort on additional columns, hold down Shift and click the relevant headings.
Once displayed, you can click the Download button to export the tabulated data to a file in CSV format. The export includes all data regardless of any filters you may have applied.
Tag Management
Select a tag from the table by clicking anywhere in its row of details, and the tag management buttons become active. Operations you can perform on a selected tag are described in the following sections.
Resetting Battery Status
You can reset a tag's battery status, after the battery has been replaced, by selecting the tag in the table and clicking Tag Battery Replaced. You are asked to confirm the operation.

The new Battery Status Update Time is displayed in the table.
Setting Tag Type
You can set or change the tag type of a tag by selecting the tag in the table and clicking Change Tag Type.

Select the tag type from the dropdown and click Apply.
Changing the Configuration to Include Tags without Tag Types in the All Tags List
With the release of SmartSpace 3.7, the Tag and Battery Status screen no longer shows tags that have not been assigned a tag type unless No Tag Type is explicitly selected in the Filter by tag type dropdown. You can revert to the previous behavior–including tags without a tag type in the all tags display–as follows:
-
Use the ubisense_configuration_client command to set the show_tags_without_type configuration parameter to 1.
ubisense_configuration_client set show_tags_without_type 1
-
In Service Manager, restart the Ubisense/Visibility/Tag status client interface service.


