Setting up Ident Sensors
UWB sensors produce a location event by sharing data with other sensors in a group. In contrast, an Ident sensor produces the location of a tag from a single AOA, without any timing synchronization.
You can use standard Ident sensors if you simply want to determine whether or not a tagged object is inside a certain area, for example, if a car is inside a particular work area such as a Test or Rework Bay. Ident sensors can also be used for tag association and disassociation, where an object is located in an area that is remote from the UWB sensors.
You can use enhanced Ident functionality to detect the presence of tagged objects at one or more defined points in space by using Ident sensors in conjunction with Ident points. For example, with one Ident point you can detect one or more tags at a particular location. Alternatively, by defining an exclusion factor, you can configure an Ident point that only ever contains one tag at a time. (Note that exclusion works on a per-sensor basis. That is sensor A will only put one tag at ident point I, and sensor B will only put one tag at ident point I, but the two sensors may each simultaneously put two different tags at that ident point.)
Using two Ident points with an Ident sensor would enable you to detect a fast-moving tagged object and its direction of travel, for instance when passing through a gate.
You can use an Ident sensor either on its own, or in conjunction with other Ident and/or non-Ident sensors.
How Ident Sensors Generate Location Events
Standard Ident Sensors
A standard Ident sensor generates a valid location when:
- It receives a signal from the tag and the signal strength is above the configured Power Threshold (see Configuring Ident Parameters).
-
The AOA from the Ident sensor to the tag intersects with the height of the tag, which is determined by the Ident parameter Tag Height (see Configuring Ident Parameters).
The following figure shows an example of a valid location.
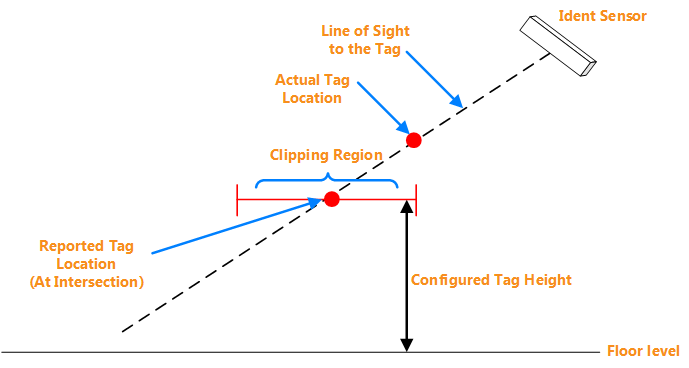
Valid Location Generated by an Ident Sensor
Invalid Locations
If the AOA does not intersect with the clipping region, the location event is reported as Invalid with the message Discarded by clipping region.
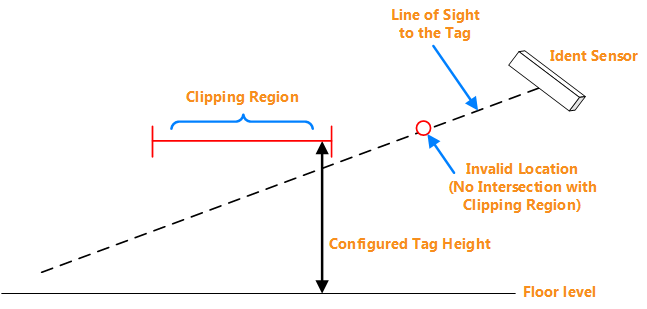
Location is Reported as Invalid
Enhanced Ident Sensors
An enhanced Ident sensor generates a valid location when:
- An Ident point exists within the 3D clipping region of the Ident sensor's group.
- It receives a signal from the tag and the signal strength is above the configured Power Threshold (see Configuring Ident Parameters).
- The tag's location is within the inclusion range for the Ident point.
If a valid location is generated, the tag's location is put at the location of the relevant Ident point.
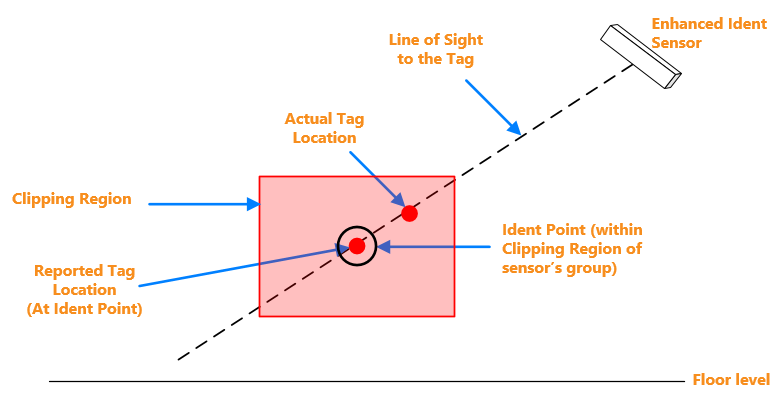
Valid Location Generated by an Enhanced Ident Sensor
Groups
Ident sensors can either work individually or in conjunction with other Ident and/or non-Ident sensors.
Ident Groups
Regardless of whether an Ident sensor works individually or with other sensors, you must first add it to an Ident group.
The following rules apply to Ident sensors and groups:
- An Ident sensor can only belong to one Ident group.
-
An Ident group can contain several Ident sensors. Factors such as the size of the tracking area and whether or not sensors have an uninterrupted line of sight to the tag (i.e., the sensors can see the tag clearly without any obstructions) determine the number of sensors in an Ident group.
- An Ident group with standard functionality detects the presence of tagged objects within its 2D clipping region whilst an enhanced Ident group detects tags near Ident points within its 3D clipping region.
- A D4 RTLS can contain several Ident groups.
- Ident groups and non-Ident groups can co-exist in the same D4 RTLS.
- To use Ident sensors in conjunction with non-Ident sensors, you must add the respective Ident groups to a Snoop Group.
Snoop Groups
If an Ident sensor is located close to other non-Ident sensors, both the Ident sensor and non-Ident sensors generate different locations at the same time, causing the tag location to jump. The Snoop group suppresses unwanted location events by acting as arbitrator when there are tag sightings generated by multiple sensors. It ensures that if an Ident sensor receives the strongest signal, then only that sensor generates a location event. Snoop groups can contain both standard Ident groups and enhanced Ident groups.
The following example shows how a Snoop group arbitrates between the tag sightings for tags T1 and T2.
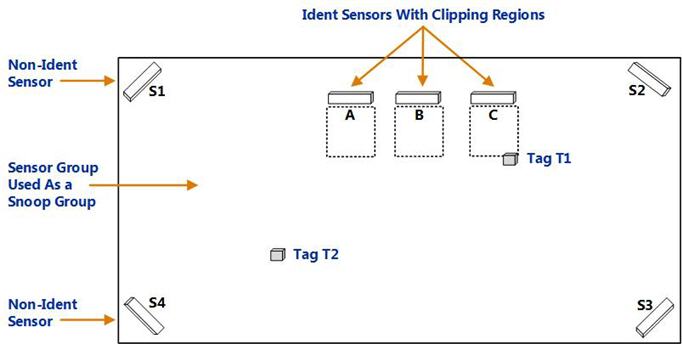
Example of a Snoop Group Arbitrating Between Tag Sightings
In the above example of a Snoop group:
| Tag | Sensor | Result |
|---|---|---|
|
T1 |
Ident sensor C receives a stronger signal than:
|
If there are multiple Ident sensors within the same Ident group, only the sensor that receives the strongest signal will generate a location. Therefore, Ident sensor C can generate a location event for tag T1. The reported location is at the intersection of the AOA with the clipping region of the Ident group. |
|
T2 |
Non-Ident sensor S4 receives the strongest signal. |
The non-Ident sensors in the Sensor group contribute to the location event recorded for tag T2. |
Configuration Overview
An Ident sensor is a UWB sensor configured to produce a location of a tag from a single AOA that intersects with a 2D clipping region.
Configuring an Ident sensor involves:
- Creating an Ident group, if you do not have one already.
- Adding the sensor to the Ident group.
- Optionally, creating a Snoop group in scenarios where you want to arbitrate between the readings generated by multiple sensor groups that are located close to each other.
- Configuring Ident parameters including the Tag Height and Power Threshold.
An enhanced Ident sensor is a UWB sensor configured to produce a location of a tag from a single AOA in proximity with an Ident point that is located in a 3D clipping area. In addition to the steps described above, configuring an enhanced Ident sensor requires the positioning of one or more Ident points within the clipping region of the sensor's Ident group (see Adding and Positioning Ident Points).
The configuration steps are described in detail in the next few sections.
Creating an Ident Group
-
On the Place devices tab, create a new sensor group.
-
Enter the following details, and then click Save.
Option Description Name A name for the group. The text (ident group) is displayed next to the name. Make these ident group(s) Select this checkbox to create the group(s) as Ident groups. The Ident group appears on the list of existing groups.
-
Double-click the Ident group to edit its properties.
-
Draw the boundaries of the clipping region to constrain the location of any tags sighted by the Ident sensor(s) in this Ident group.
Notes:
- To generate valid locations, you must define a clipping region.
- The clipping region defines the horizontal bounds of the area where the tag is tracked. For a standard Ident group, the height of the 2D clipping region from the base of the location cell is defined by the parameter Tag Height (see Configuring Ident Parameters). For an enhanced Ident group, you define a top and bottom for the 3D space of the clipping area.
- The clipping region should be big enough to capture all expected locations of the tag. We recommend that you use an additional margin to the actual area that you want to cover.
-
Define the tag height for a Standard Ident Group. Select Use fixed tab height to set the height of the clipping region (and hence the intercept height). You can also set this on the Configure ident parameters tab (see Configuring Ident Parameters).
or
Select Use ident points to configure an Enhanced Ident Group and specify the height (top and bottom) of the clipping region in meters—this must be contained within the height of the Location Cell.
-
- Click Save.
Troubleshooting Ident Groups
Occasionally, Ident Groups may not behave as expected. This section answers some of the questions about unexpected behavior of Ident Groups.
Why is my Normal Ident Group displaying settings for an Enhanced Ident Group in the Configure ident parameters tab?
If a Normal Ident Group happens to have an Ident Point exactly on its clipping plane, it will be shown as if it is an Enhanced Ident Group in the Configure ident parameters tab. In the unlikely event that this happens, the workaround is to move the Ident Point or the clipping plane height slightly.
What happens if my Enhanced Ident Group doesn't contain an Ident Point?
An Ident Group will behave as Enhanced Ident Group (placing the tag at an Ident point) only if the clipping polygon contains an Ident Point. If there is no Ident Point, the group will behave as a Normal Ident Group (placing the tag at the intersection of the AOA with the clipping plane: half-height between top/bottom of clipping polygon). This happens regardless of whether Use fixed tag height or Use ident points is selected for the group in the Place devices tab.
What can I do if an Ident sensor detects a signal from a tag but fails to extract valid angle data from it?
In some cases a sensor may detect a signal from a tag but fail to extract valid angle data from it. Using the Assume Boresight ident configuration option allows an Ident group to be configured in a way that allows the group to assert a tag location, at an Ident point, when an event is received, when the angle cannot be determined. When enabled, invalid angle data from an Ident sensor is translated into the pair of valid angles (0,0), and this can then be used in conjunction with fixed height ident or ident points in order to generate a valid sighting.
The Assume Boresight parameter can be enabled in the Group/Ident section of the Change all parameters tab.
Adding an Ident Sensor
- On the Place devices tab, add the sensor by using either its MAC Address or barcode label.
-
Add the sensor to an Ident group by dragging and dropping the sensor into the group. The text (ident sensor) is displayed next to the name.
Because an Ident sensor cannot be in more than one group, you cannot drag it from one group to another while holding down the Shift key. -
Position the sensor on the map.
The sensor is now identified as an Ident sensor and the text (ident sensor) is displayed next to the sensor name or MAC address.
Optionally, you can now change the power threshold for the Ident sensor, as described in Configuring Ident Parameters.
Creating a Snoop Group
You can either create a new group to use as a Snoop group, or can use an existing Sensor group.
- If the group that you need does not exist already, on the Place devices tab, create a new Sensor group. Ensure that you do not select the Make these ident group(s) checkbox.
-
On the Configure ident parameters tab, assign the new or existing group (as a Snoop group) to the Ident groups.
- Click Save.
For Ident groups that do not have a Snoop group, the Snoop Group column displays <default>.
Notes:
- To check if the Snoop group is working as expected, review the event logs. Check that the location event shows the MAC address of the Ident sensor as source of the AOA. If the location event is generated by non-Ident sensors, the source of the AOA shows a minimum of two sensors.
- If the Snoop group is no longer required, go to the Configure ident parameters tab, and then unassign the group. The group no longer gives first preference to the Ident sensor, even if it receives the strongest signal from the tag.
Configuring Ident Parameters
You can use the Configure ident parameters tab to view or configure the following parameters for one or more Ident groups and the Ident sensors that belong to them.
| Option | Description |
|---|---|
|
Snoop Group |
The Snoop group that is configured for the Ident group. For Ident groups without a Snoop group, this column displays <default>. You can assign or change the Snoop group by double-clicking the Ident group and choosing from the list in the editor. |
|
Tag Height (Standard Ident Groups) |
The fixed height of the tag (in meters), which defines the height of the clipping region. For Standard Ident Groups, you can view the clipping region and change the tag height on the Place devices tab. See Creating an Ident Group. N/A is displayed for Enhanced Ident Groups. |
|
Ident Points (Enhanced Ident Groups) |
Ident points associated with an Enhanced Ident Group identified by their X, Y, Z positions. For an Enhanced Ident Group, all Ident Points that are located within the group's clipping area are listed here and are in the group. See Adding and Positioning Ident Points for information on positioning Ident Points and Creating an Ident Group for information on creating an Enhanced Ident Group's clipping area. |
|
Power Threshold |
The received UWB signal strength above which a location event is generated. We recommend that you do not set the power threshold higher than 1.7. To set it back to the default value, in the editor, select the Reset power threshold to default checkbox. |
Adding and Positioning Ident Points
In the Add background objects tab, you add Ident points by positioning instances of the Ident point object.
An Ident point representation is supplied by Ubisense: you do not need to import a representation for this purpose.
The following rules apply to Ident points and groups:
- An Ident point can only belong to enhanced Ident groups.
- An Ident point belongs to an enhanced Ident group when it is positioned within the clipping region of the group.
- An enhanced Ident group can contain several Ident points.
- An Ident point can belong to more than one Ident group if the clipping regions of the groups overlap. This allows you to configure Ident points that might have complex obstructions, using more than one sensor.
To place an Ident point:
- Click the Add background objects tab. The Ident point object is listed under Reference Objects.
- Select and drag the Ident point reference object to the screen. The Ident point object is listed at the bottom identified by its X, Y, Z coordinates and orientation (usually [1,0,0,0])—double-click the object to display an editor in which you can adjust its location and orientation.
- If you have already created sensor groups with clipping regions, you can see which clipping regions you are placing the Ident point in by clicking Show view options and then clicking Show clipping regions.
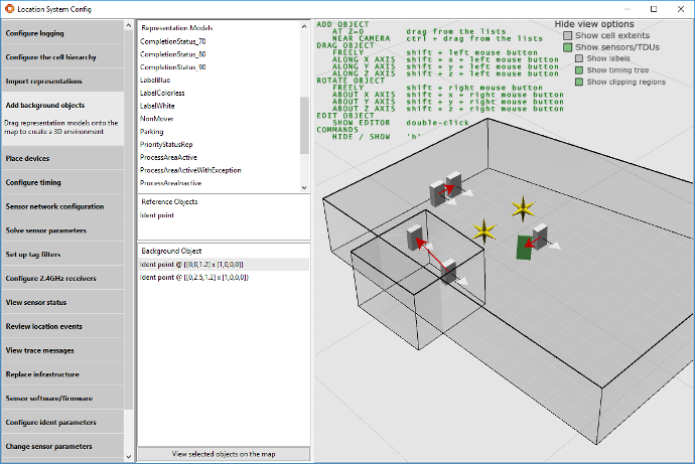
Example of Ident point positioning
Example Scenario
This example usage scenario shows you can set up Ident and non-Ident sensors together to track location events.
The following graphic shows a car plant finishing area that contains rework bays with obstructions, which do not allow non-Ident sensors to see the tags.
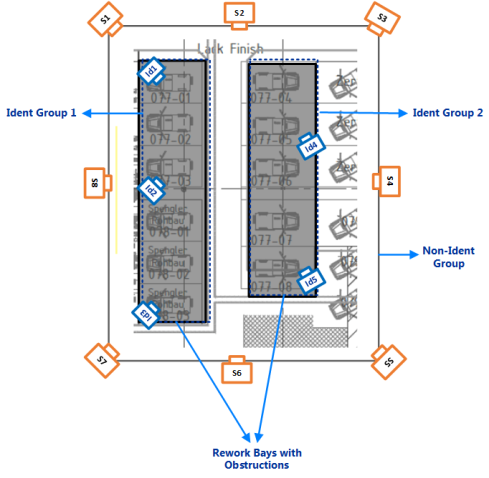
Location Tracking Using a Combination of Ident and non-Ident Sensors
The area is covered completely with non-Ident sensors, which are positioned high-up to provide general tracking capabilities in open areas and aisles. However, the rework bays have heavy obstructions that block these sensors.
Therefore, additional Ident sensors are placed at defined positions inside the bays.
- Sensors Id1, Id2 , and Id3 belong to Ident Group 1.
- Sensors Id4 and Id5 belong to Ident Group 2.
- Non-Ident sensors S1-S8 belong to the non-Ident Group.
- Ident Group 1 and Ident Group 2 are associated with the non-Ident Group, which functions as a Snoop group.
When an Ident sensor receives the strongest signal from the tag (when the car is in a bay), the non‑Ident sensors are ignored. The Ident sensor which is the closest to the tag generates the location.
Note that you could add all Ident sensors to Ident Group 1, but splitting them makes the design clearer.